Envira Gallery Blog
Digital Photography Tips, Tutorials and Resources
Digital Photography Tips, Tutorials and Resources

Last updated on Oct 18, 2019 by [email protected]
Are you looking for a guide to the patch tool in Photoshop? You are? Great! You’re in the right place.
If you’re reading this article, odds are you have a good picture that only needs tidying up with the Patch Tool to be a great photo. Maybe it’s a fun shot of your children playing on the beach, but there are other people in the background that you want to get rid of.
Or maybe you just want to delete a few leaves or rocks, or even remove a tattoo.
Fortunately, Photoshop has a plethora of tools to fix or remove unwanted objects. These include the Clone Stamp Tool, the Healing Brush Tool, the Spot Healing Brush Tool, the Lasso Tool, and of course, the Patch Tool. That’s what we’ll be focusing on in this article.
With practice, it is possible to make any edited image look natural — as if those objects you delete weren’t ever there.
This guide will show you how to use the Patch Tool, one of the most useful (and easiest) tools the program offers. After you’re done reading this guide, you will be able to make quick edits to your pictures. To summarize, this article will:
It is recommended that you have Photoshop open as you go through this guide to practice each step. That way, you can follow along with each step and see what you’re doing. It’s one thing to read or watch a Youtube video about editing in Photoshop and another to actually do it on your own.
Also, this guide assumes you have the latest version of Photoshop CC. Older versions may look a little different than this one. You can download Photoshop through Adobe’s Creative Cloud Plan for only $9.99/month if you don’t already have it.
The Patch Tool belongs to the family of Healing Brush Tools, which are designed to retouch images. You can find these tools in the toolbar, located on the left side of the Photoshop workspace window. They appear in a drop-down menu when you click and hold the Healing Brush Tool icon.
Whichever tool you selected is the one that remains visible in the toolbar. The Patch Tool icon looks like a patch that you might stitch onto a piece of clothing.

In short, the Patch Tool allows you to fix large areas of an image. For example, you can get rid of people, rocks, leaves, or any other distracting objects with the Patch Tool.
On the other hand, you can also use the Tool to replicate objects to bulk up a scene, like adding more birds in the sky or flowers in a bouquet.
Specifically, the Patch Tool works by using pixels from another area in the image. As you will see below, you can manually select these areas after making the initial selection around the object.
The Patch Tool, and the other tools Photoshop offers, allow for maximum flexibility and creativity when editing images. Keep reading to learn how to use the Patch Tool.
The Patch Tool can help you create a number of changes to your images in Photoshop. Don’t forget to follow along with Photoshop open!
First, open the picture you want to edit in Photoshop.
In the Layers Panel on the right side of the workspace, right click on the Background image layer and select Duplicate Layer (or choose it under “Layer” on the top menu bar). A dialog box will appear. Click “OK” without changing any of the settings options.

You will now see a copy of the layer appear above the Background. This is the layer we will work on.
Note: The purpose of adding the duplicate layer is to avoid making changes to the original (Background) file. In other words, you can easily go back to the original image and start again if you need to. You don’t have to duplicate the background layer, but it might prove helpful during the course of the edit.
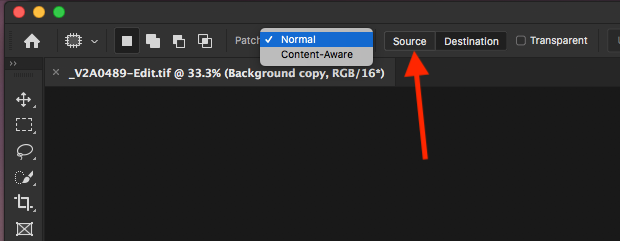
Now, at the top of the Photoshop window, make sure “Source” and “Normal” modes are selected.
Then select the Patch Tool from the toolbar on the left side, or press J on the keyboard.
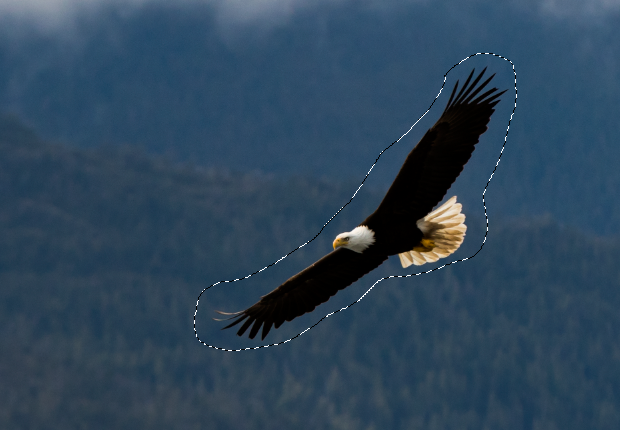
Now, make a selection around the object you want to remove. In this case, I want to remove the eagle from this photo, so I’ll draw around the eagle’s shape. “Marching ants” will appear around the selection.
It is not necessary to select the exact outline of the object; in fact, you should leave some space around it.
Note: You can use any selection tool for this step, such as the Lasso Tool, to make the selection. Once you do, switch to the Patch Tool.
Click on the selection and drag the cursor to a different area so that the object disappears. Just like magic!
What actually happens is that Photoshop blends the pixels from the source area, or the space where you dragged the selection to, and the destination area, or the area around the object.
Note: The initial edit might not be exactly perfect. If that is the case, simply use the Patch Tool to make more selections around the parts of the image that don’t look natural.
The patch tool doesn’t only enable you to get rid of unwanted objects. You can also use it to replicate them.
In the Layers Panel, right click on the Background image layer and select Duplicate Layer (or choose it under “Layer” on the top menu bar). A dialog box will appear. Click “OK”.
You will now see a copy layer appear above the Background. If it is not already selected, click on this new layer.
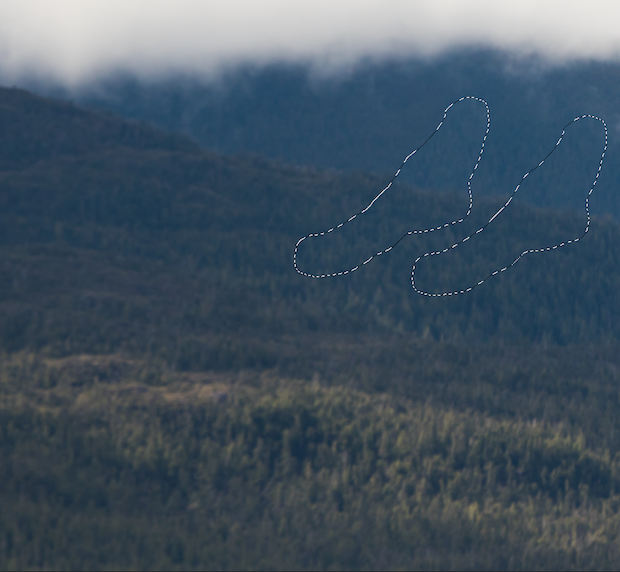
Select the Patch Tool by pressing J on the keyboard, and make a selection around the object. At the top of the window, select Destination.
Click on the selection and drag it to another spot on the image. You have now successfully copied the object.
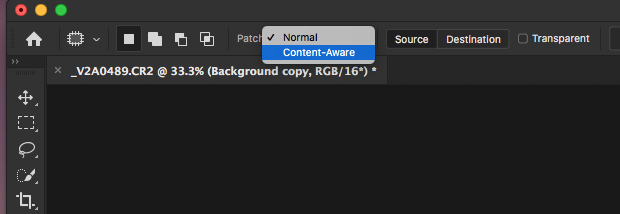
You can also use Content Aware to reach the same result. Again, be sure to select the Background layer copy.
Then, select Content Aware from the top of the window.
Select the Patch Tool, and this time draw a shape to a spot on the image where you want to replicate the object. Then, click on the new selection and drag it over the object.
Note: Using Content Aware tends to be less useful than the normal mode, which generally does a better job of blending the selections. However, you can make some adjustments to make Content Aware work better for you:
In Structure and Color, increase or decrease the sliders to see how change affects the selection’s blending. As you can see in the example, the area around the eagle looks better, but is still a bit fuzzy.
This is the final step of using the Patch Tool. Unless exact copies of the object are what you want, you’ll want to move the new copies around so that they don’t look identical to the original.
In order to change the shape of copied objects, leave the marching ants surrounding the selection. Then, under Edit from the top menu, select Free Transform (or simply press Cmd/Alt + t).

Now you can adjust the shape by rotating it or expanding/decreasing its size.
If you’re just starting to use Photoshop, the number and variety of tools it offers can be a bit daunting. So let’s break down the family of Healing Brush Tools to learn how they differ from the Patch Tool.
The Healing Brush Tool works very much like the Clone Stamp Tool. To use it, select a source point by pressing and holding Alt/Option, and then brush over the area you want to fix.
However, the Clone Stamp is usually does a better at removing or replicating objects because it is more accurate. In contrast, the Healing Brush tends to blur objects and is therefore better at fine-tuning an object’s textures.
Yes, the Spot Healing Brush is different than the Healing Brush Tool.
The main difference is that you can’t choose a source point with the Spot Healing Brush. So the Spot Healing Brush is useful for removing skin blemishes, wrinkles, or any other small imperfections in an image. Generally, you want to keep the size of the brush small and make short brush strokes.
The Content-Aware Move Tool enables you to move an object from its original spot to another spot. When you use this tool, Photoshop doesn’t simply leave the original space blank; it tries to replace the empty space using the information in the rest of the image. So, if you want to remove a person from a photo, the Content-Aware Tool is the one to use!
You are probably familiar with the Red Eye Tool and know what it does. It removes the red that appears when flash is used to take a picture. The red you see is the light bouncing off the back of eyes.
As you saw in this article, the Patch Tool is incredibly useful, and it is one of the editing tools that photographers use the most. You should now be able to quickly remove or replicate objects to create the image you want.
Keep in mind though that, just like the other Photoshop tools, the Patch Tool might take some getting used to. This is especially true when you need to refine your selections so that they match the surrounding area. In that case, you might have to use the Clone Stamp Tool, the Healing Brush Tool, the Spot Healing Brush Tool or another editing tool to get the image just right.
So, you know what they say, practice makes perfect! This might sound a little cliche, but it is true. And hopefully you have followed along with this tutorial in Photoshop, practicing with a picture you want to edit.
Remember, it’s always a good idea to check that the edits you’ve made look natural. The easiest way to do this is to zoom out completely from your image using the keyboard shortcut z and Alt/Option. That way, you can see your full image.
If you enjoyed this article, you may be interested in checking out these other Envira articles:
How to Make White Transparent in Photoshop
Guide to the Refine Edge Tool in Photoshop
How to Smooth Skin in Photoshop
17 Best Photography Editing Software for Photographers
Are you looking to improve your photography skills even more? If so, follow us on Twitter and Facebook where you will be able to find more of our free WordPress tutorials and other resources.
Envira Gallery helps photographers create beautiful photo and video galleries in just a few clicks so that they can showcase and sell their work.


