



A photo delivery link only works as long as your client can find it.
A few weeks after the shoot, that link is buried under receipts and newsletters, and the email arrives asking where the photos went.
A client login solves this by giving every client one private address on your own website, plus a sign-in that only opens their photos.
Your clients don’t have to create an account, and only someone with their email and password can open it.
Below, I’ll walk you through setting up a photography client login in WordPress, from the first gallery to the message you send your client.
What a Photography Client Login Actually Is
A photography client login is a private page for each client, with a sign-in screen in front of it. The client types their email address and a password, and only then do their photos appear.
WordPress can already put a password on a page. The catch is that it’s one password for anyone who has it, with no email check.
WordPress’s Private setting doesn’t help either, because it only shows content to people who can edit your site. Your clients aren’t on that list, and you don’t want them to be.
The setup below pairs each client with their own gallery and their own sign-in, all on the photography website you already have.
What You Need to Set Up a Client Login in WordPress
For this tutorial, I’m using Envira Gallery, the WordPress gallery plugin, together with its Password Protection Addon.
The addon is included in Envira Gallery Plus and every plan above it. It adds the email check that turns a basic password into a real client login. You can see everything it does on the password protection feature page.
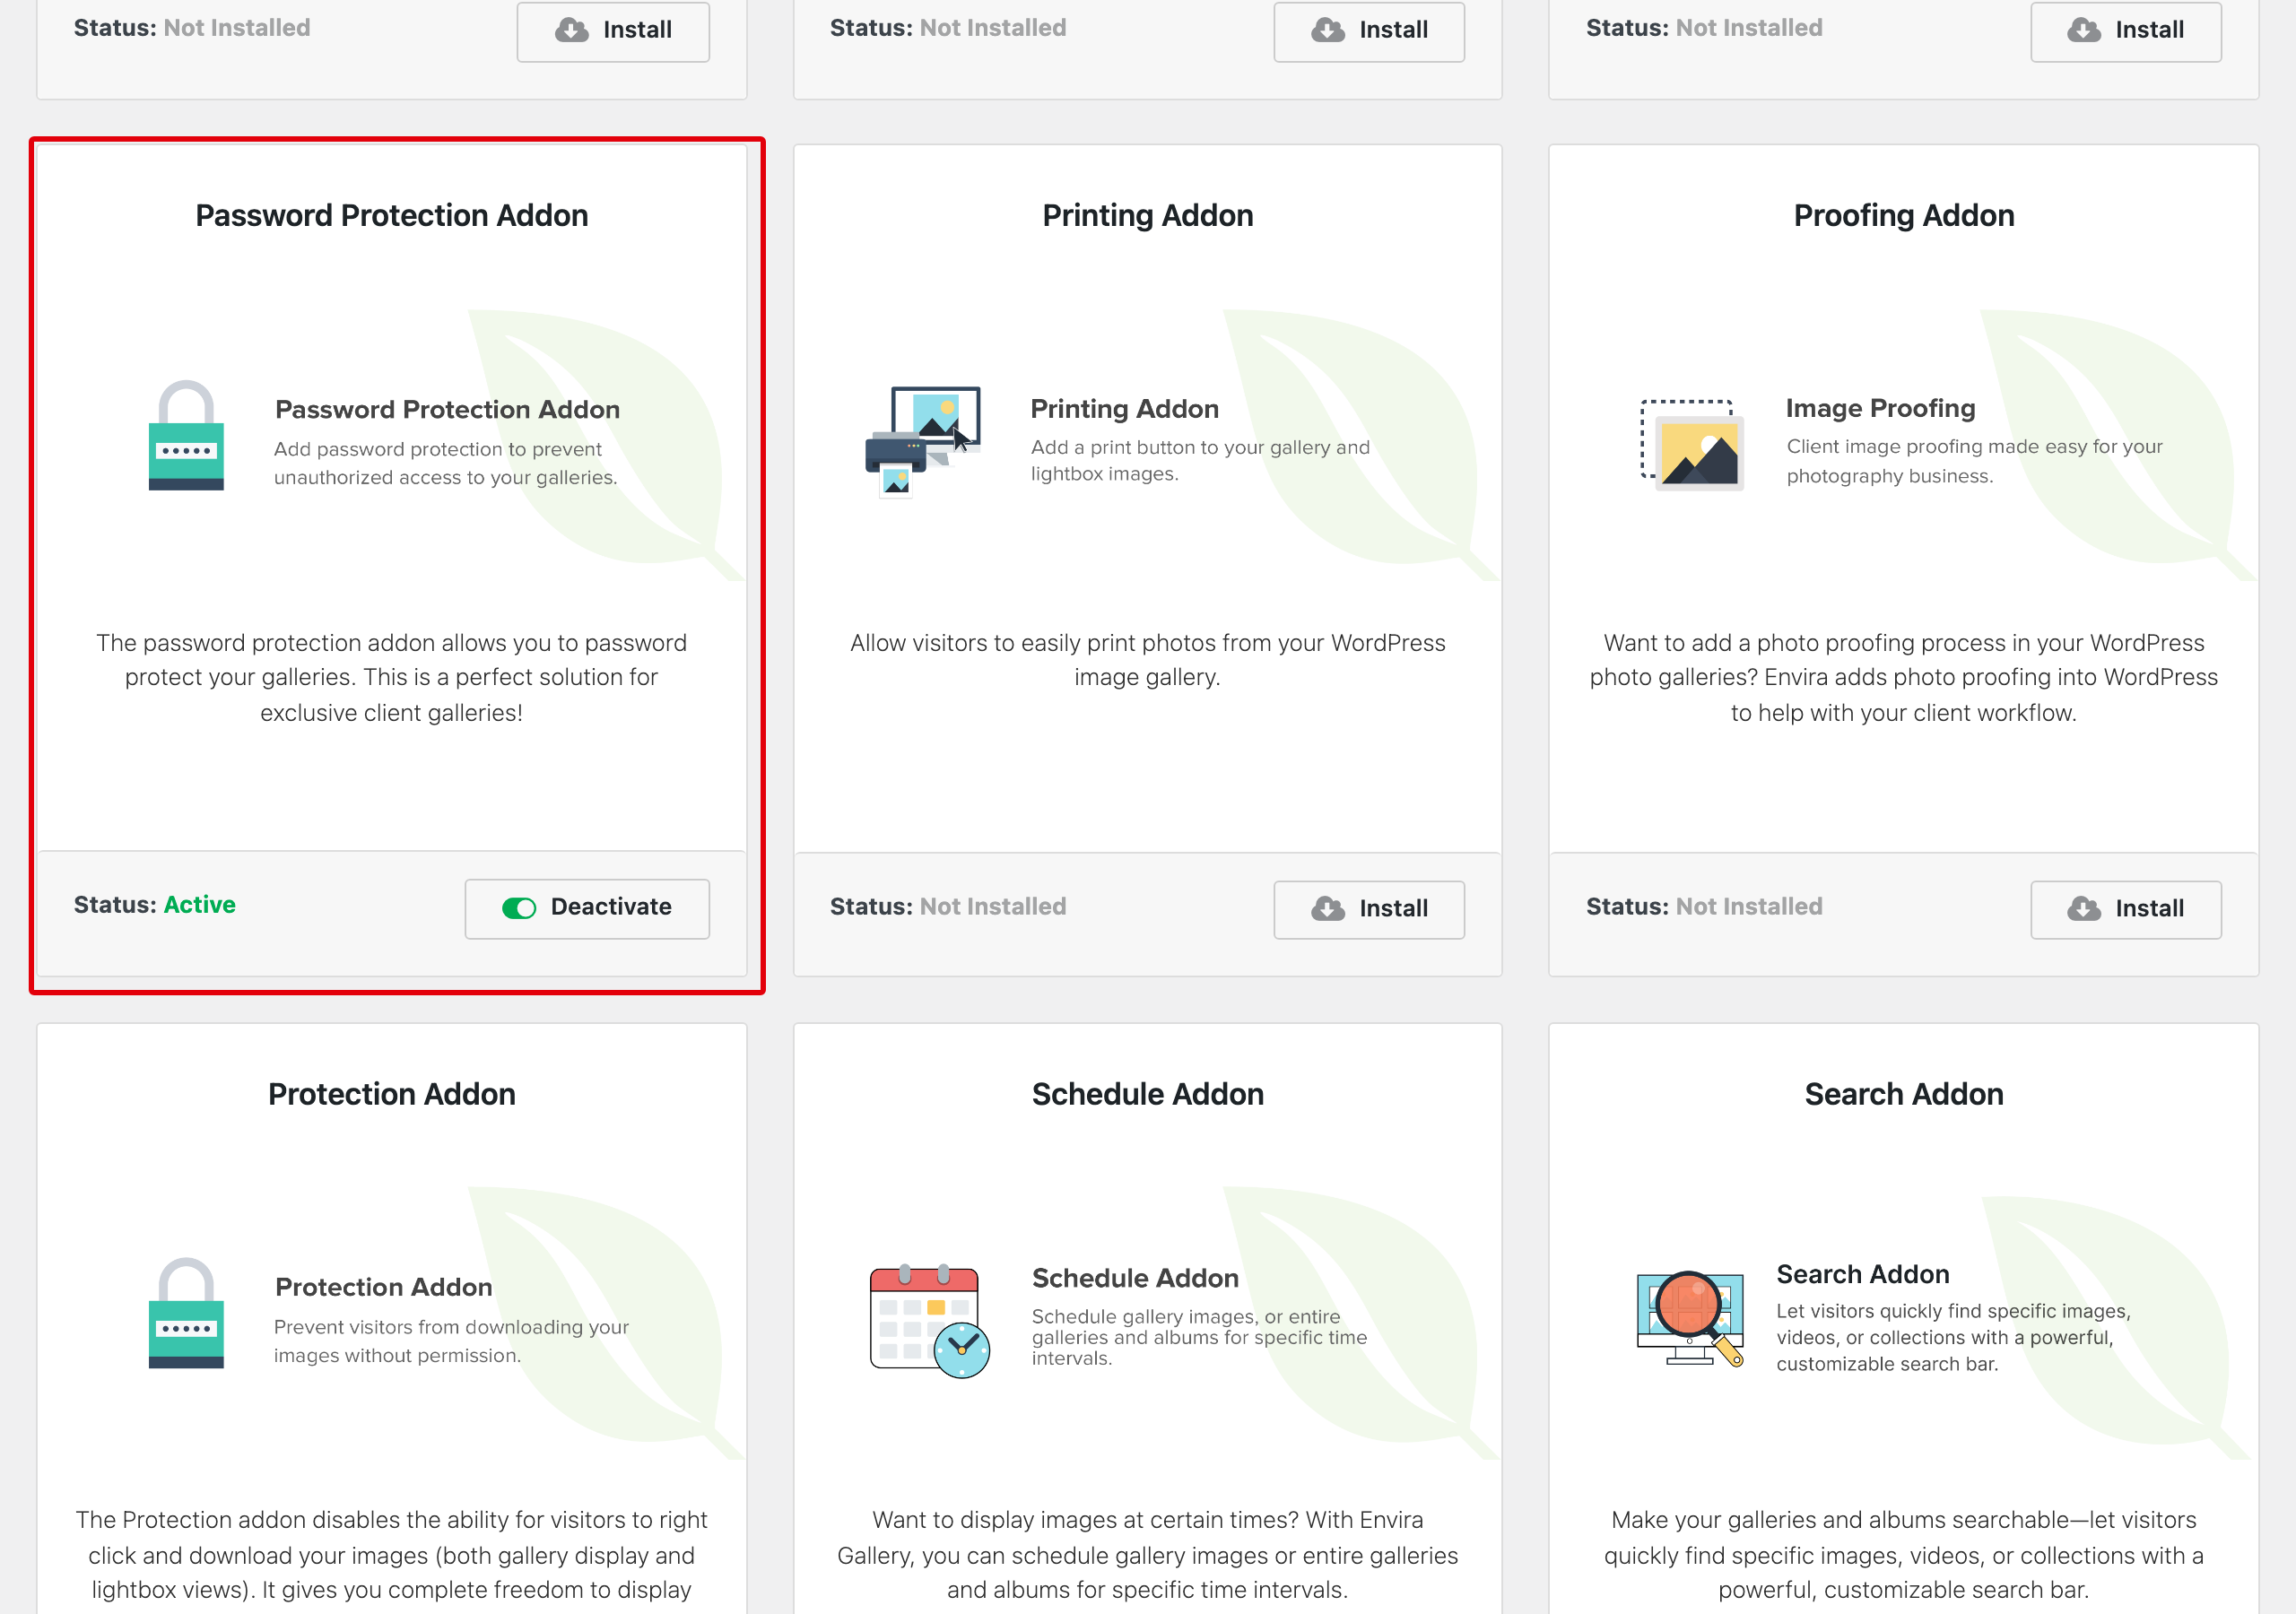
Once Envira Gallery is installed, go to Envira Gallery » Addons, find the Password Protection Addon card and click Activate (or Install first, if it isn’t installed yet). The status on the card turns green and reads Active.
For Step 4 you’ll also need an SEO plugin, and whichever one you already use is fine.
Step 1: Create One Gallery for Each Client
Each client gets their own gallery, and that gallery becomes their private address. Go to Envira Gallery » Add New Gallery and give it a name you’ll recognize months from now, like Smith Wedding, June 2026.
Drag the client’s photos into the upload area, and pick a layout if you want something other than the default. If you’re new to building galleries, our guide on creating an image gallery with thumbnails covers the basics.
Envira’s Standalone Galleries feature gives every gallery its own web address, shown in the Permalink field under the title. That’s the link your client will use, and it’s included in Plus.

For returning clients, Envira Pro adds Albums, which can group several sessions under one address. Our guide on creating a photo album in WordPress shows how they work.
Step 2: Turn On the Client Login With an Email and Password
The password itself lives in WordPress’s own Publish box. Click Edit next to Visibility, choose Password protected, type the client’s password and click OK.
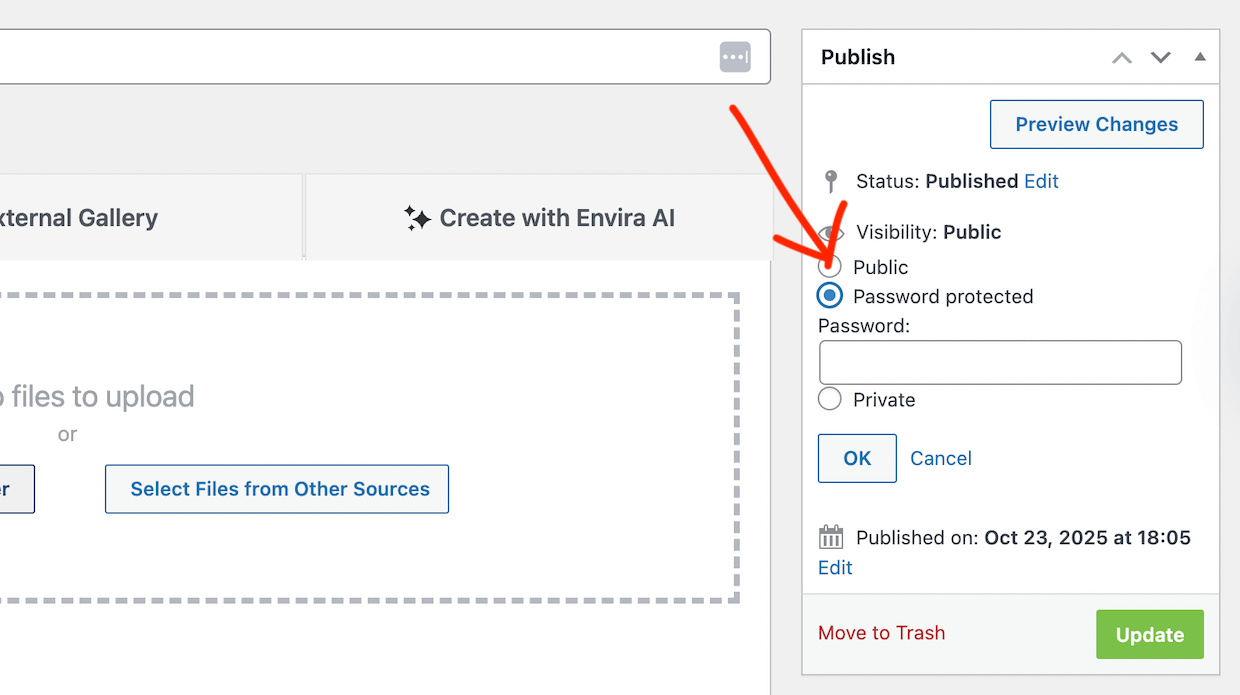
That’s the short version. For every option on that screen, see our guide on password protecting a WordPress gallery.
Now scroll down the right-hand column to the Envira: Password Protection box. This is the part that makes it a login.
Type your client’s email address into the Email Address / Username field. Once it’s filled in, the gallery asks for that email as well as the password, so a forwarded password on its own won’t open it.

The field takes one email address or username, so think of it as one client per gallery. I’d use the address the client booked with, since it’s the one they’ll remember.
Click Publish (or Update, if the gallery already exists) to save, and the login is live.
Step 3: Check What Your Client Will See
Before you send anything, open the gallery’s address in a private browser window. That shows you the page exactly as your client will see it.
WordPress puts its standard sign-in screen in front of the photos: a short line saying the content is password protected, then a Username box and a Password box. Your client types their email address into Username, adds the password and clicks Enter.

The box says Username even though you set an email address, so that is the one detail worth spelling out for your client. You’ll do that in Step 5.
 Expert Tip
Test every new client gallery in a private window before you send the link. It takes a minute, and it catches a mistyped email or password before your client does.
Step 4: Keep Your Client Area Out of Google and Off Your Public Pages
Search engines can’t open the gallery behind the sign-in, but they can still list the page itself. The gallery’s title usually carries your client’s name, so that name could show up in search results.
The fix is a noindex setting, which asks Google to leave a page out of its results. Most SEO plugins for WordPress let you switch it on for a single page, so set it on the page your client lands on.
I’d also keep client galleries off your portfolio page, your blog posts and any public album. If you’ve placed a gallery inside a blog post, our tutorial on keeping protected galleries out of your site’s listings shows how to hide it from your blog page.
If you use albums, there’s one catch. A protected gallery inside an album with the Lightbox turned on can show its images without asking for the password. Either protect the album too, or turn off the Lightbox for that gallery from the album screen.
Step 5: Send Clients Their Login Details
Copy the gallery’s address from the Permalink field at the top of the editor. That link is your client’s way in.
I’d send it in two messages: the link in one, the password in another. In the first, tell the client to type their email address in the Username box, so the sign-in screen doesn’t surprise them.
Once they sign in, the gallery opens in whatever layout you picked for it.

Some clients will look for a “Client Login” button on your site anyway. A menu item pointing to a short page that says “Your private gallery link is in your welcome email” is enough. It’s a signpost to their link rather than a central login form, and it saves you a reply.
Give Every Client a Private Login, Starting on Envira Plus
Email and password sign-in comes with the Password Protection Addon on Plus and every plan above it.
What to Do After Clients Log In
A client login gets people to their photos. What they do next is a separate job, and Envira Pro covers the two most common ones.
If you want clients to pick their favorites before you edit, there’s client proofing. Clients select images, leave notes and send their choices back to you from the same gallery.
If the gallery holds finished photos, the Downloads addon lets clients save them, and it can ask for its own password first. Our guide on delivering wedding photos to clients online covers that side.
FAQs About Photography Client Logins in WordPress
Do my clients need a WordPress account to log in?
No. The sign-in belongs to the gallery, not to your site’s user list. Clients only need the gallery link, the email address you entered and the password you set.
Can each client have a different password?
Yes. Every gallery has its own password and its own email address, so each client’s login is separate. Changing one client’s password doesn’t affect anyone else.
Will my client galleries show up in Google?
Search engines can’t open the gallery behind the sign-in, but the page itself can still be listed. Setting the page to noindex in your SEO plugin asks Google to leave it out of search results, and keeping the gallery off your public pages helps too.
What’s the difference between a client login and client proofing?
A client login controls who can see a gallery. Client proofing lets the client do something once they’re in, like select favorites and send their picks back to you. You can use both on the same gallery.
Which Envira Gallery plan do I need for a client login?
Plus or higher, because that’s where the Password Protection Addon starts. Client proofing, downloads and albums need Pro or higher.
Do I need a membership plugin for a client login?
Only if you want clients to have accounts with a dashboard that lists all of their galleries. For most photographers, a sign-in on each client’s gallery does the job with far less to manage.
Once your client login is set up, the natural next step is letting clients choose their favorites. Be sure to check out our post on how to create a client gallery and proof images online.
Not using Envira Gallery yet? Get started today!
Don’t forget to follow us on Facebook and X (Twitter) for the best photography tips, resources, and WordPress tutorials.









Hello,
Thanks for your post !
Is there a way to design the client login with your plugin Envira ?
Thanks for your answer,
Best regards.