Envira Gallery Blog
Digital Photography Tips, Tutorials and Resources
Digital Photography Tips, Tutorials and Resources
Last updated on May 28, 2024 by [email protected]
There are countless tools in Photoshop, such as the Pen Tool, that have many capabilities to perform the same task. The key is knowing which one is the best to use.
Some may be wary of trying the Pen Tool because of the mixed reviews creatives give. Generally, the main complaint about this tool is that it’s time consuming, tedious, and hard to learn.
For a creative to become more acquainted with this tool, learning the beginner’s guide to the Pen Tool is a helpful start to learning how important this tool is. Here are some important aspects to learn.
In order to use the Pen Tool, you’ll need to have downloaded Photoshop. If you don’t already have it, you can get it through Adobe’s Creative Cloud Plan, which also includes Lightroom, for $9.99/month.
From outlining an object to creative shapes, the Pen Tool has many capabilities for different types of creatives. There is a misconception that this tool is mostly for designers but in actuality is very useful when used while photo editing.
The Pen Tool is a precise tool that creates straight lines or curves to outline or design a shape which can then be filled in with a color. In other cases, the Pen Tool can be used to remove objects from a background to be moved to a different location.
For Graphic Designers, this tool is generally used to create simple or complex logos or shapes. Other tools, such as the Shape Tool or Direct-Selection Tool have similar capabilities but don’t have the same customization options. Creatives can specifically indicate where they would like Photoshop to “cut” into the image or the size of the logo instead of the program deciding for itself.
When deciding on what tool to use for executing a task, there are different options but the key is knowing which one is the best option. For example, if a subject needs to be removed from the background there are three different tool options to complete this task.
The first option is the Direct-Selection Tool which may seem like a quicker process but can produce choppy pixelated corners. Photoshop samples the pixels surrounding the area which may seem more accurate but will add more edges then needed.
The second option is the Lasso Tool which is a tool for those who have a stead hand. This tool allows an individual to outline an object with a “freehand” but should not be considered for detailed work.
The last option available is the Pen Tool which is the most advisable tool to use because this tool allows an individual to change the work path of the outline at any given time and avoids Photoshop including unwanted areas.
In tricker cases where there is an image of an individual with long flowing hair that creates a vast amount of angles, this may require using more than one tool to accomplish this task. use the Pen Tool to outline the individual but use a different process, such as the Quick Selection Tool, to complete the area around the hair. Every object will be different but the most advisable tool to use will be the Pen Tool.
The world of creativity and access to it has exploded throughout the years making Photoshop more accessible to different types of formats. Not only is Photoshop available on desktop computers but is available on laptops and tablets making access to work while “on the go” more accessible to creatives and freelancers.
The most popular tool to use for designing in Photoshop is a Stylus or is also called a Pen Tablet. A Stylus is a pen-shaped tool that allows editing to become more accurate and is capable of creating a “hand-drawn” effect with the Pressure Sensitivity settings in Photoshop. The sensitive surface tablet component lays flat next to the computer which is a representation of the computer screen or can be used as a mouse.
Some may believe that there isn’t a difference between using a mouse or a stylus while using the Pen Tool but in actuality, there is a slight difference. When using a mouse with the Pen Tool, select any area of the workspace to create different points in the workspace.
To create a curved area, select a point and drag the mouse in any direction to create a curve. When using a pen tablet, simply tap the area desired to be adjusted instead of clicking the area with a mouse.
A unique feature that a stylus provides is by pressing the “up” button on the side of the stylus. This button provides a quick shortcut when a stroke needs to be applied or a path needs to be filled. This action is comparable to clicking the right button on a mouse. Although there is a slight difference, using a stylus does save time and gives more accurate results.
When trying out different tools in Photoshop, an individual with generally get an idea of what the tool does and how to use it. The Pen Tool isn’t as easy to “wing it” unless one knows the basics of the tool. This tool requires more practice before implementing any serious projects.
The Pen Tool’s components are made out of lines, work paths, and anchor points. Anchor points appear when a change in direction or shape wants to be made within a created work path. To adjust any points, simply select and move the mouse to create a different angle.
Exploring all of the Pen Tool’s capabilities is key to understand how to use it.
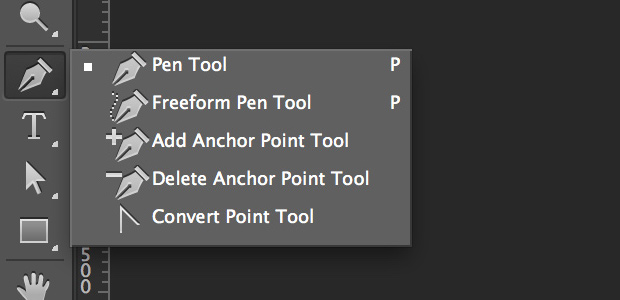
1. First, locate the left side of the Photoshop workspace where the Tool Panel is located. Within the Tool Panel, locate the Pen Tool which is defined by a pen tipped shaped symbol.
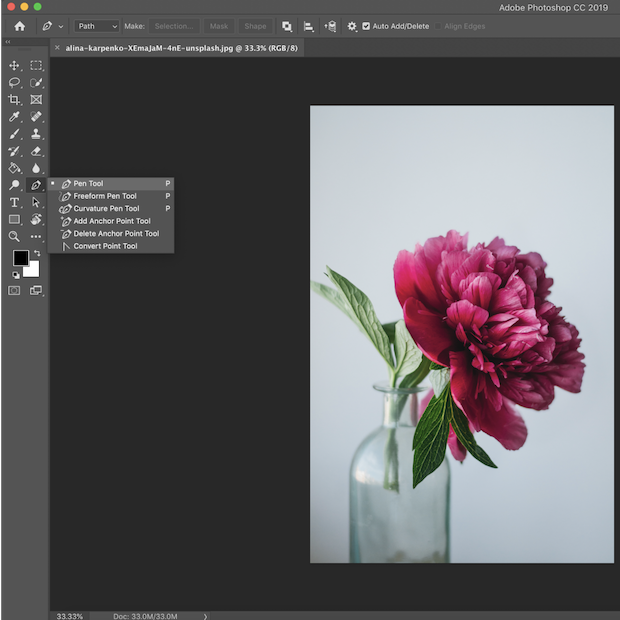
2. Once located, select the Pen Tool and hold down the mouse to view the Pen Tool’s drop-down menu. Not only is there the “generic” Pen Tool but different variations of the tool and options to choose from.
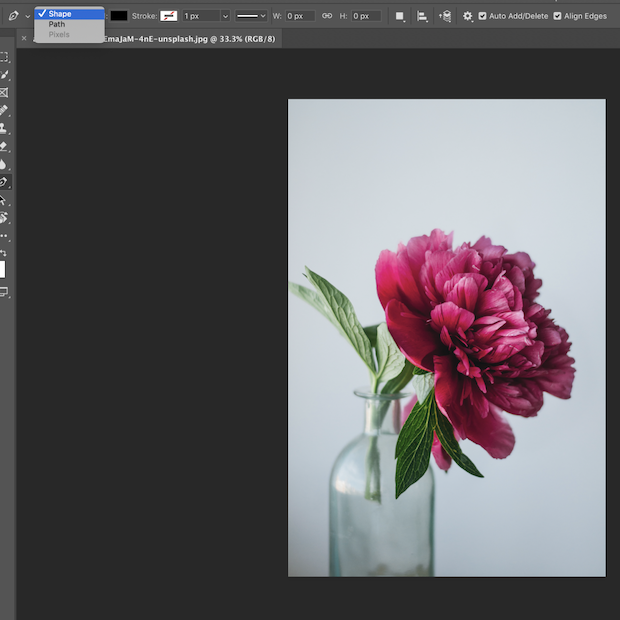
3. Select the top Pen Tool and notice the different custom options that appear in the workspace above.
First, you must signify if the intent for this project is to create a Shape or Path. This option is located on the top left side of the workspace.
When selecting Shape, different options will appear at the top of the workspace to help customize the shape desired. Change the color and outline of the shape by adjusting the Fill and Stroke options.
The window next to Stroke allows you to adjust the pixel width of the line and the line design type. You can customize the measurements in the “W” and “H” boxes.
An important option to always check is how the new path will interact in the Layers Panel on the right side of the workspace. The square symbol which indicates this option is located next to Height.
The options in the drop-down menu allow an individual to signify if they want the new design to combine with other shapes, become a new layer, etc.
The last option that is an important aspect is the Auto Add/Delete checkbox. By selecting this option, all anchors are added or deleted at any time while a line is being created. This can save time while working on large projects.
The Path option at the top of the workspace doesn’t give as many options compared to Shape but does give the option to customize how the line interacts with the design.
The “generic” Pen Tool is completely manual, which means that Photoshop does not decipher where the lines should be placed. This gives full access to the creative when deciding the design of the object.
The second option, Freeform Pen Tool, allows an individual to actively trace an item while holding down the mouse. Once you release the mouse, anchor points will appear with every change in direction the mouse makes.
The Curvature Pen Tool is the best Pen Tool to start with when learning how to use the Pen Tool. This option automatically creates lines and curves to make outlining the object quicker and easier.
The Add Anchor Point Tool and Delete Anchor Point Tool allow you to add of delete anchors to any line created with the Pen Tool. Anchors are identified by a blue square that appears throughout the created path.
The last option in the drop-down menu is the Convert Point Tool. This tool allows a curved line between two anchors to become perfectly straight line just by selecting the anchor point.
You can use the Pen Tool to create several points and anchors, but there might be cases when your project needs only one anchor point or one line.
There are a couple of different ways to implement this task but in this case, using a keyboard shortcut is quicker and easier. Let’s say that you need to create a curve with only one anchor point.
1.With the “generic” Pen Tool selected, select the canvas to place a starting point for the Pen Tool.
2. Now, select another point and hold down the mouse. While holding the mouse, hold down the Command button on the keyboard and drag the mouse down. Notice how a curve appears within the line.

3. Now, hold Option and select the second point that you just created. Once selected, a one anchored line appear.

After you use the Pen Tool to outline or create a design, you can take the project one step further by selecting different options. If you want to fill an object with color, there are certain steps you can take to implement this task.
1.With the Pen Tool selected, hover the mouse over the outlined area. The tool should have an asterisk (*) located next to the pen-shaped symbol.

2. With the original file selected, right-click the area to reveal a drop-down tab that offers different options. In this case, select Fill Path… and the Fill Path window will appear with different ways to customize the path.
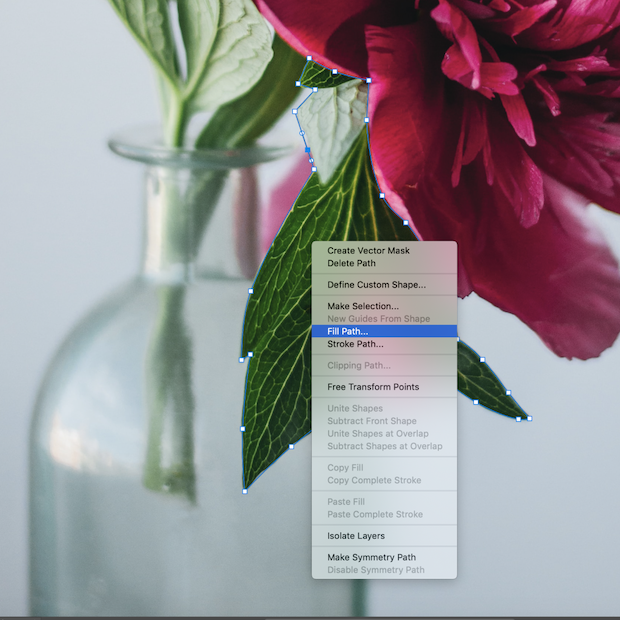
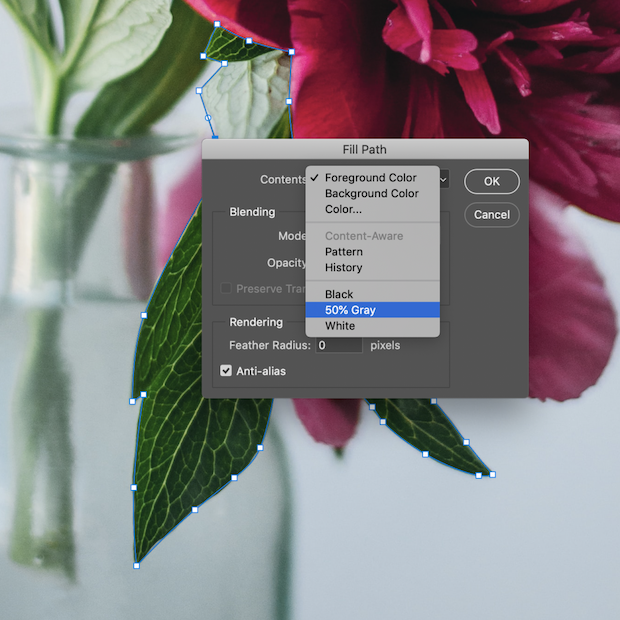
3. The first option allows you to choose what type of Content to fill. Photoshop automatically will place the Foreground Color as the default but options such as Background Color, Color…, and 50% Grey are available. For this example, select 50% Grey.
4. The second option, Mode, allows you to apply a Blending Mode to the selection. You may choose this option later on. The Opacity signifies how much the layer will be visible or invisible but in this case, set to 100%.
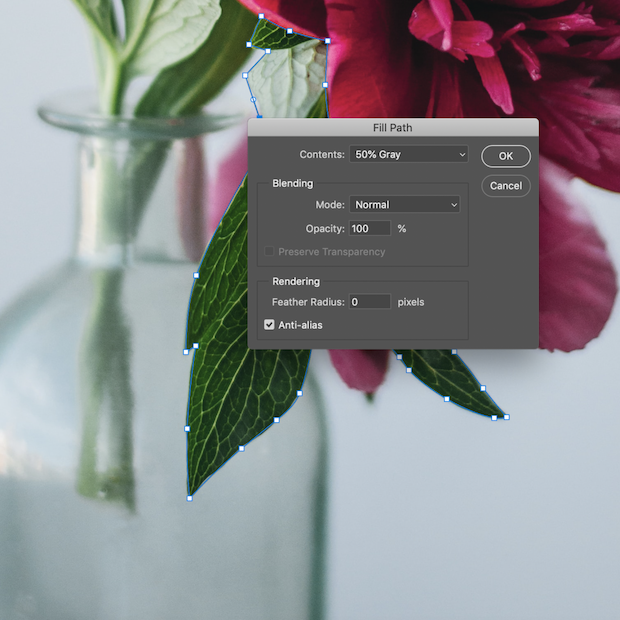
5. Once completed, select OK. Now, Photoshop will fill the area you created with the Pen Tool grey.

You can use the Pen Tool in many different ways. It is important to know when the Pen Tool is the most appropriate tool to use. The answer to this question is that it entirely depends upon the subject’s shape and the intent of the end product.
Photo editors generally prescribe the Pen Tool for outlining an object, whether it be for placing the object on a different background or for removal of the background. In other instances where you require the unique crop of an image, the Pen Tool does not confine the crop to just a typical square or rectangular format.
Graphic Design involves angles and measurements which defines what the Pen Tool is capable of implementing and is the most recommended tool for design. The Pen Tool also makes the process easier because it allows you to adjust the outline at any time by clicking and dragging the anchors.
If this process seems time-consuming or too tedious, try using the Curvature Pen Tool on not overly complex projects to speed up the process.
When using the Pen Tool, there are different options to choose from for creating a thicker or thinner line. This aspect entirely depends on what the settings are for the Brush Tool. If you set Brush Tool with a large brush at 50% opacity, then the outlined areas will appear larger with only a 50% flow.
1.To customize the Pen Tool’s thickness, first create the outlined area desired.

2. Select the Brush Tool in the Tool Panel after you link the last point.
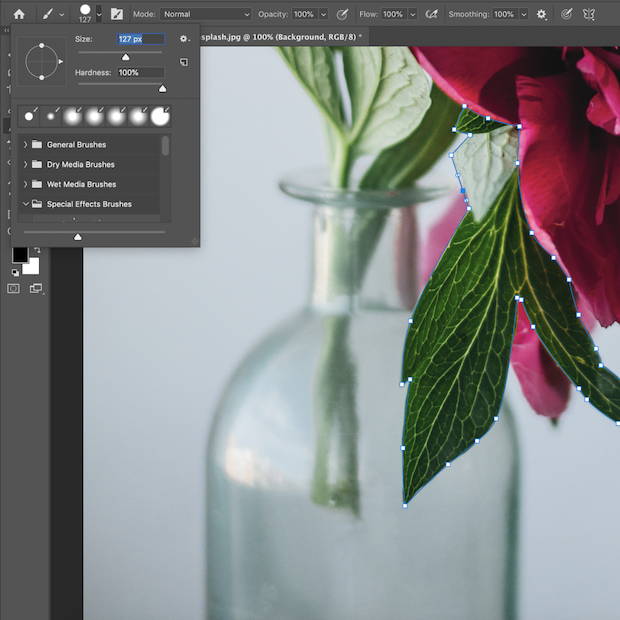
3. As an example, select a large brush, set the Hardness at 100%, and the Opacity at 100%.
4. Now, re-select the Pen Tool in the Tools Panel and position the mouse over the outlined area.
5. Right-click with the mouse to view a drop-down menu where the option Stroke Path… will appear.
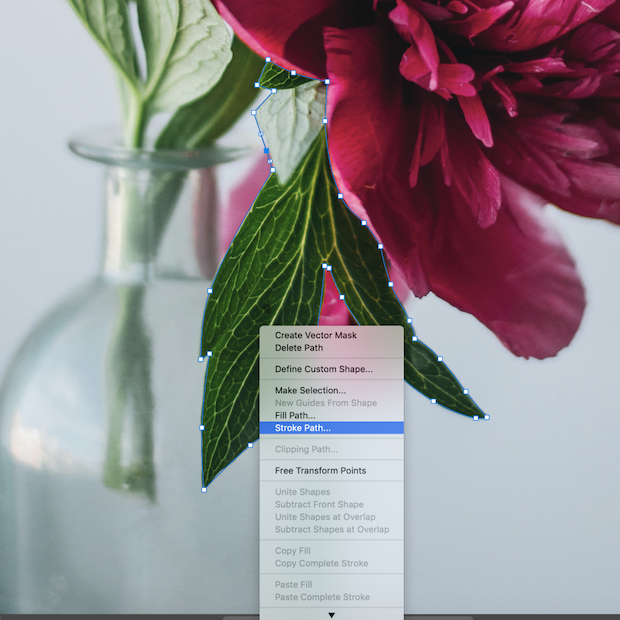
6. Select Stroke Path… This option produces a window that allows you to select the tool you’d like to use to make the path.
7. Select the Brush Tool as the desired tool and leave the Simulate Pressure box unchecked.
8. Select the options, and click OK to view the end product. To remove the Pen Tool blue lines, simply hit the return or enter button on the keyboard.

With so many tools in Photoshop with multiple capabilities, it is sometimes difficult to decipher when to use a specific tool. The Pen Tool isn’t the only capable tool in Photoshop for designing or outlining an object. It is important to understand when to use the Pen Tool over other tools.
Before you start to edit, observe the subject you want to isolate, and notice the angles and curves that you need to create. If there is an image of a windmill in a yard and an individual just wants the windmill placed on a white background. The windmill is made up of multiple angles that may be hard for other tools to accurately select, so the Pen Tool is the right tool for the job.
In other instances, if there is an image of a person with long flowing hair then other processes and tools would be more advisable for the hair section of the image. For the graphic design aspect of the Pen Tool, the Pen Tool is the most customizable tool when it comes to creating designs or logos. If you want to create certain designs or patterns, the Pen Tool is the best tool to start with since it can create precise angles and implement precise measurements.
There are many ways that an individual can learn more about using the Pen Tool. The first step to learning more about the Pen Tool is taking the time to practice. Simply open a blank canvas or image in Photoshop and test out how each of the Pen Tools works.
When starting, use the Curvature Pen Tool to better understand how the Pen Tool works. The Curvature Pen automatically picks the lines and anchors as you drag the mouse around an area of the image. Try practicing on easier images so that the tool will not seem as intimidating and time-consuming.
Practice adjusting the anchors to see how each movement changes the path. After practicing, now try using the manual Pen Tool on an object that has different types of angles.
Mastering the manual Pen Tool will allow an individual’s capabilities to be endless. Other ways to learn more about the Pen Tool is by researching the tool online and searching for tutorials to further expand a person’s capabilities.
When looking for a reliable source to find various types of tutorials online, there are millions of different options to choose from but the question is which one is the best resources? Without a doubt, one of the first resources individuals go to when they have a question is by using Google but Google, unfortunately, doesn’t always produce reliable resources.
In this day and age, anyone can create a website and put content online without getting a “stamp of reliability”. This makes sorting through links a more time-consuming process.
The second instant “go-to” that individuals will use for help is Youtube, which is a more reliable website than Google but can seem overwhelming with the number of options offered. A simple search for one type of tutorial will return thousands of tutorials on that specific topic.
The best way to know if a video is somewhat reliable is by changing the search options to “search by views”. This will force Youtube to present only videos with highly watched videos which can then help narrow down the search. Many credible resources or well-known companies post tutorials on Youtube but the key is knowing how to search for them.
Whether a project involves creating a logo or isolating an object, the Pen Tool is an important tool to learn. Always remember that although the Pen Tool may seem intimidating or time-consuming, it creates the most accurate and precise results.
In this day in age, editing software or apps are available on all different types of formats. Photoshop has expanded to not only be available on computers but on smartphones and tablets.
Unfortunately, the Pen Tool isn’t available on all mobile devices but there are some alternatives to replace this important tool. Here are some great ways on How to Remove a Person from a Photo on Your iPhone.
You can get Adobe Lightroom and Photoshop together here in Adobe’s Creative Cloud Plan.
Envira Gallery helps photographers create beautiful photo and video galleries in just a few clicks so that they can showcase and sell their work.
