Want to add a contact form to your WordPress website? A contact form is essential for helping visitors easily get in touch, whether for business inquiries, customer support, or general feedback.
While some WordPress themes include a built-in contact page, these forms are usually too basic to meet most websites’ needs. That’s why many users prefer a dedicated plugin that offers everything required to create and style different types of forms.
In this guide, we’ll show you how to create a WordPress contact form using the best free method. You’ll learn everything you need to know, from installing the right plugin to customizing your form and embedding it on your site. By the end, you’ll have a simple contact form that’s fully functional and makes it easy for visitors to reach out.
In This Article
Can you create a contact form on WordPress?
Yes, you can easily create a contact form on WordPress using a plugin. While many WordPress themes include a basic contact page, a dedicated plugin offers more customization options and functionality. Popular plugins like WPForms, Ninja Forms, and Gravity Forms provide drag-and-drop builders and pre-made templates, making it simple to create a fully functional contact form without any coding knowledge.
While it’s technically possible to create a contact form without a plugin, it requires custom coding in PHP, HTML, and CSS, as well as setting up a script to handle form submissions. This approach is not recommended for non-developers, as it can be complex and time-consuming. Using a dedicated plugin is the best and most efficient option for most users.
How to Add a Contact Form in WordPress
We reviewed many of the best forms plugins to create a contact form for WordPress, and WPForms is our hands-down favorite. Whether you’re looking to create a simple contact form for free or something more advanced, WPForms is a user-friendly and versatile plugin that makes it easy to create and customize any type of form for your site.
WPForms offers a drag-and-drop form builder and over 2,000 form templates to help you quickly create contact forms, payment forms, client booking forms, form landing pages, and more. We recommend a Pro license to unlock advanced features, such as:
- Smart conditional logic
- Advanced form fields like layouts, custom calculations, file uploads, signatures, polls, and more
- Multi-page forms with progress bars
- Form abandonment to capture partial form entries
- Entry management and analytics features
- And much more!
However, for this tutorial, we’ll use the plugin’s free version, WPForms Lite, since it provides plenty of functionality for a simple contact form.
Step 1: Install WPForms
As mentioned above, we’ll use the free version of WPForms for this tutorial.
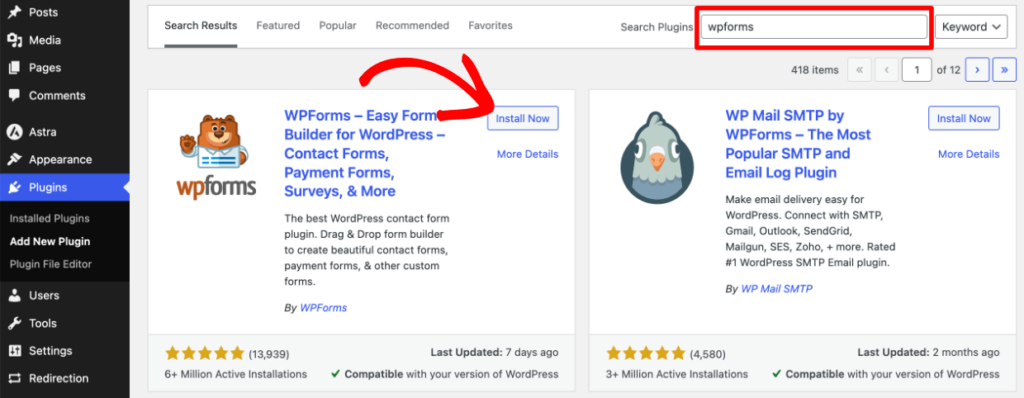
To start, go to Plugins » Add New from your WordPress admin sidebar menu. Type ‘WPForms’ into the search bar and press Enter to search. When you see the plugin, click on the Install Now button. Then, click Activate when the button changes.
You’re now ready to create your first WordPress contact form!
Step 2: Create a New Contact Form
After activation, you’ll see a welcome screen. Click the Create Your First Form button here, or go to WPForms » Add New to access the form builder.
In the builder, you’ll see options for setting up your contact form. Let’s start by giving your form a name at the top. Then, hover over the form template you want to use and click Use Template. We’re going to select the Simple Contact Form template.
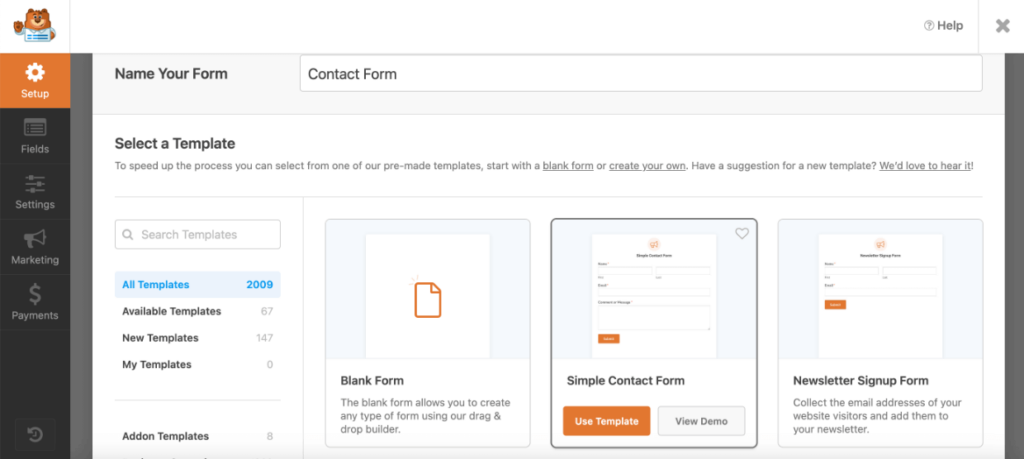
Pro Tip: Click Available Templates in the left menu to see all the templates included in WPForms Lite, or upgrade to WPForms Pro to access many more unique form templates.
Step 3: Customize Your WordPress Contact Form
Now, it will take you to the Fields tab, where you can add, remove, or edit any field you want. On the right-hand side of the screen, you can see a preview of how your contact form will appear on your WordPress site.
To edit existing fields, press Field Options at the top of the left panel or select the field you want to edit on your form. You can edit the label, add an optional description, set the field to required, and adjust other field-specific options.
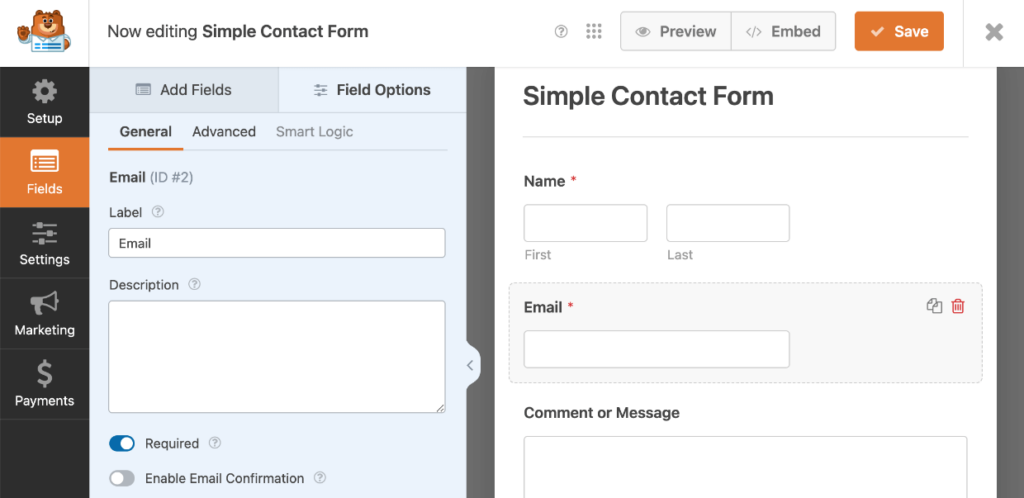
The Advanced tab under Field Options gives you additional customization options, such as adding placeholder text, changing the size of the field, and adding custom CSS. The Smart Logic tab is available with any paid license and lets you add dynamic content, show or hide fields, and add redirects based on users’ interactions.
To add fields to your form, just drag and drop them from the left panel. For example, we added a multiple-choice field with images to find out what photography service the client is inquiring about.
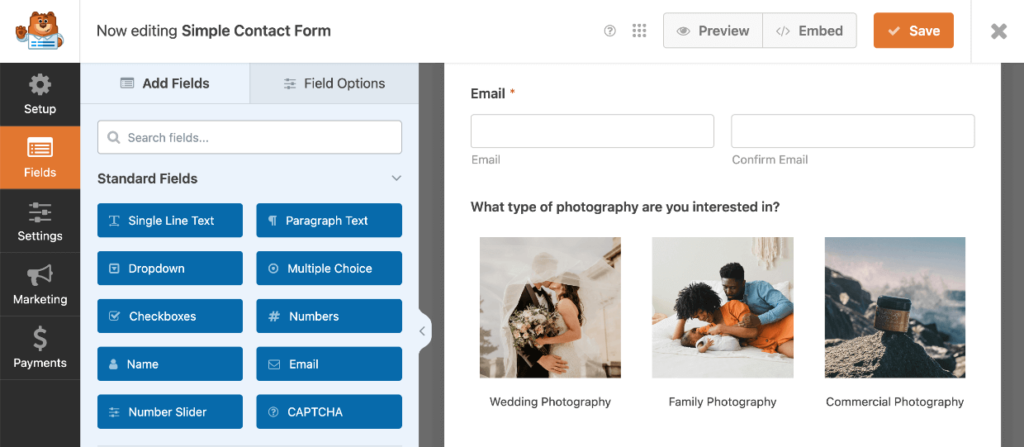
You can delete any field by selecting it and clicking the trash icon. Go ahead and add any fields you’d like to include and customize them to your liking! When you’re finished designing your form, press Save in the top right corner.
Pro Tip: We suggest adding a CAPTCHA field to your form to help prevent spam. WPForms supports hCAPTCHA, reCAPTCHA, and Cloudflare Turnstile, but you’ll need to set it up from your WPForms » Settings page first. Check out this documentation to learn more.
Step 4: Configure Your Form Settings
Next, click the Settings tab on the far left and configure your form:
- General Settings: Edit the submission button, add a form description, tag the form for easy management, and more.
- Spam Protection and Security: Enable anti-spam measures like minimum required time and CAPTCHA to reduce spam submissions.
- Notifications: Enable automatic email notifications to alert you when a form is submitted and determine the information to include for each submission.
- Confirmations: Customize the confirmation message shown to visitors, display a confirmation page, or redirect users to a custom URL after they submit your form.
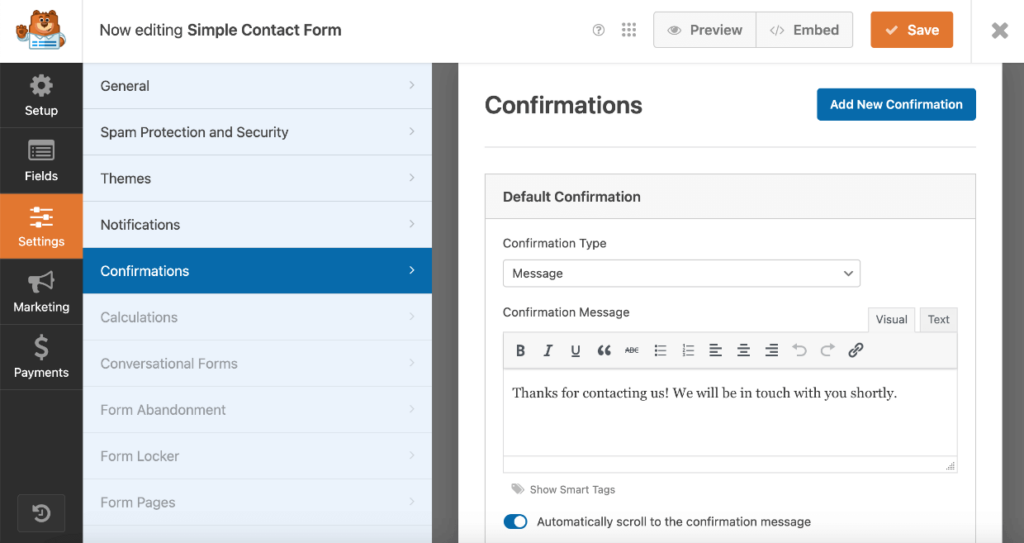
If you’re using a premium version of WPForms, you’ll see additional settings options like conversational forms, Google Sheets integration, form abandonment, and more.
Lastly, click the Marketing tab on the left and follow the instructions to connect your contact form to an email marketing service. The free plugin integrates with Constant Contact, or you can use Uncanny Automator for automations. You’ll need to upgrade if you want to connect your forms with other popular platforms like Drip, Mailchimp, and Zapier.
Once you’ve configured everything to your liking, hit the Save button at the top. Your contact form is now ready!
Step 5: Add the Contact Form to Your Site
Now that you’ve finished creating your form, there are a few different ways to add it to your website. One of the easiest methods is to click the Embed button in the top right corner of the form builder. Then, press Select Existing Page or Create New Page in the popup to embed your form.
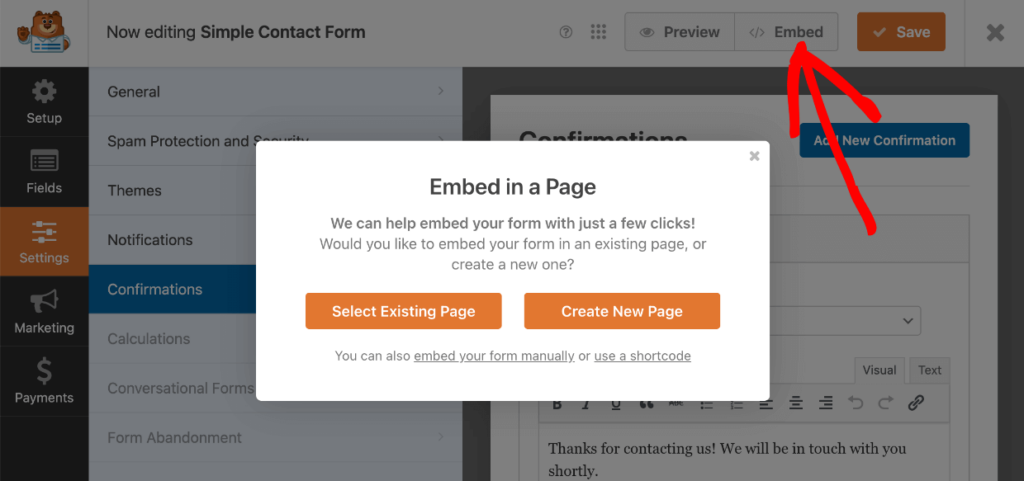
Alternatively, you can use a shortcode or the block editor to embed forms easily. Head to the page or post you want to edit, click the + sign to add a new block, and search for/select the WPForms block.
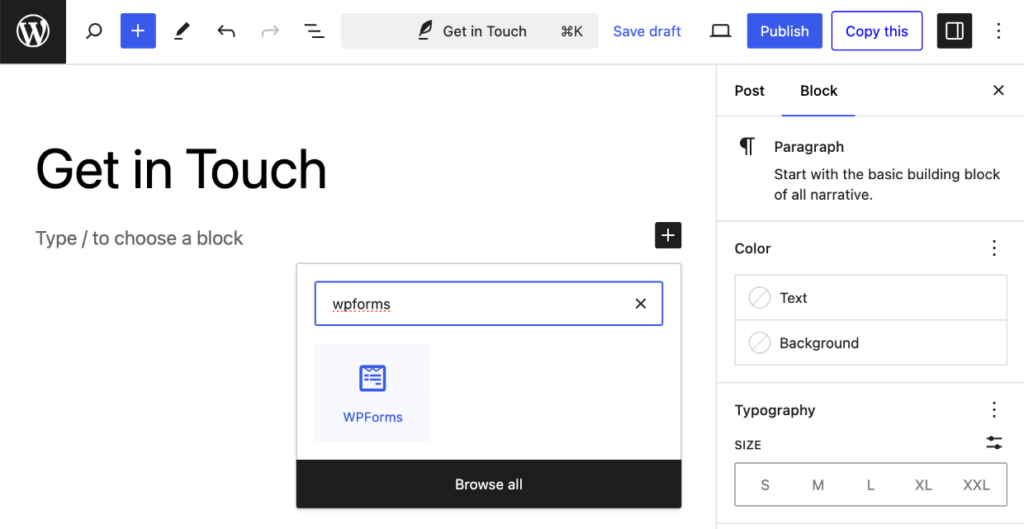
Then, you can use the dropdown menu inside the block to select which form you want to add. Once selected, you’ll see a preview of your contact form in the editor.

In the block settings sidebar, you can show or hide the form’s title and description and customize your form’s appearance, such as the size, background colors, border, button style, and form theme.
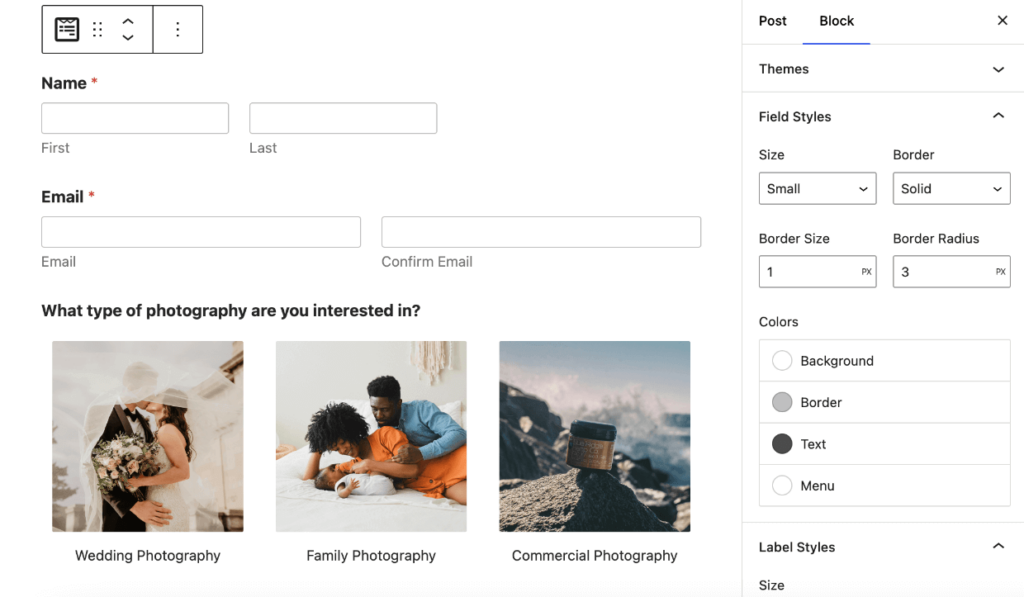
Make sure to Publish your changes after you finish. Now, you can head to the front end of your site to see how your new WordPress contact form looks!

Congrats—you created your very own contact form for WordPress!
Frequently Asked Questions
What is the best way to set up a contact form in WordPress?
The best way to set up a contact form in WordPress is with a user-friendly plugin that allows for easy customization and spam protection. Start by installing a plugin like WPForms, which offers a drag-and-drop form builder and pre-built templates. Once installed, you can create a form, customize the fields, enable anti-spam features, configure settings for notifications and confirmations, and embed the form on your site using the block editor.
Is there a free contact form for WordPress?
Yes, WPForms offers a free version called WPForms Lite, which is one of the most popular contact form plugins for WordPress. It lets you easily create and customize forms using the drag-and-drop form builder. The plugin includes a library of pre-built templates and essential features such as primary form fields, spam protection, and email integration, making it an excellent choice for beginners who need a simple contact form without any cost.
How do I add a contact form widget in WordPress?
To place a contact form in a widget on your WordPress site:
- Go to Appearance » Widgets in your WordPress dashboard.
- From there, add the WPForms block (or the one provided by your form plugin) to your desired widget-ready area, such as the sidebar or footer.
- Once placed, choose the form you want to display from the dropdown menu and customize the appearance using the settings panel.
- Save your changes; the contact form will now appear in the specified widget area.
That’s all!
We hope this article helped you to learn how to create a WordPress contact form for your site. If you enjoyed this article, check out:
- Best WordPress Form Plugins: Simple & Advanced Builders
- How to Add a Client Booking Form in WordPress
- How to Create a WordPress Photo Gallery (Easy Tutorial)
- How to Make a WordPress Photography Website in 5 Easy Steps
Not using Envira Gallery? Get started today!
Don’t forget to check out our blog and follow us on X (Twitter) for the best photography tips, resources, and WordPress tutorials.


