Are you a passionate photographer looking to showcase your work online and grow your business? Creating a stunning website to display your photos has never been easier, thanks to WordPress. In this comprehensive, step-by-step guide, we’ll walk you through the process of building a professional WordPress photography website from scratch – no coding skills required!
By following this tutorial, you’ll have a fully functional photography website that beautifully presents your work, attracts potential clients, and helps you stand out in a competitive industry.
We’ll cover everything from setting up your domain and hosting to choosing a theme, installing essential plugins, creating your portfolio, and more. Let’s get started!
Do photographers use WordPress?
Absolutely! WordPress is the go-to platform for photographers of all levels, from hobbyists to seasoned professionals. Here’s why:
- Customization: With thousands of themes and plugins available, WordPress allows you to create a unique website that perfectly reflects your brand and style.
- User-friendly: WordPress has an intuitive interface that makes managing your site easy, even if you have no prior web development experience.
- Scalability: As your photography business grows, WordPress can grow with you. It’s easy to add new features and functionality as your needs change.
- SEO-friendly: WordPress is optimized for search engines and offers plugins to easily improve SEO, making it easier for potential clients to discover your work online.
- Cost-effective: WordPress is open-source software, which means it’s free to use (you will have to pay for a domain and hosting, but we’ll get to that). Creating your own professional website is a much more affordable option than hiring a web developer or using alternative photography platforms.
With WordPress, you have full control over your photography site and can create a stunning online presence without breaking the bank.
How to Build a Wordpress Photography Website
Step 1: Set Up Your Site and Install WordPress
The first step in creating your photography website is registering a domain name and choosing a hosting provider. Although WordPress is free, you’ll still have to pay for your domain and hosting. Don’t worry though, it’s still the most affordable way to create a website.
Choose a Hosting Provider and Register Your Domain
Your domain name is your website’s address on the internet (e.g., www.yourphotography.com), while hosting is the service that stores your website’s files and makes them accessible to visitors.
We recommend using Bluehost or Siteground for affordable, reliable hosting. They offer various plans to suit your needs, a simple setup process, and your domain name is included. For alternative hosting options, check out our article on the best web hosting for photographers.
The setup process is similar for most hosting services, but you’ll want to follow the specific instructions for your chosen hosting provider. We’ll be using Bluehost for this tutorial.

If you’re using a different hosting provider, you’ll want to follow the specific instructions provided by your chosen host. From the Bluehost homepage, click on the Get Started button. This will take you to the pricing page where you’ll choose your plan. Press Select on the plan on you want.
You’ll arrive at the next page where you’ll need to pick a domain name.
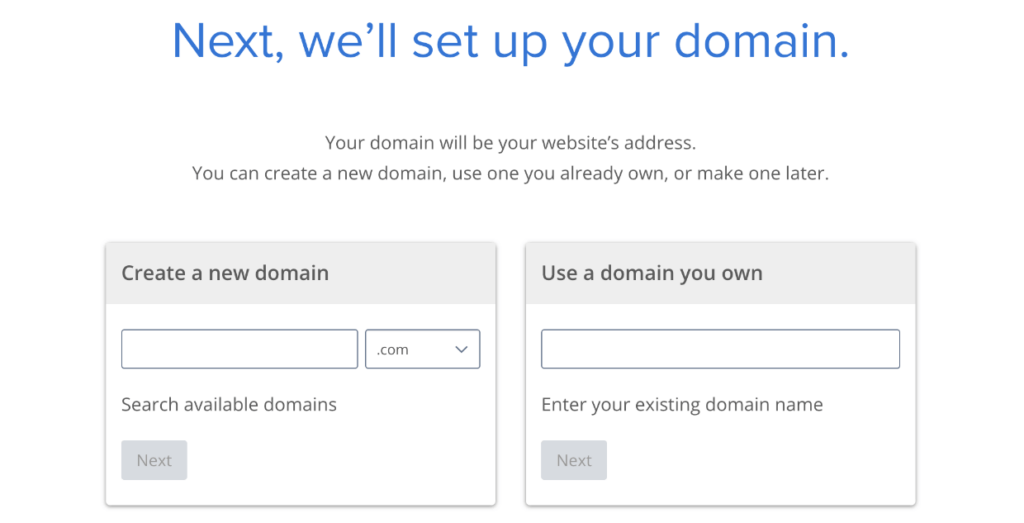
If the domain you want isn’t available, Bluehost will return some suggestions to choose from. We usually recommend using .com domains because they’re easier for visitors to remember.
On the next page, you’ll fill in information to create an account. You’ll see a number of addons you can purchase, but we recommend leaving them off for now. You can always add extras to your plan later.
Complete your purchase and wait for the confirmation email with your login details. Your login details are for your hosting account control panel (cPanel). This is where you’ll manage your hosting account, get support, and install WordPress.
Install WordPress
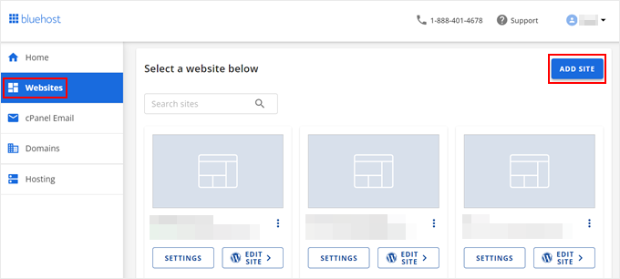
Next, log in to your Bluehost account, click Websites from the menu on the left and then click Add Site.
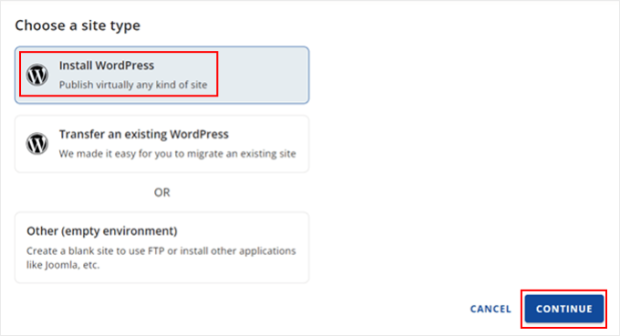
Now, you’ll be asked to choose a site type. Select Install WordPress and click Continue.
Next, enter a title for your website. Don’t worry, you can always change this later. Click Continue.
After that, Bluehost will create your new WordPress website. Head back to the Websites tab and you should see it there. Click Edit Site to log in and access your site. You can also log into your WordPress site’s dashboard by going to “yoursite.com/wp-admin/” from your browser.
With WordPress installed, you’re ready to start building your photography website!
Step 2: Choose Your Theme
Your website’s theme determines its overall look and feel. Your site will come with a basic, default theme installed, but you’ll probably want to change it.
WordPress offers thousands of themes, but it’s essential to choose one that’s designed with photographers in mind. Look for a theme that:
- Showcases your images beautifully
- Offers a clean, minimalist design that keeps the focus on your photos
- Provides easy customization options to match your brand
- Is responsive and looks great on mobile devices
You can also check out our list of the best photography themes.
For this tutorial, we’ll be using Astra. It’s a very popular, multipurpose theme that offers tons of pre-built templates, including ones for photography.
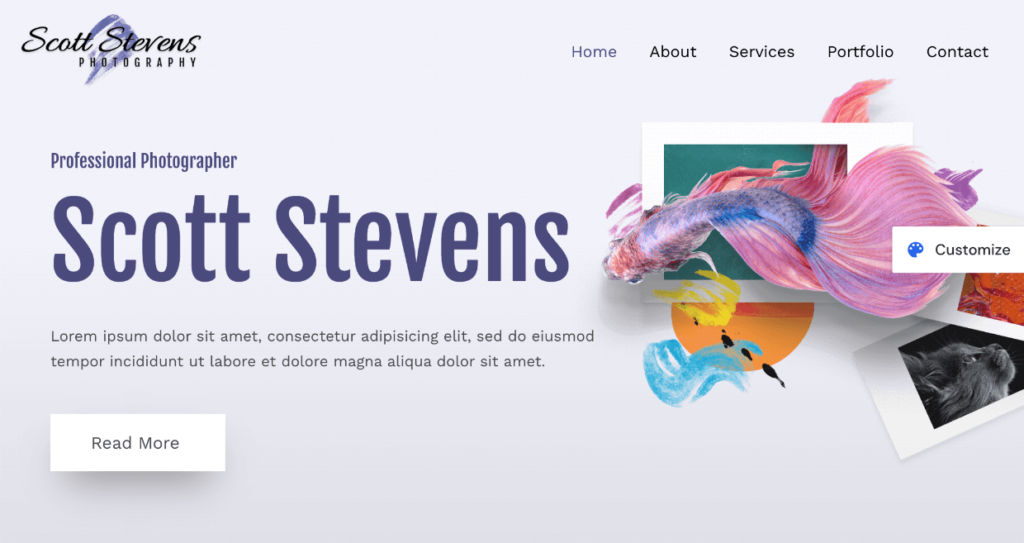
While the Astra’s premium version offers more templates and customizations, we’ll use the free version for the sake of this tutorial.
To install your theme, select Appearance » Themes after logging into your WordPress dashboard. Then click on the Add New Theme button at the top.
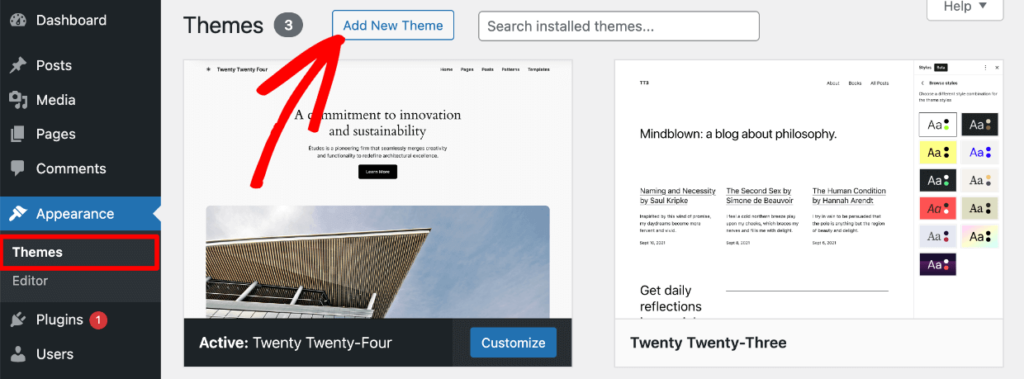
Use the search bar to look up the theme you want, or type “photography” to browse other themes for photography websites. As mentioned, we’ll be using Astra.
When you’ve found the one you want, click the Install button.
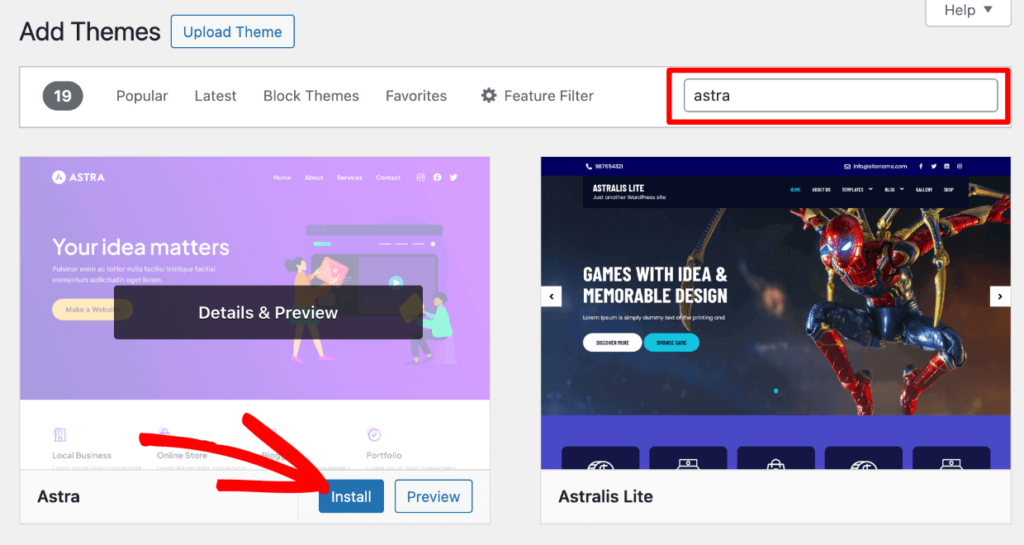
After it finishes installing, the button will change to say Activate, and you should click it.
Your photography theme is now installed and activated in WordPress!
Step 3: Add Content and Customize Your Site
It’s often much easier to customize your theme once you have a little content on your site. So, let’s start with that.
Create Your Website Pages
WordPress lets you create two types of content: pages and posts. Pages are for static, timeless content that doesn’t change much, like your Contact or Services pages. Posts, on the other hand, are for blog content that’s updated regularly.
By default, your latest posts will display on your homepage, but you can easily change this to a static page if you prefer. And if your photography site doesn’t need a blog at all, no worries! Posts are totally optional.
To add pages to your photography site, click Pages from your WordPress admin menu. Then, click Add New Page at the top.

Now, you’ll need to add pages to your website one by one. You can edit your pages and add content individually later. For now, just give each page a title and click Publish.

Depending on the theme you chose, you may have a few pages already created. If you want to have a static home page, which is typically best for photography sites, you’ll want to create a “Home” page. Some other pages you should consider starting with include “Portfolio”, “About,” “Services,” and “Contact.”
Note: Similar to adding pages, you can go to Posts » Add New to add a new blog post in WordPress.
After you’ve added some pages, let’s go customize how your website looks.
Customize Your Theme
You can customize your theme by going to Appearance » Customize in your WordPress menu. Here, you can change colors, fonts, layouts, and more to make your site truly your own.
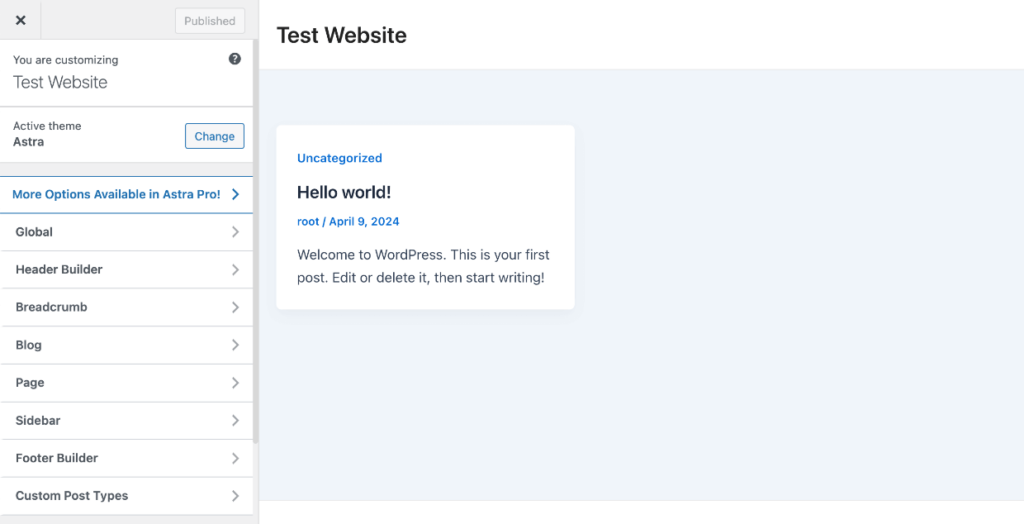
Note: Some themes support full site editing, in which case your site customizer may look different. If you’re using the Astra theme, you can also go to Astra » Dashboard to see a handy list of things to customize and install starter templates.
There are a lot of things to customize such as your header and footer, global fonts and colors, page and post layouts, and much more. We won’t go over everything in this tutorial, especially since this part will vary depending on the theme you’re using.
That said, three areas you’ll want to customize right off the bat is your Site Identity, Menus, and Homepage Settings.
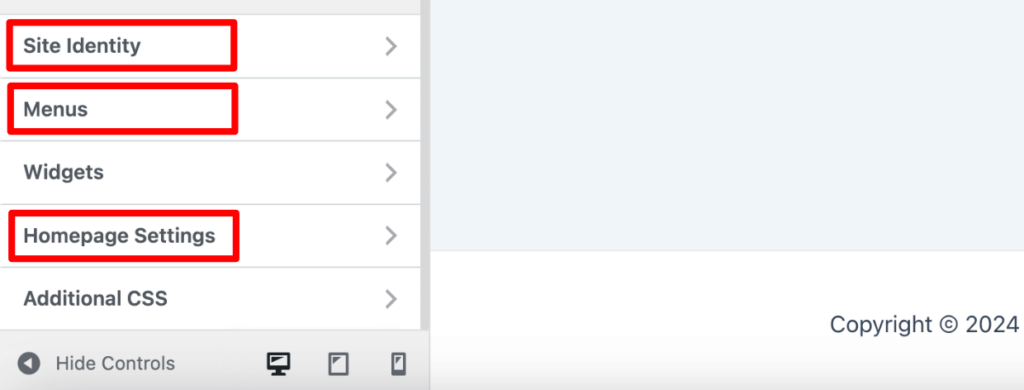
Again, the process for this may be different, based on your theme, but it’ll most likely be similar.
First, click Homepage Settings. Here, you can change your homepage to display a static page rather than your recent blog posts. Select the page to use for your Homepage and Posts Page (if you want your website to have a blog).

Click Publish at the top. Then press the arrow to go back to the customizer menu.
Many themes let you create and display multiple menus in various locations, but at the very least you’ll need a primary menu so visitors can navigate to other pages like your Portfolio and Contact page. Under Menus, click Create New Menu. Then, give your menu a name and select Primary menu for the location.
Now you’ll want to add your main pages to the menu. Just click which ones you want to add in the right column and they’ll be added to your menu, which is displayed in the left column.
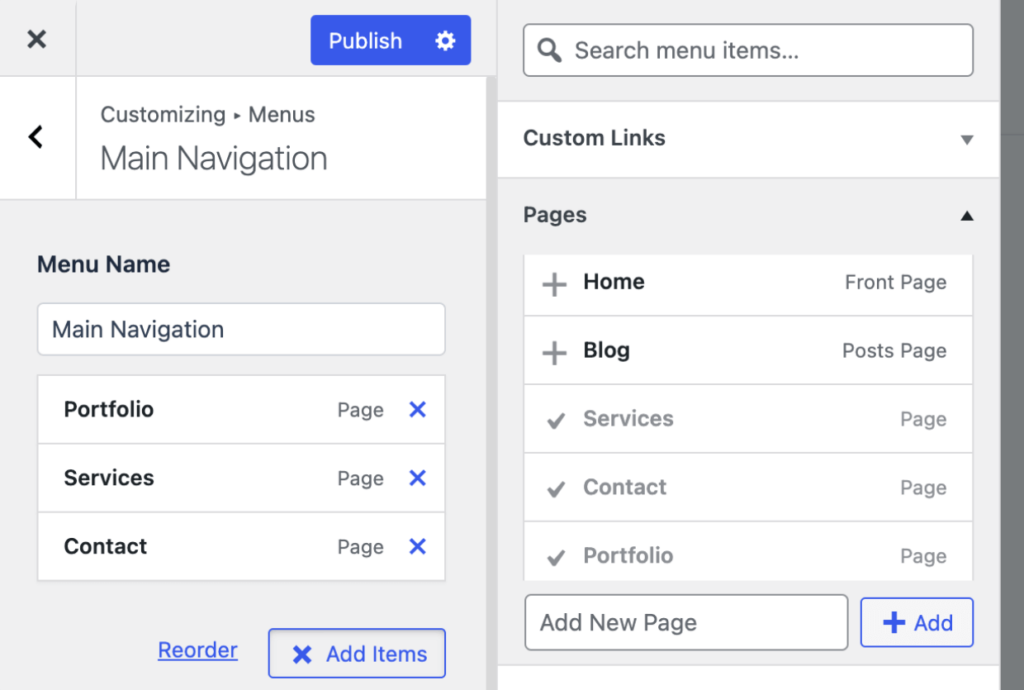
You can drag the items in your menu to change the display order and place items under other items if your theme supports submenus.
When you’re done, click Publish. You’ll see your navigation menu displayed in the the customizer preview, wherever your theme’s primary menu location is (most likely in the header).

Lastly, under Site Identity, you can edit the title of your photography website and add a logo and tagline. Be sure to click Publish after making any changes in the customizer.
For more help with customizing your site, you’ll want to refer to your theme’s documentation. However, here are a few best practices to keep in mind:
- Simplicity: Choose a clean, minimalist design that puts your photos in the spotlight. Avoid cluttered layouts or excessive decorative elements that distract from your images.
- Mobile Responsiveness: Ensure that your theme and design is mobile-friendly and looks great on screens of all sizes. Test your website on various devices to confirm that images load quickly and navigation is intuitive.
- Color Scheme: Select colors that complement your photos and reflect your brand identity. Neutral backgrounds often work well for photography websites, as they allow your images to take center stage.
- Fonts: Opt for easy-to-read, web-safe fonts that align with your brand’s style. Limit the number of fonts used on your site to maintain a cohesive look and feel.
Step 4: Install Essential Plugins
While WordPress is powerful on its own, plugins can extend its functionality and help you create a more professional photography website. Here are a few essential plugins we recommend.
Envira Gallery
For starters, you’ll definitely want to install Envira Gallery.
Envira Gallery is the best premium WordPress gallery plugin, allowing you to create beautiful image and video displays using a drag-and-drop builder and multiple layouts including masonry, fullscreen, masonry, lightbox display, and more.
It’s the perfect way to show off your work, and we’ll be using it to build your portfolio in the next step.
You can use the free version to get started. Head to Plugins » Add New Plugin. Then, search for “Envira Gallery” and click Install Now and then Activate after the button changes.
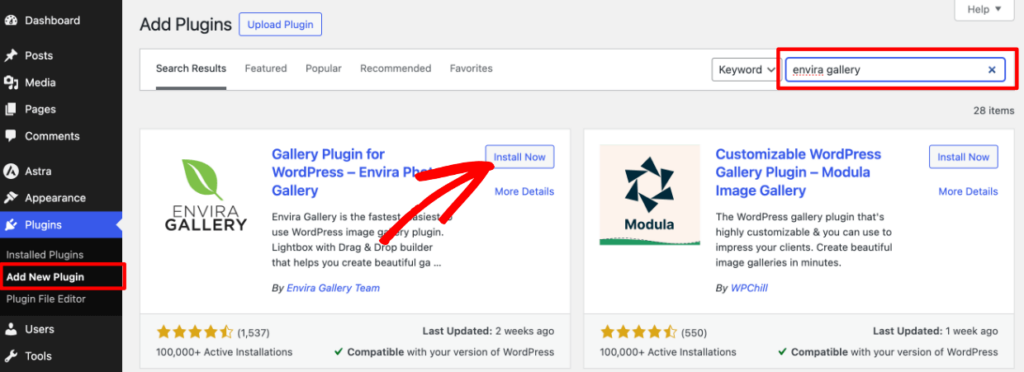
The free version is great for building simple galleries, but you’ll probably want to upgrade to the Pro version to really make the most out of your photography site. With it, you’ll get advanced gallery customizations and powerful features like:
- Additional gallery layouts, themes, lightbox settings, and animations
- Albums to organize and display multiple galleries
- Video support
- Built-in image compression, breadcrumbs, and deep linking for SEO
- eCommerce integration to display and sell photos
- Client image proofing
- Watermarking, image protection, and password-protected galleries
- Adobe Lightroom integration
- Social sharing buttons on images, galleries, and albums
- And lots more…
For instructions on how to install Envira Gallery Pro, head to our documentation. We’ll cover how to create your photography portfolio with Envira Gallery in the next section.
We also recommend installing a few other plugins on your site. All of them offer a free version that you can install the same way we did above.
AIOSEO
All in One SEO (AIOSEO) is a powerful plugin that helps optimize your photography website for search engines.

With AIOSEO, you can easily analyze your content, titles, and meta descriptions for SEO improvements, generate XML sitemaps and control which pages are indexed by search engines, and so much more.
Basically, it’ll help you rank higher in search engines like Google and get your work discovered by potential clients.
WPForms
WPForms is the best drag-and-drop form builder for WordPress.
To help potential clients get in touch, you’ll need a contact form on your website. WPForms allows you to easily create custom contact forms, booking forms, payment forms, and lots more in just a couple of minutes.
MonsterInsights
MonsterInsights allows you to easily connect your website to Google Analytics and view your traffic data right from your WordPress dashboard.

To make data-driven decisions about your photography website, you need to understand how visitors interact with your content. That’s where MonsterInsights comes in. It lets you set up advanced tracking in just a few clicks to monitor your site’s performance and see where your traffic comes from, which content is most popular with your visitors, which photos visitors download or purchase most, and so much more.
In addition to the plugins above, you may want to also consider installing these plugins:
- WP Super Cache – A free WordPress caching plugin to improve your website speed.
- Duplicator – A back-up plugin to create automatic, scheduled backups of your website.
- WooCommerce – the most popular eCommerce plugin to sell digital and physical products (integrates with Envira Gallery).
- Smash Balloon – Lets you create a dynamic widget to display social media content from Instagram, X (Twitter), Facebook, TikTok, and more.
Be sure to also check out our Ultimate List of the Best WordPress Plugins (35+ FREE Tools).
Step 5: Create Your Portfolio
Now that you have Envira Gallery installed, it’s time to create a stunning portfolio that showcases your best work.
Create a New Gallery
To create a new gallery, go to Envira Gallery » Add New in your WordPress menu. You need to start by giving your image gallery a name, and then drag and drop your photos in the images section.
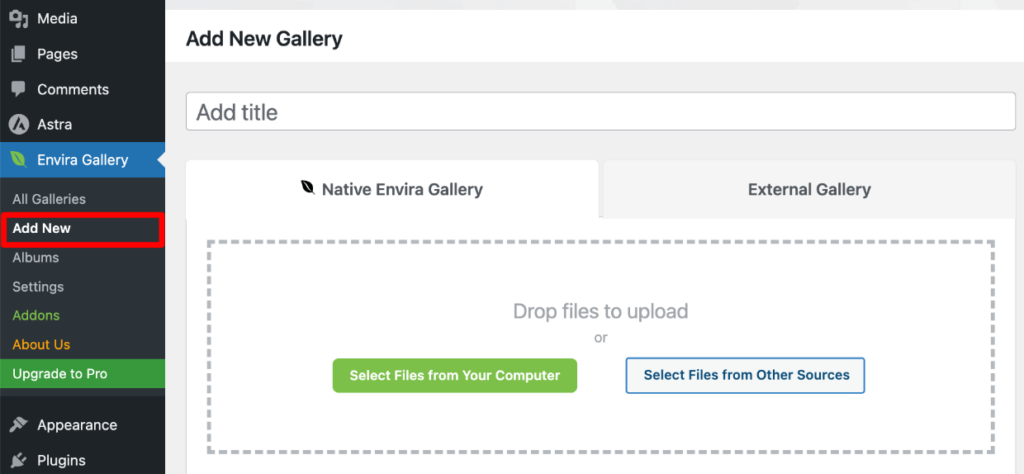
Alternatively, you can click Select Files from Other Sources to add images that you already uploaded to your WordPress Media Library.
After you’ve added your photos, scroll down to the Settings panel. Here, you’ll see all the images you added in the Gallery tab.

You can drag images to rearrange the order and click the blue Pencil icon to edit the title, add alt tags, (important for SEO), link the image to a different URL, and add a custom caption (if you’re using a paid license).
When curating images for your portfolio, consider the following:
- Showcase Your Best Work: Choose photos that demonstrate your skills, creativity, and unique style. Be selective and only include your strongest images.
- Highlight Variety: Include a range of photos that showcase different subjects, techniques, and styles to demonstrate your versatility as a photographer. You can also use an album to display separate galleries for various styles or niches.
- Tell a Story: Arrange your images in a sequence that tells a compelling story or takes viewers on a visual journey. This can help create an emotional connection with your audience.
- Regularly Update: Keep your portfolio fresh by periodically adding new photos and removing older ones. This shows potential clients that you’re actively engaged in your craft and keeps them coming back to see your latest work.
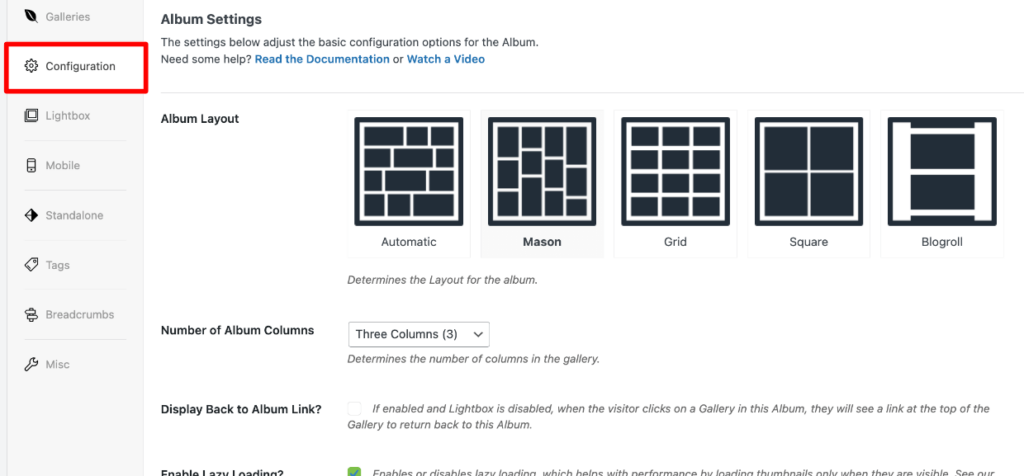
Click the Configuration tab to customize the layout of your gallery portfolio. You won’t have access to different layouts in the free version, but you can still adjust your columns / rows and other settings like lazy loading, image resizing, and gallery margins.
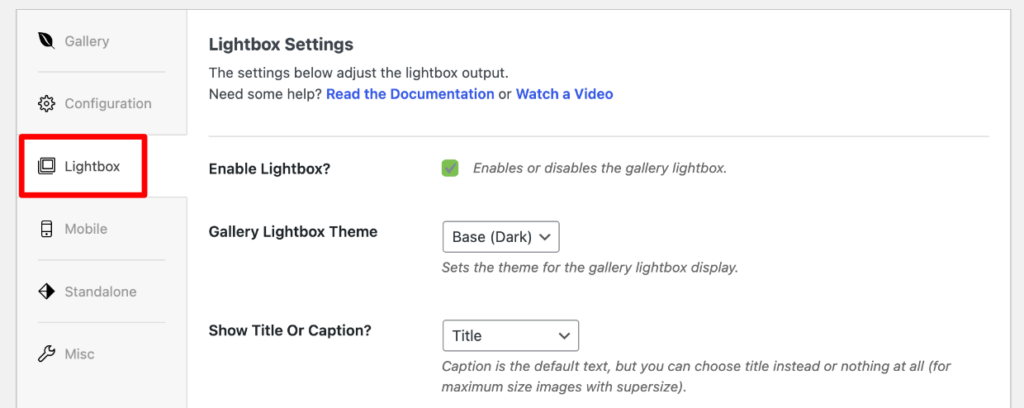
Use the Lightbox tab to enable a responsive lightbox for visitors to view your photos when clicked.
Where you’re finished creating your gallery, simply click on the Publish button and your new image gallery is ready.

Head to our detailed tutorial for more help with creating your first gallery. If you’re using Envira Gallery Pro, you can also check out our guide on how to create a filterable portfolio.
For now, lets go ahead and see how to add the gallery to your site.
Add Your Portfolio Gallery to Your Site
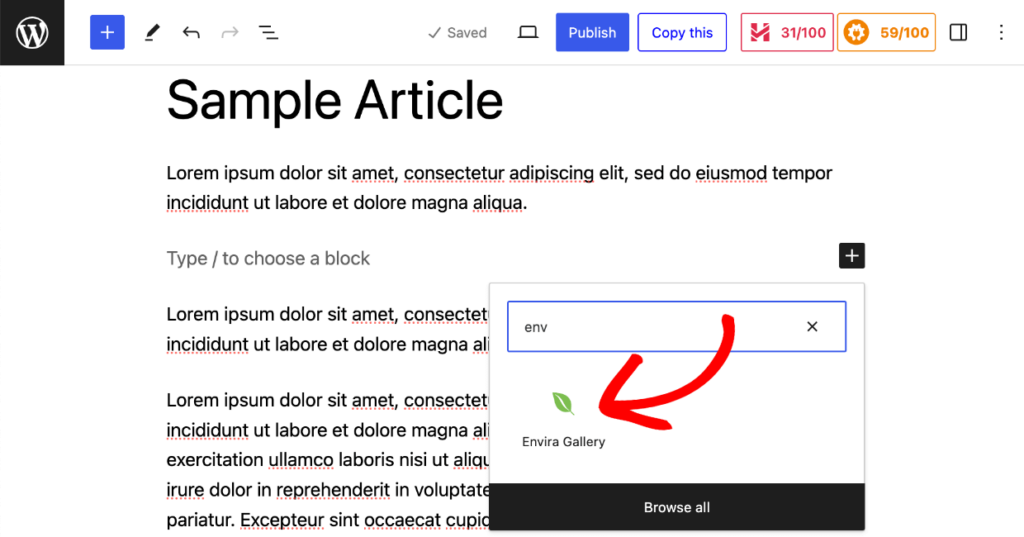
To add your gallery to a page, click Pages and select the page you want to add it to. This will open up the WordPress editor. Now, click the + sign to add a new block anywhere you want to place your portfolio gallery. Then, search for and select the Envira Gallery block.
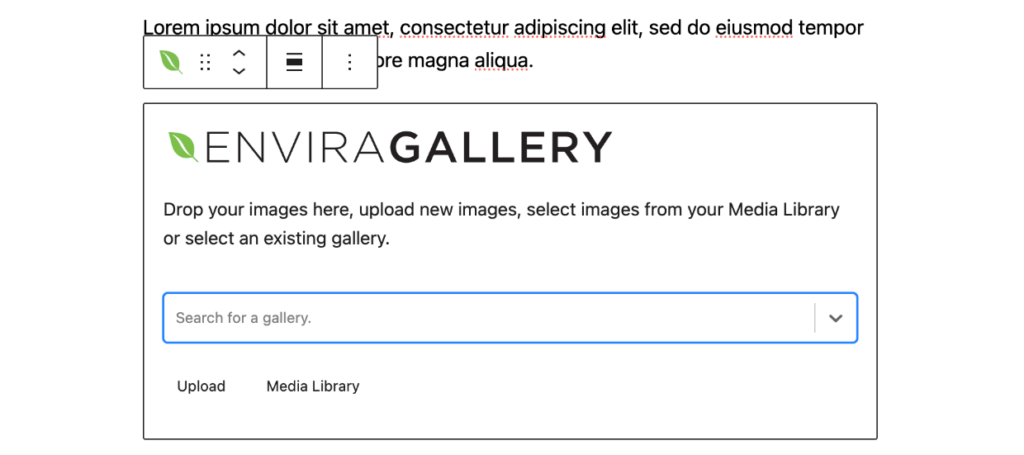
Now you’ll see the Envira Gallery block on your page. Use the dropdown menu to select the gallery you just created and view it on your page.
Click Update in the top right corner of the page to publish your changes. Your portfolio gallery is now live! Visit that page on your website to see how it looks to visitors.
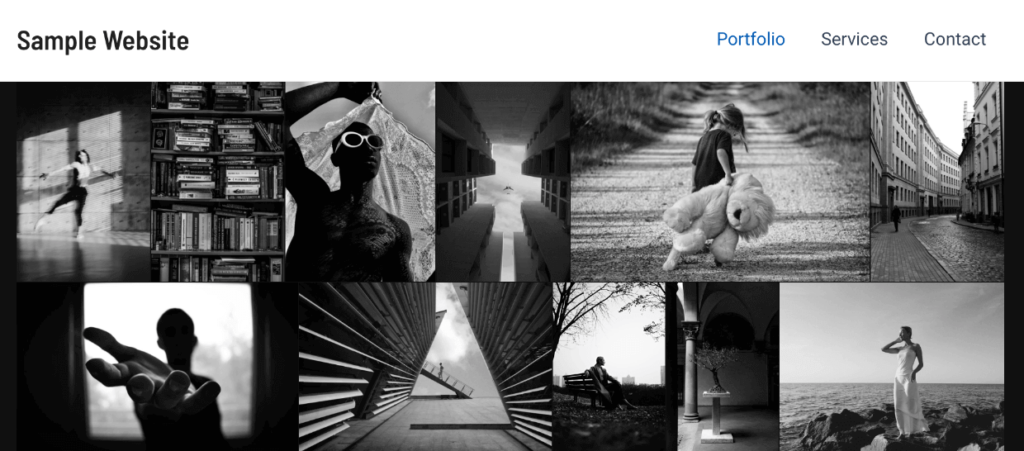
If you enabled lighbox, your visitors can click any photo to expand it in a lightbox for better viewing. If you’re a Pro user, you’ll also be able to showcase thumbnails and arrows for visitors to easily navigate between images while in the lightbox.
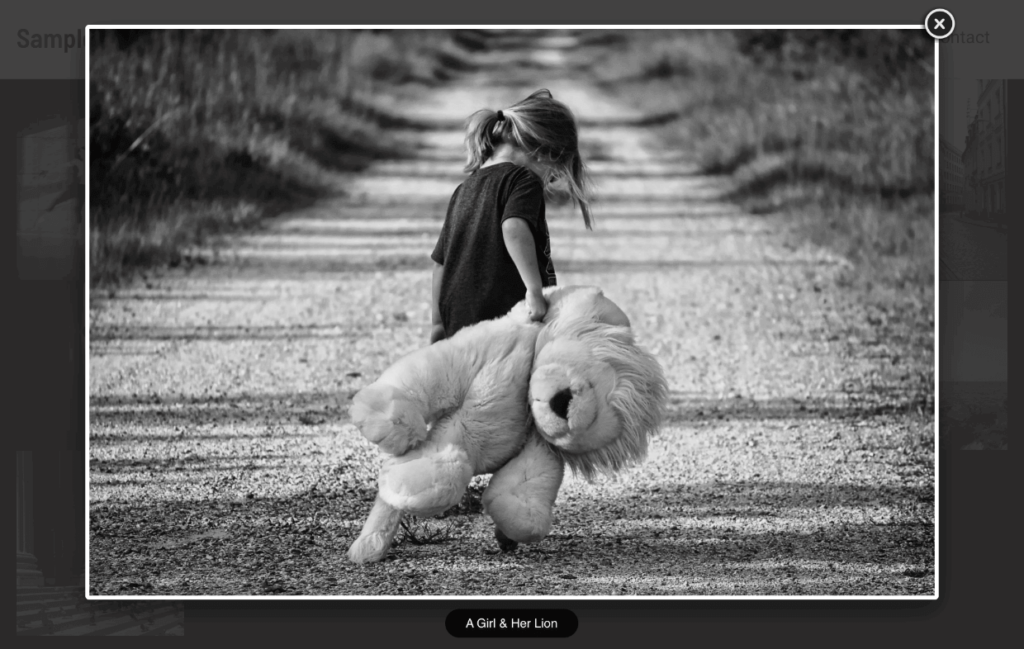
By using Envira Gallery to create your portfolio, you can present your photography in a professional, visually appealing way that impresses visitors and potential clients.
Voilà! You learned how to create a photography website in only 5 steps!
Of course, there’s a lot more you’ll want to do in terms of customization and adding content. If you’re looking for a WordPress page builder to help you build pages quickly, Envira Gallery integrates with Elementor and BeaverBuilder.
You can also check out our other resources to make the most of your new WordPress photography website:
- How to Make a Client Proofing Page in WordPress
- Tutorial: How to Sell Photos on WordPress (Beginner-Friendly)
- How to Optimize Images for Web (WordPress Best Practices)
- How to Create a WordPress Featured Gallery to Highlight Content
- How to Upload Photos Directly from Lightroom to WordPress
- How to Create a Simple Contact Form in WordPress
- Best WordPress Plugins for Photographers
- Mistakes to Avoid When Building a Photography Website
Frequently Asked Questions
How much does it cost to create a WordPress photography website?
The cost of creating a WordPress photography website varies depending on your hosting plan, theme, and plugin choices. While WordPress itself is free, you can expect to pay around $50-100 per year for hosting. If you use a premium theme and premium plugins, they can range anywhere from $20 to $300 per year. However, this is still much more affordable than hiring a web developer to create a custom site from scratch.
How do I choose the right WordPress theme for my photography website?
When choosing a WordPress theme for your photography website, look for a theme that is designed specifically for photographers. It should have a clean, minimalist design that puts your photos front and center, be fully responsive, and offer features like galleries, albums, and eCommerce integration. Don’t forget to read reviews and check the theme’s compatibility with popular plugins before making your decision. Check out our recommendations for the best free and paid themes for photographers.
Can I use a free WordPress theme for my photography website?
While there are many free WordPress themes available, it may be worth investing in a premium theme for your photography website. Premium themes often offer more features that are tailored to photographers, better customization options, and regular updates and support. This ensures your website looks professional and functions smoothly, which is essential for impressing potential clients and growing your business.
How do I optimize my photography website for search engines?
To optimize your WordPress photography website for search engines, start by installing the AIOSEO plugin and following its setup wizard. This will help you set up basic SEO settings like page titles, meta descriptions, and XML sitemaps. Additionally, make sure to use relevant keywords in your page titles, headings, and content, optimize your images with descriptive file names and alt tags, and create high-quality, shareable content that attracts backlinks. Check out our article on SEO for Photographers: 21 Proven Tips You Need Know to Rank
How often should I update my photography website?
It’s a good idea to update your photography website regularly with new content, such as blog posts and galleries. This shows potential clients that you’re active and engaged in your business, and it can also help improve your search engine rankings. Aim to add new content at least once a month, and don’t forget to share your updates on social media to drive traffic back to your site.
You made it to the end!
Congratulations on learning how to make a photography website! With your new WordPress photography website, you’re well on your way to success in the competitive world of photography.
Remember, your website is an ongoing project that requires regular updates and maintenance to ensure it continues to serve your business well. Keep your portfolio fresh, engage with your audience through blog posts and social media, and continuously explore new ways to improve your site’s performance and user experience.
By following these steps, using the right tools like Envira Gallery, and experimenting with the various tools and features available, you’ll have a professional online presence with a beautiful website that showcases your work, helps you attract new clients, and truly reflects your unique style and brand as a photographer.
With your new WordPress photography website, you’re well on your way to success in the competitive world of photography.
Not using Envira Gallery? Get started today!
Don’t forget to follow us on Facebook and X (Twitter) for the best photography tips, resources, and WordPress tutorials.


