Are you a photographer looking to create a client gallery with online image proofing?
Giving clients a convenient, professional way to view and select their favorite photos can significantly streamline your workflow and improve customer satisfaction. Luckily, setting up WordPress photo proofing on your website is pretty simple!
In this tutorial, we’ll show you the easiest way to create a client proofing gallery in WordPress. Before we dive in, let’s go over what a proofing gallery for photographers is.
In This Article
- What Are Proofs in Photography?
- The Best WordPress Photography Proofing Plugin
- How to Create an Online Gallery for Clients to Proof Images
- Step 1: Install and Activate Envira Gallery
- Step 2: Activate the Proofing Addon
- Step 3: Create a New Gallery
- Step 4: Configure Your Proofing Settings
- Step 5: Password Protect Your Client Gallery
- Step 6: Publish Your Client Proofing Gallery
- Step 7: View Your Client's Submitted Proofs
- Frequently Asked Questions
What Are Proofs in Photography?
In photography, proofs are lightly or unedited images uploaded to a gallery at a low-resolution size and often overlaid with watermarks. Photo proofs give clients a sense of what their pictures look like before final retouching. Since photographers typically don’t deliver every image they shoot to a client, a proofing gallery lets clients easily view and select the best images before the final print or digital delivery.
The Best WordPress Photography Proofing Plugin
Adding a client proofing page to your website is much faster and more professional than trying to schedule in-person meetings or finalize images over email. However, WordPress galleries don’t have a client proofing option by default, so you’ll need to use a plugin.
The good news is that Envira Gallery is the perfect tool for the job! You can create beautiful client photo galleries where clients can easily select their favorites and specify sizes/quantities. Plus, you can protect your proofing gallery from regular site visitors using password protection.
Aside from its proofing features, Envira Gallery is a powerful, easy-to-use WordPress plugin that allows you to create beautiful, responsive photo and video galleries anywhere on your site. Check out a few of the features that make Envira Gallery the best premium WordPress gallery plugin available:
- Drag-and-drop builder with multiple gallery layouts like masonry, fullscreen, and more
- Built-in lightbox with thumbnail navigation
- Filterable galleries and albums using tags
- Albums to organize and display multiple galleries
- Social sharing buttons on images, galleries, and albums
- eCommerce integration to display and sell photos
- Watermarking and image protection features
- Lightroom integration
- And lots more…
So, now that you know it’s possible, let’s get started and see how to create a WordPress proofing gallery for photographers.
How to Create an Online Gallery for Clients to Proof Images
Before you can set up online image proofing, you’ll need the Envira Gallery plugin. If you haven’t already purchased a license, head to the Envira Gallery pricing page and choose the plan that best suits your needs. You’ll need a Pro license or higher to access the proofing features.
After purchase, just follow the steps below to create a client gallery.
Step 1: Install and Activate Envira Gallery
First, install and activate the Envira Gallery plugin on your WordPress site. After purchasing a license, download the plugin’s ZIP file from your Account area.
Then, head to your WordPress website and install and activate the plugin.
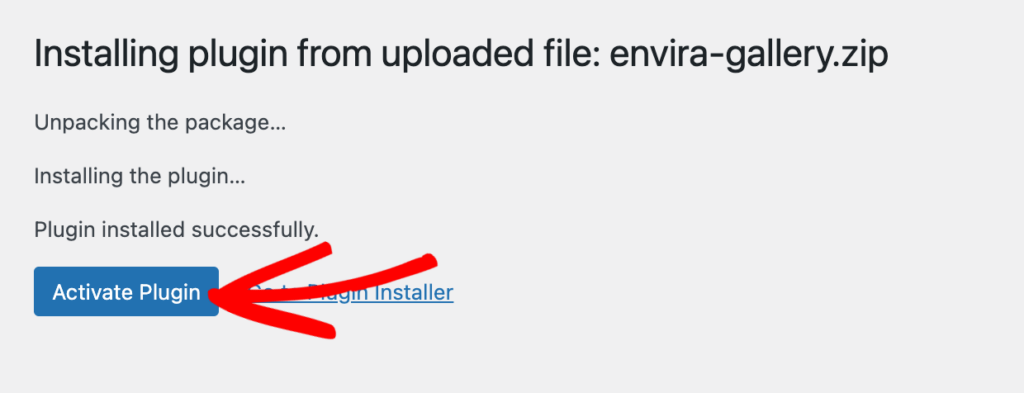
If you need guidance, refer to our step-by-step tutorial on how to install and activate Envira Gallery.
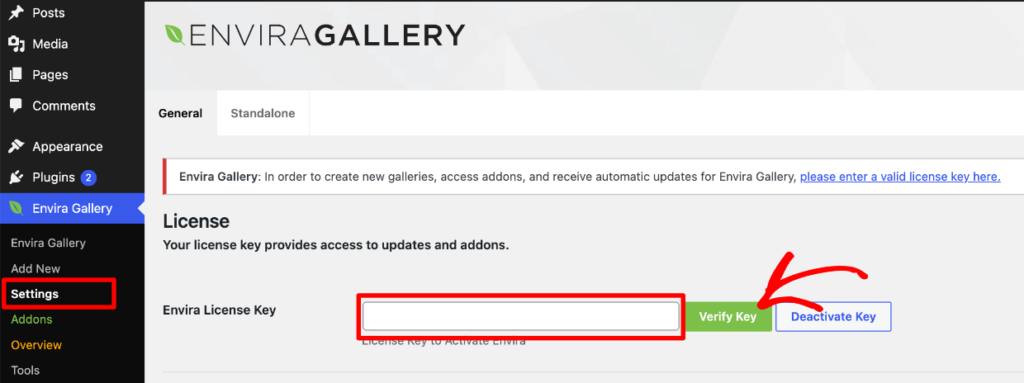
Next, click Envira Gallery » Settings and paste your license key (found in your Account area or purchase confirmation email). Press Verify Key.
Now that the plugin is active, we’ll show you which addons you need for image proofing.
Step 2: Activate the Proofing Addon
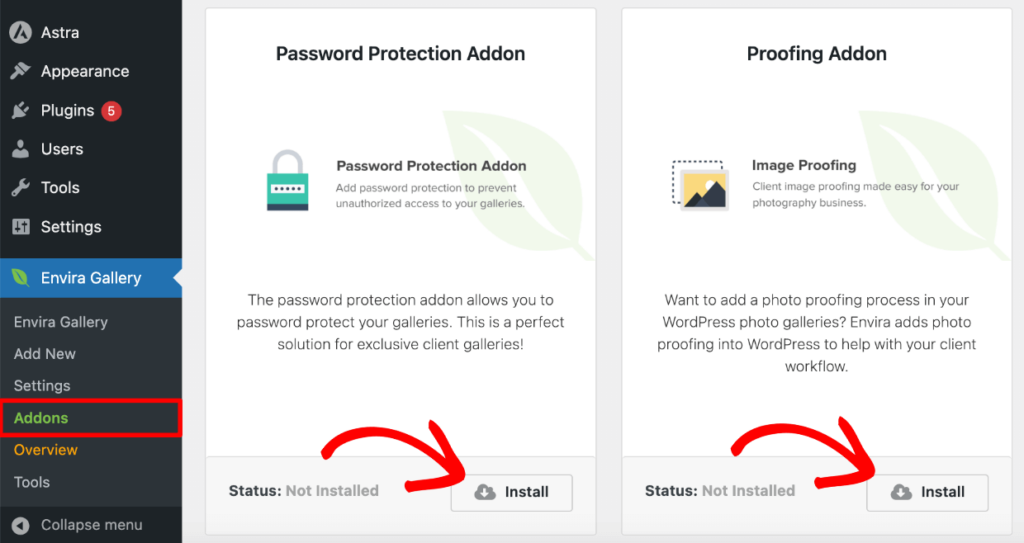
To access the proofing features, you’ll need to install and activate the Proofing Addon. However, we also recommend activating the Password Protection Addon to keep your client’s proofing photos separate from your general audience.
Simply head to Envira Gallery » Addons and find the addons in the list. Click Install on each one. When the button changes to Activate, click it.
Now that you have the necessary addons installed, it’s time to create a new gallery for your client proofs.
Step 3: Create a New Gallery
To create your client gallery, navigate to Envira Gallery » Add New. Give your gallery a title (e.g., “Client Name – Session Date”).
Then, drag and drop or upload the images you want to include for proofing into the upload box. You can click Select Files from Other Sources to add photos from your WordPress media library.
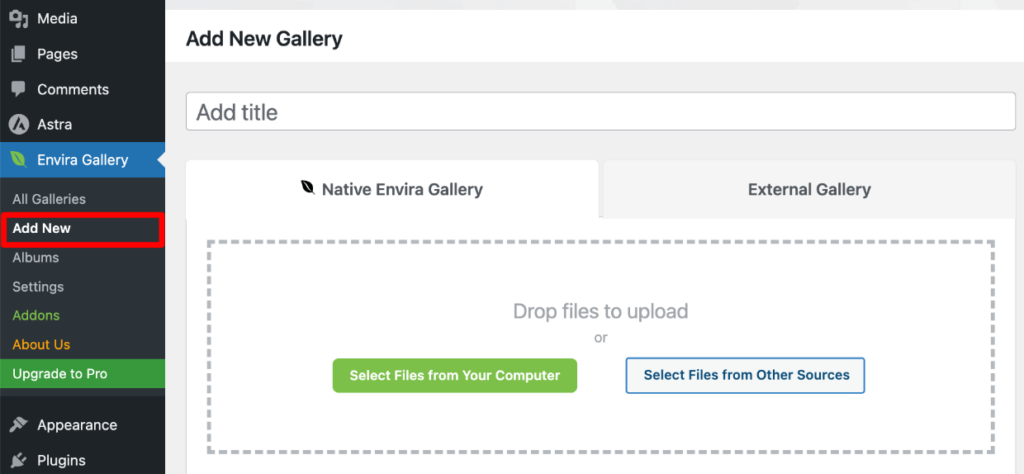
After adding your images, scroll down to see them in the gallery settings panel. From here, you can rearrange the order, customize the layout, add watermarks, and more, depending on which addons you have installed.

For the sake of this tutorial, we’ll move on to enable proofing, but you can learn more about all the available settings in our documentation.
Step 4: Configure Your Proofing Settings
With your images uploaded, you can now set up your proofing options. First, click the Proofing tab in the gallery settings panel and check the box next to Enabled?
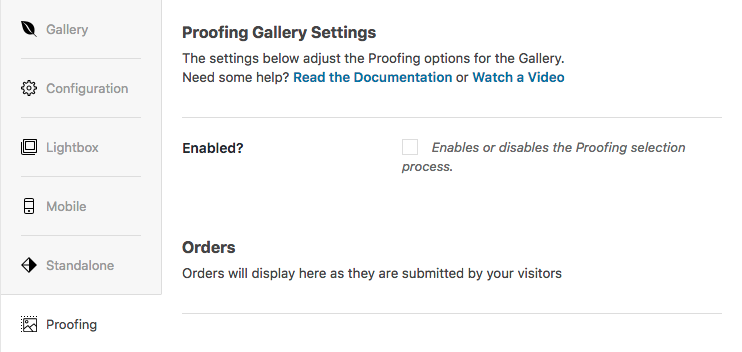
This will extend the options for photo proofing, which includes requiring an email address (useful if multiple people are selecting proofs from the same gallery), enabling quantity and size options, customizing the button labels, and more.
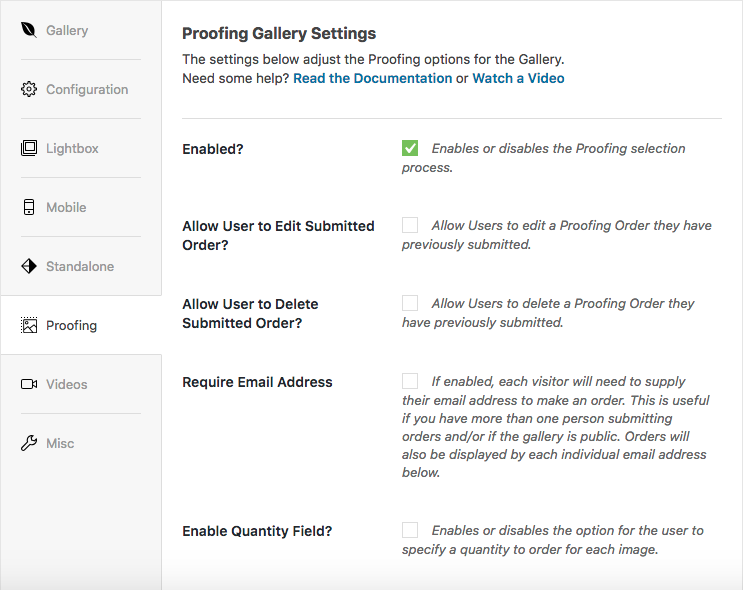
Simply check the options you want to enable for your client proofing gallery. These settings can be modified any time you need.
Pro Tip: You can customize your success messages and the proofing confirmation email to send clients by clicking Orders » Settings from your WordPress admin menu. That way, it’ll apply to all your proofing galleries, but you can always override the global settings on an individual gallery basis.
Step 5: Password Protect Your Client Gallery
To ensure that only your intended client can access their proofing gallery, you’ll also want to add password protection. If you didn’t install and activate the Password Protection Addon previously, you’ll first need to do that.
Then, on the gallery creation page, you’ll see these settings on the right side in the Envira: Password Protection panel. You can leave it as is or customize these fields.
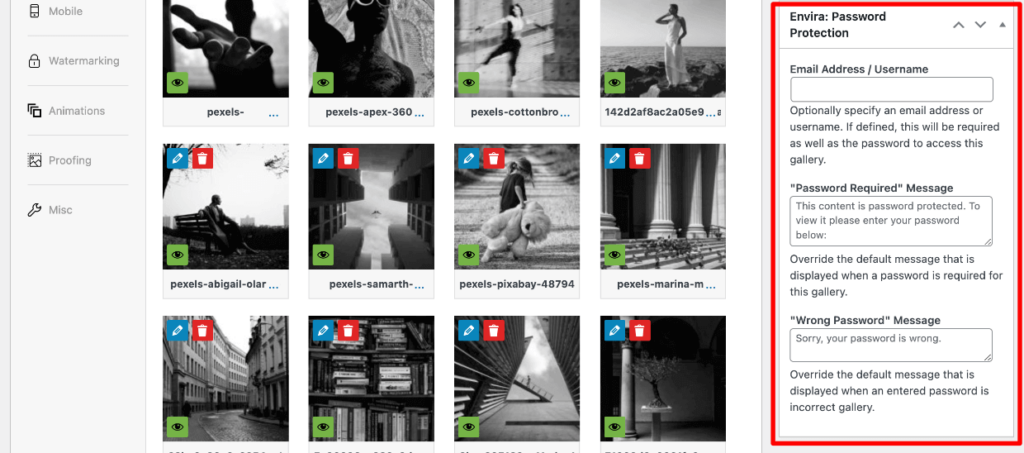
After that, scroll up to the Publish panel and click the Edit link next to Visibility to expand your options. Select Password protected, enter the password you want to use, and press OK.
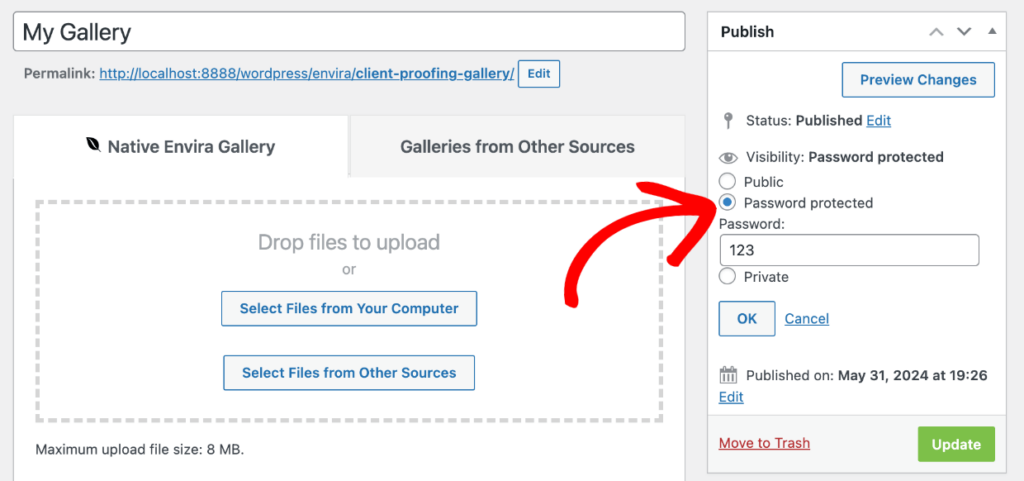
Now, you can go ahead and press the Publish or Update button on your new client proofing gallery.
Step 6: Publish Your Client Proofing Gallery
After you’ve published your gallery, it’s time to add it to your site so clients can proof images.
You can enable standalone galleries, which gives each gallery a unique URL that isn’t tied to a page or post (e.g., www.yoursite.com/envira/smith-wedding), or you can easily embed galleries on any post/page.
To embed your client gallery on a page or post, head to the page where you want to add it, click + to add a new block, and search for/select the Envira Gallery block.
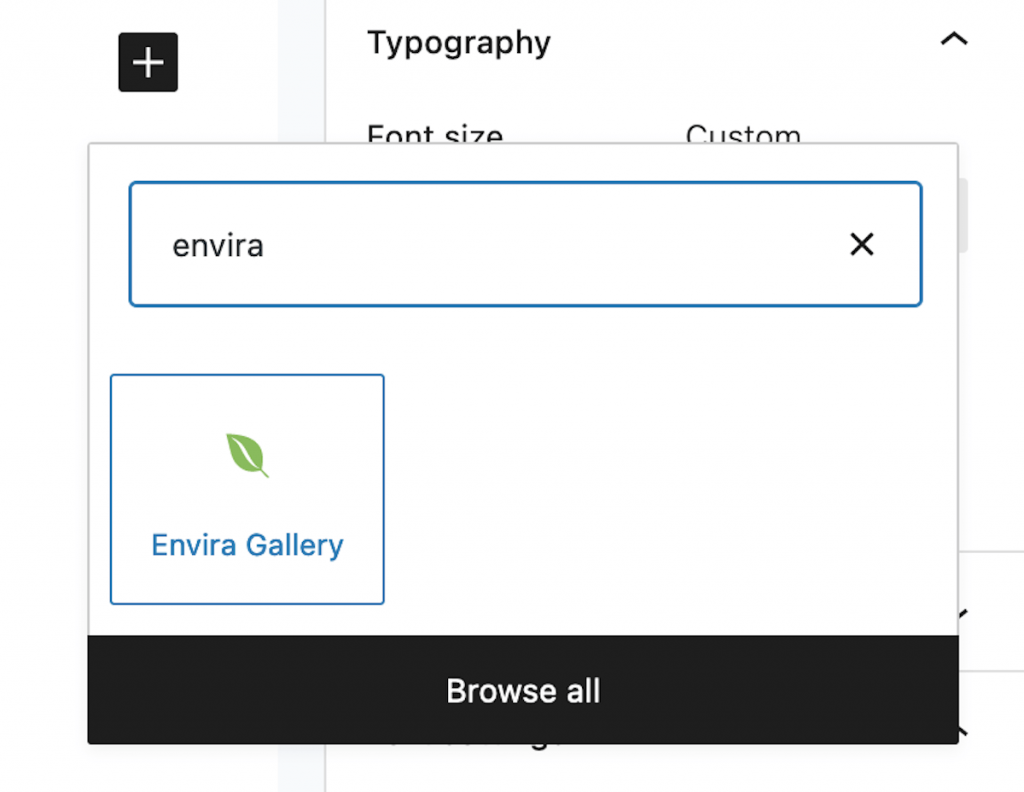
Then, select the proofing gallery you just made from the drop-down menu inside the block.
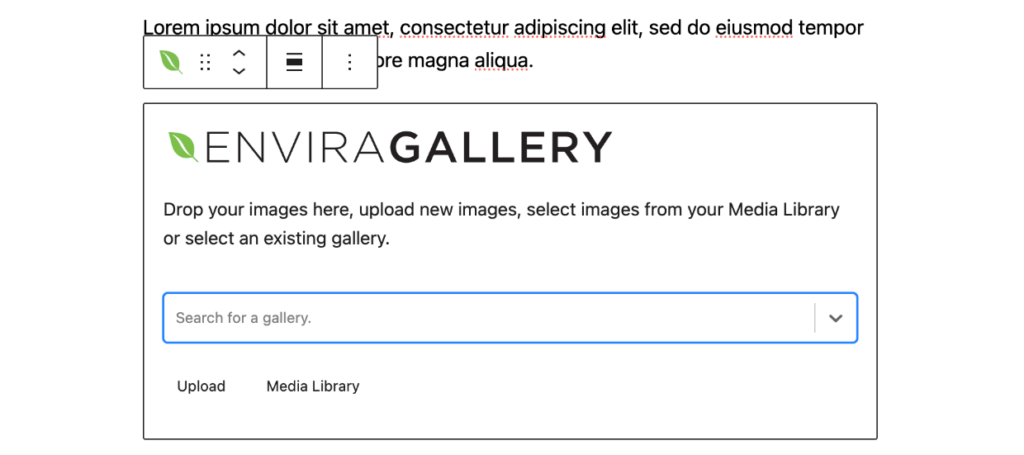
After that, you’ll see a preview of the gallery you added. Make sure to click the Update or Publish button on the page or post.
Now, visit that page to see how your new WordPress photo-proofing system looks to clients! If you previously enabled password protection, clients will first be prompted to enter the password.

Then, they can easily select and submit photography proofs, add notes, and specify sizes/quantities, depending on the settings you previously enabled.
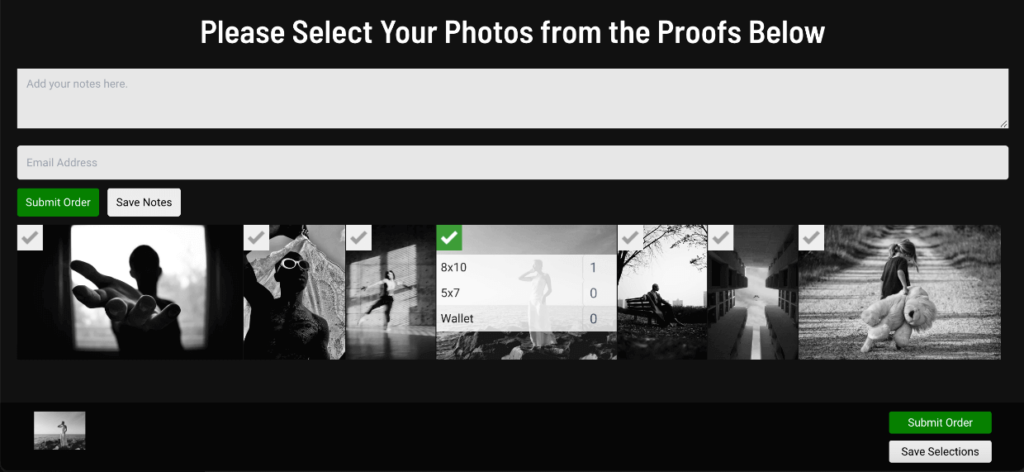
Voilà! You learned how to display photo proofs online for your photography clients.
Step 7: View Your Client’s Submitted Proofs
The only thing left to do is view your client’s submitted proofs. From your WordPress menu, click Orders. Here, you’ll see a list of all your proofing orders, along with the client’s name/email (if collected) and the associated gallery.
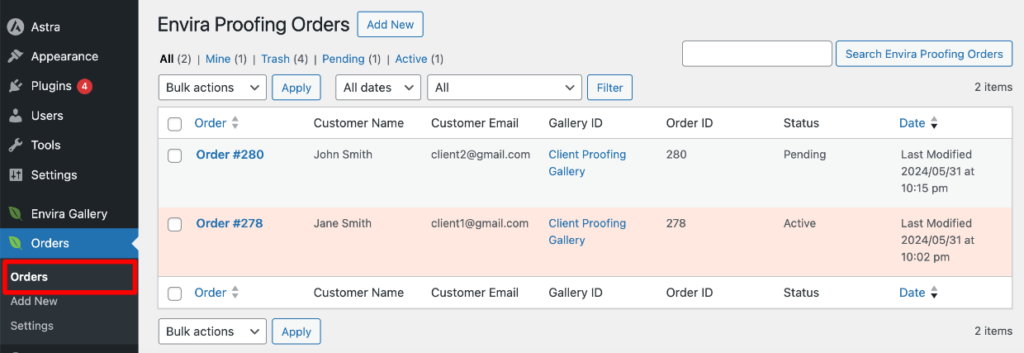
Pending status means the client saved their proof selections, but they haven’t submitted them yet, which is helpful if the proofing process requires a number of “rounds” before a finalized order.
Click on any order to see which photos were selected and any added notes. You can also click the Create Gallery button to instantly generate a new gallery with the client’s chosen photos.
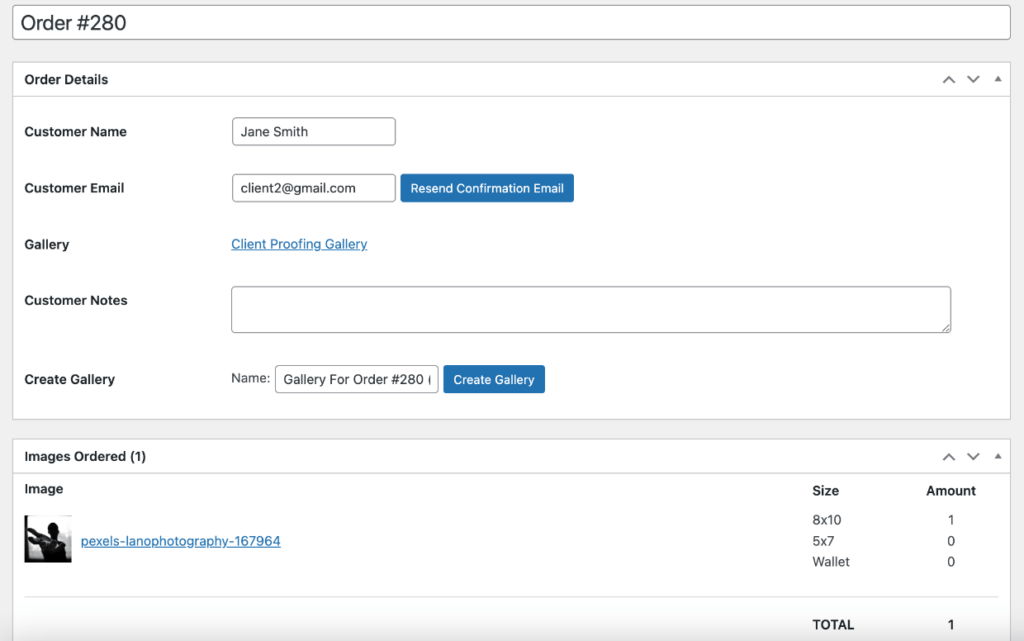
That’s it! As you can see, Envira Gallery makes creating a client gallery for photographers to proof images super easy.
Frequently Asked Questions
- Can I customize the appearance of my client proofing gallery?
- Yes! Envira Gallery offers numerous customization options, including different layouts, gallery themes, lightbox styles, custom CSS, and more. Experiment with the settings to create a look that matches your brand and website.
- Is it possible to watermark the images in my proofing gallery?
- Absolutely. Envira Gallery’s Watermarking Addon allows you to automatically apply custom watermarks to all images in a gallery while preserving the original files. You can easily add your logo or any text and customize the appearance to your liking.
- How can I view and manage proofed photos and client comments?
- Envira Gallery stores all client favorites and comments as custom post types in your WordPress dashboard. You can easily view and manage this feedback by navigating to Envira Gallery Orders in your admin area.
- Are client proofing galleries mobile-friendly?
- Yes! Envira Gallery is fully responsive, ensuring that your proofing galleries look great and function smoothly on any device, from desktop computers to smartphones and tablets.
Creating a client gallery and proofing images online doesn’t have to be a hassle. You can easily set up a professional, user-friendly proofing experience, streamline your workflow, impress your photography clients, and simplify the process of finalizing image selections.
Not using Envira Gallery? Get started today!
We hope this tutorial helped you set up a client gallery to proof images on WordPress. You may also want to check out our guide on How to Allow Users to Download Gallery Images in WordPress.
Don’t forget to follow us on Facebook and X (Twitter) for the best photography tips, resources, and WordPress tutorials.

