Envira Gallery Blog
Digital Photography Tips, Tutorials and Resources
Digital Photography Tips, Tutorials and Resources

Last updated on Feb 8, 2024 by Southie Williamson Reader Disclosure
Are you a professional photographer eager to turn your captivating images into a lucrative online business? Unlock the potential of your photography by learning how to sell photos on WordPress.
In this comprehensive guide, we’ll walk you through the process of creating a stunning WordPress image gallery and seamlessly integrating it with WooCommerce. You’ll be ready to sell photos on WordPress in no time!
Yes, you can sell photos on WordPress. Several WordPress plugins are available to facilitate selling your photos online. For example, Envira Gallery is an excellent plugin for photographers as it allows you to set up gorgeous gallery displays and sell your digital files directly from your WordPress site using native WooCommerce integration.
Setting up your own WordPress site to sell photos or other digital goods such as music, ebooks, digital art, videos, and digital designs gives you full control over your products and allows you to keep 100% of the profits by avoiding platform fees or commissions.
Every independent photographer knows that, to be successful, you have to find a way to monetize your image catalogue. With the right tool, you can post your collection of photos on your WordPress photography website and start earning a substantial income!

With over 3 million users, Envira Gallery is the best WordPress gallery plugin. The plugin streamlines your workflow, allows you to create beautiful, mobile-friendly image and video galleries, and offers powerful client proofing and eCommerce features for selling photos.
Check out some of the reasons photographer’s love Envira Gallery:
“I’ve been using Envira Gallery for a few years now, and it has been worth every penny – they are continually adding new features and improving the software, even 5 years after I started using it.” – GACREE, Envira Gallery Pro User
So, are you ready to start using WordPress to sell photos and earn some extra dough? By the end of this tutorial, you’ll have created a WordPress image gallery that allows users to easily purchase your media via an “Add to Cart” button.
The first thing you need to do is install and activate the Envira Gallery plugin. Then we’ll show you how to create customized image galleries that are tailored for your WordPress site, and draw in potential customers.
Head to the pricing page and grab a license (you’ll need Pro or above to access eCommerce features). Next, download the plugin and install it on your WordPress site. Make sure to click Activate after you install it.
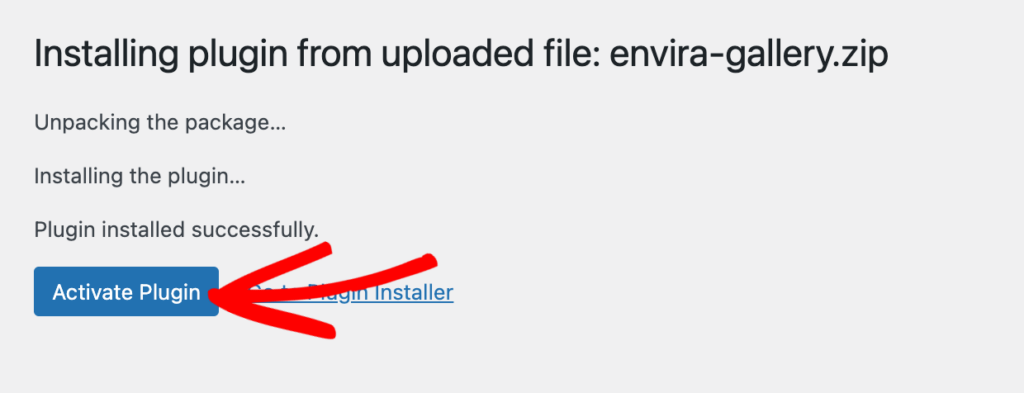
Read our guide to learn how to install Envira Gallery if you need more help.
Next, you need to enter your license key (found in your account area on the Envira Gallery website or your purchase confirmation email.) Go to Envira Gallery » Settings on your WordPress dashboard, paste your license key, and press Verify Key.
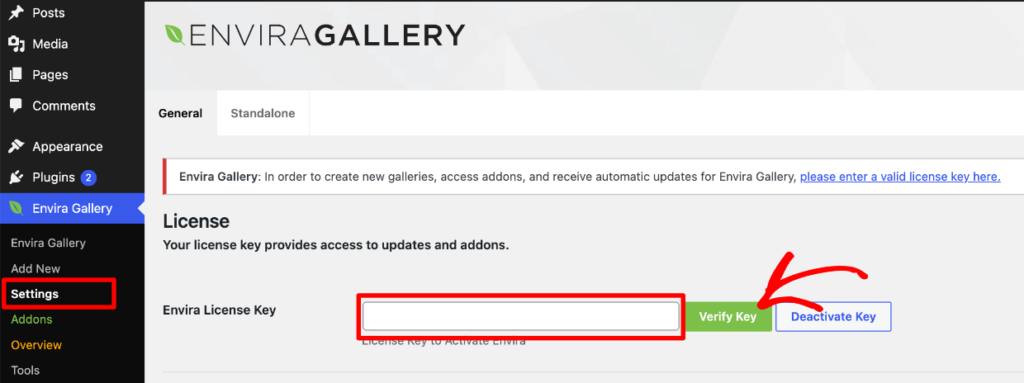
Once the plugin is activated and your license is verified, you can move on to the next step where we’ll show you how to set up WooCommerce, so you can start selling photos!
First, you need to get the Woo plugin if you don’t already have it. Although you can purchase premium addons and plugins for Woo, the base plugin is completely free and has native integration with Envira Gallery.
To install the plugin, go to Plugins » Add New Plugin, and search for “WooCommerce.” When you see it, click Install Now and then Activate when the button changes.

After that, you’ll be guided through the WooCommerce set up wizard where you’ll need to provide a few details like your business name and location.
Then, you can go through the handy setup checklist to customize your store options and other settings.
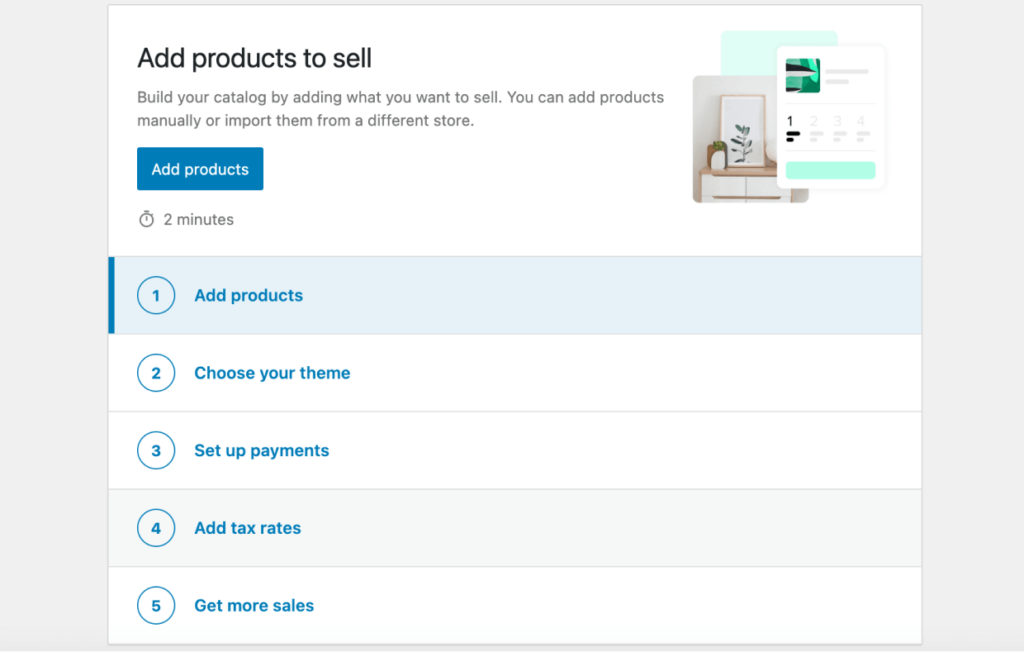
Note: You should prioritize installing WooCommerce and setting up/customizing your WooCommerce store before linking any photos with Envira Gallery. You can learn more about setting up your online store and products in Woo’s documentation.
Now, we’ll create a new product draft to use as a template for each digital photo you’re going to sell. You can do this during the Add Products step in the Woo setup wizard or by clicking Products » Add New in your WP menu.
Enter a product name such as “Digital Photo Template.” Add a product description and any other data you want applied such as tags or categories.
Then, scroll down to the Product data section and check the boxes next to Virtual (not linked to a physical product) and Downloadable. Now, add your pricing, but leave the Downloadable files section blank.
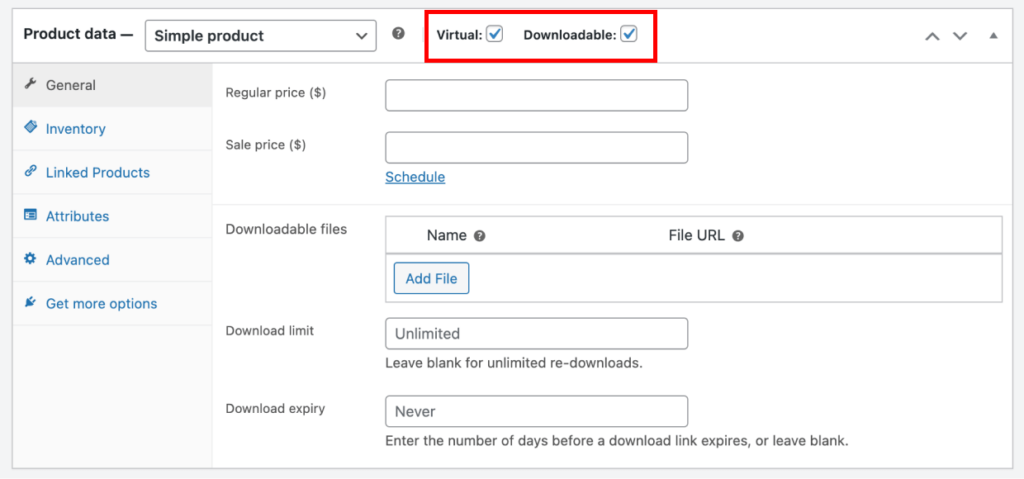
If you’re offering variations on your digital photos such as different sizes or formats, you can change the dropdown next to Product data to Variable product. Then, add your variations with their respective prices using the Attributes and Variations tabs in the left menu.
Once you’re done creating your Woo product, click Save Draft.
Next, you need to install the WooCommerce Addon for Envira Gallery. Head to Envira Gallery » Addons and scroll down until you see the WooCommerce Addon.
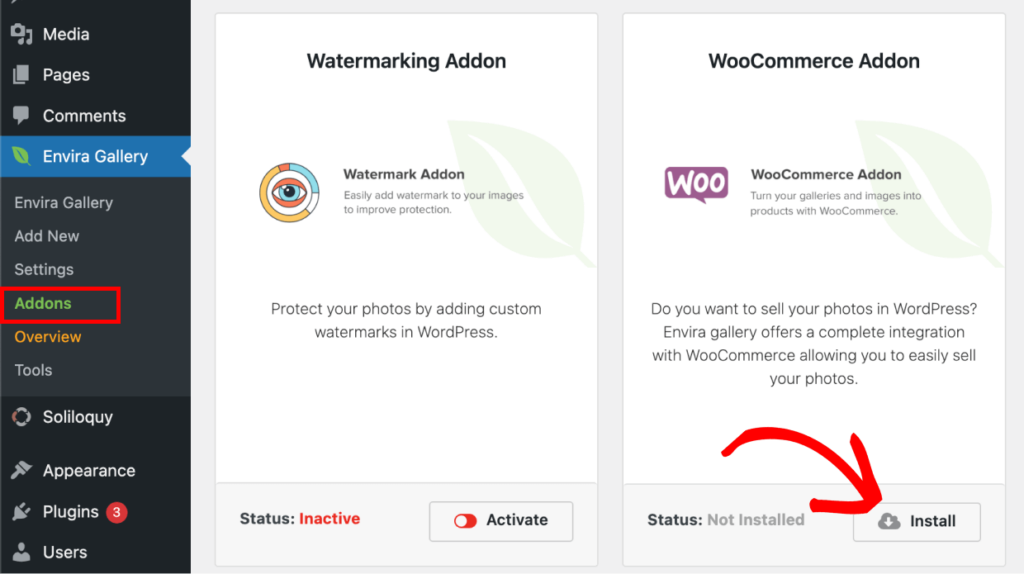
When you see it, click Install Now and then Activate.
From your WordPress admin dashboard, click Envira Gallery » Add New. Go ahead and give your new image gallery a unique title.
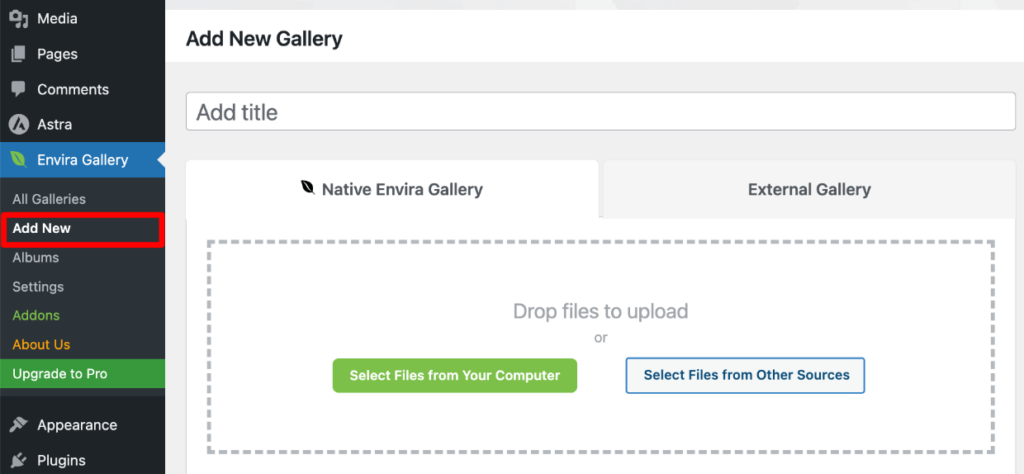
Then, before adding any images, scroll down the page to see the customization options for your gallery. With the addon now activated, you’ll see a WooCommerce tab in the list of customizations.
Check the box next the Automatically Create WooCommerce Products? and select the Woo product draft you just created as the Default Product Template. You’ll need to check the box(es) to Enable WooCommerce on either or both of the Gallery and Lightbox options.
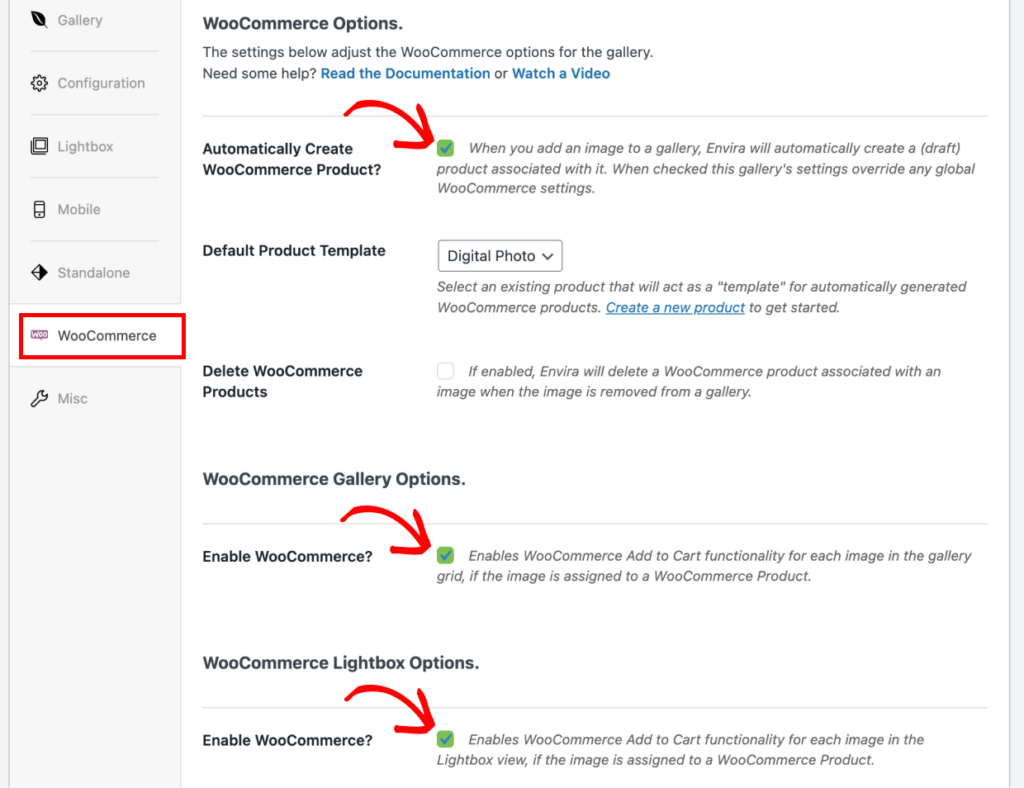
If you’d like, you can also choose to automatically delete WooCommerce products when the associated image is removed from the gallery.
After turning on the WooCommerce options, click Publish.

After the gallery is published, we’ll add images from your computer or WordPress Media Library to populate the gallery.
Once you’ve published the gallery with automatic WooCommerce products enabled, use the options in the Native Envira Gallery tab to import your photos.
Note: You’ll want to be sure the titles of the photos you add are correct since that’s what will be used as product names.
After adding your images, you can scroll down to see the images you added.

You can click the pencil icon to modify the meta data for each photo. Do note that you’ll see a WooCommerce product option in the meta popup. Since we’re automatically creating new Woo products for each added photo, we’ll leave this unset. However, if you wanted to assign photos to products individually, this is where you would do it.
Using the left sidebar menu you can select a gallery layout under Configuration and customize other settings.
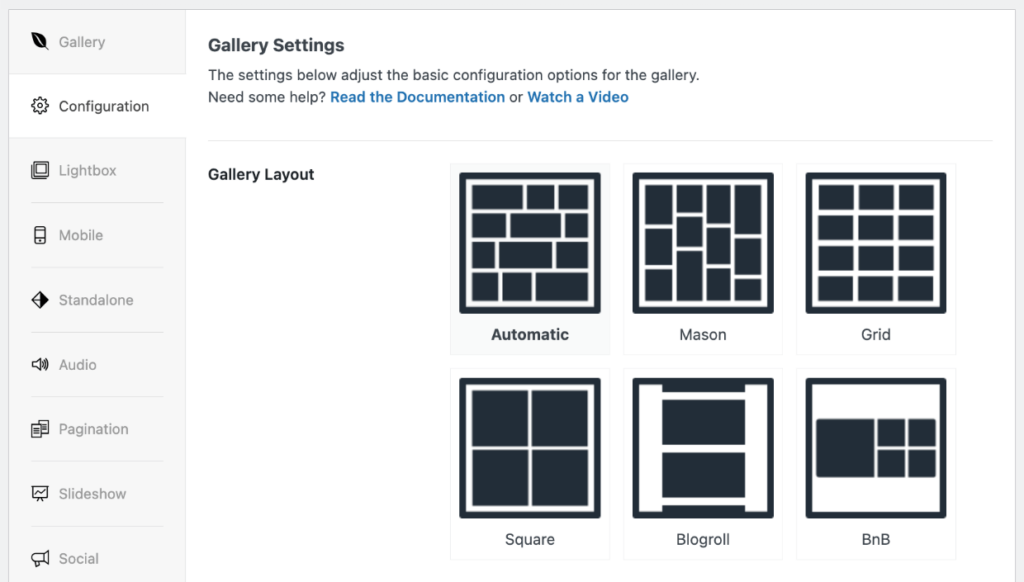
Depending on which addons you have installed, you’ll see a number of other display settings you can adjust in the customizer panel. For the sake of this tutorial, we’re not going to go over all of them, but you can learn more in our documentation.
When you’ve added your photos and customized the gallery, go ahead and press Update in the top right to save your changes.
Now, go back to your Woo products to see all the photos you added to the gallery listed as new product drafts.
Each product’s name will reflect the uploaded photo’s title and have all the same info that you added to the template draft such as price, description, etc.
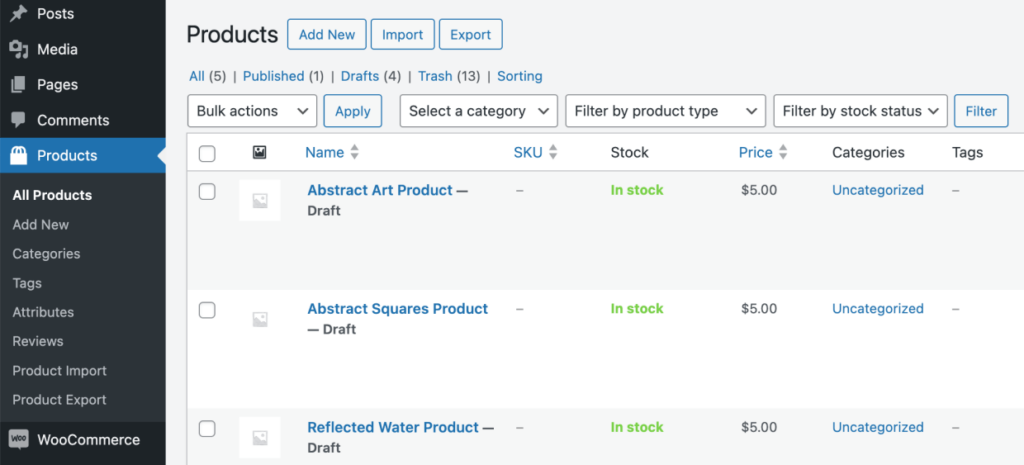
Unfortunately there isn’t a way to automatically add each photos download file link to Woo, especially since many photographers store the full size images somewhere external like a Dropbox or Google Drive. So, you’ll need to add the correct post-purchase download link to each product.
If needed, you can adjust pricing, tags, categories, etc. on all or multiple products at once using Woo’s Bulk Edit feature. You can also use this feature to publish multiple products at once by changing the Status to Published.
After you’ve added the correct download file for each photo and published your products, it’s time to add the gallery to your site and start selling photos!
Choose the post or page where you want your gallery to appear and select Edit. Alternatively, you can place your gallery on a new page or blog post by selecting Post/Page » Add New.
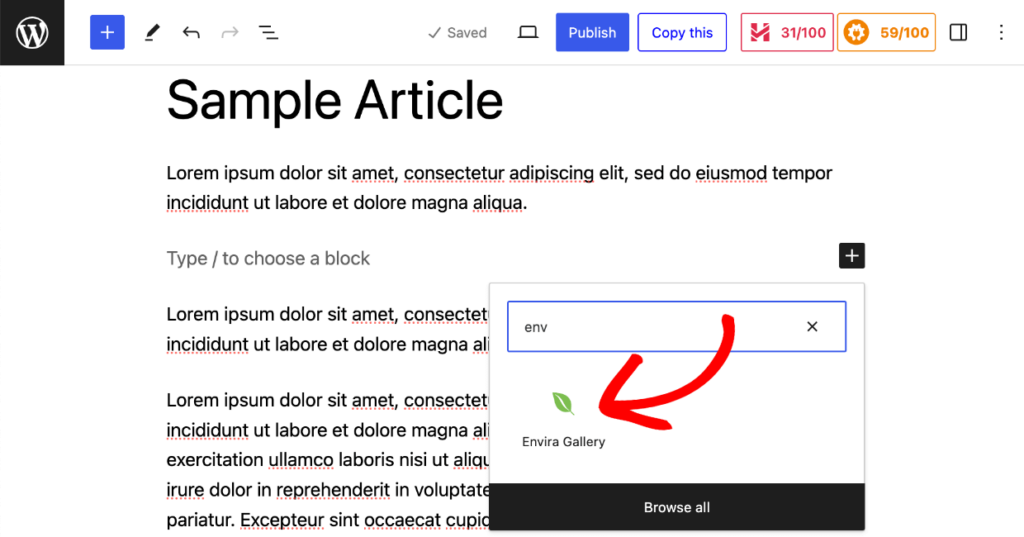
Click the + sign to add a new block wherever you would like it, and search for/select Envira Gallery.
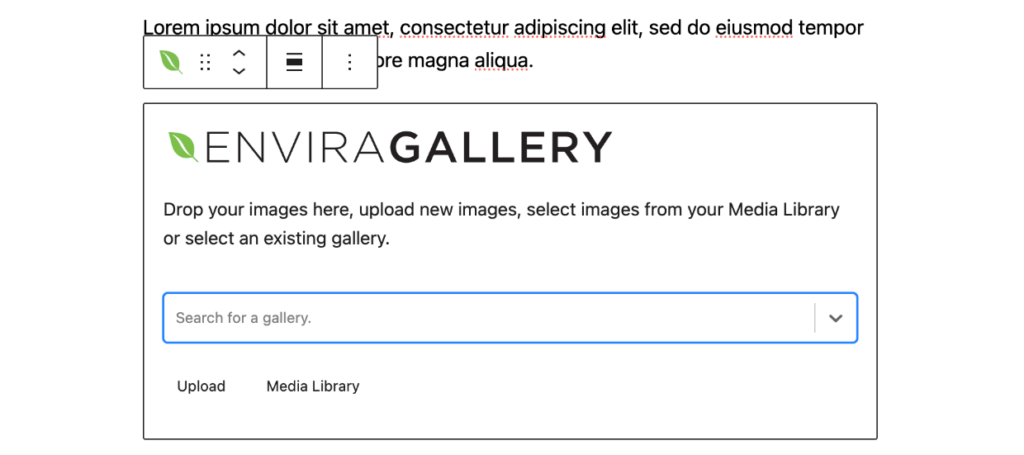
Then, use the dropdown menu inside the block to select the gallery you created for selling photos.
Finally, press Update to publish your changes.
Note: You can also add a gallery to a widget area using the Gutenberg blog, or place it anywhere on your site using the respective shortcode.
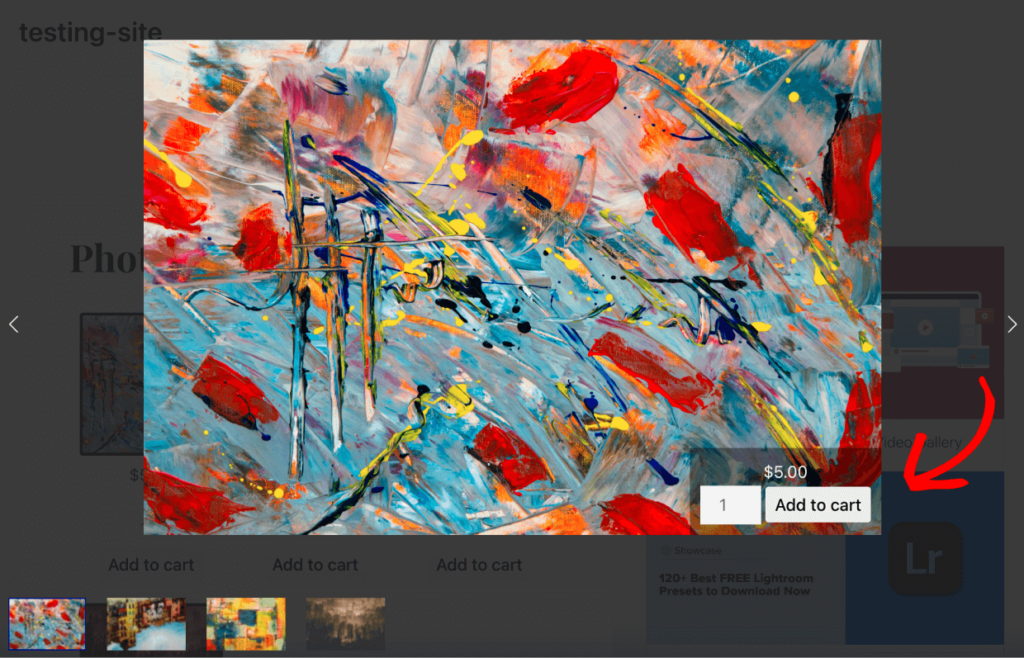
Lastly, go to your website to see how it looks! You’ll now see an Add to Cart button on images in your Gallery and/or Lightbox depending on what you enabled.
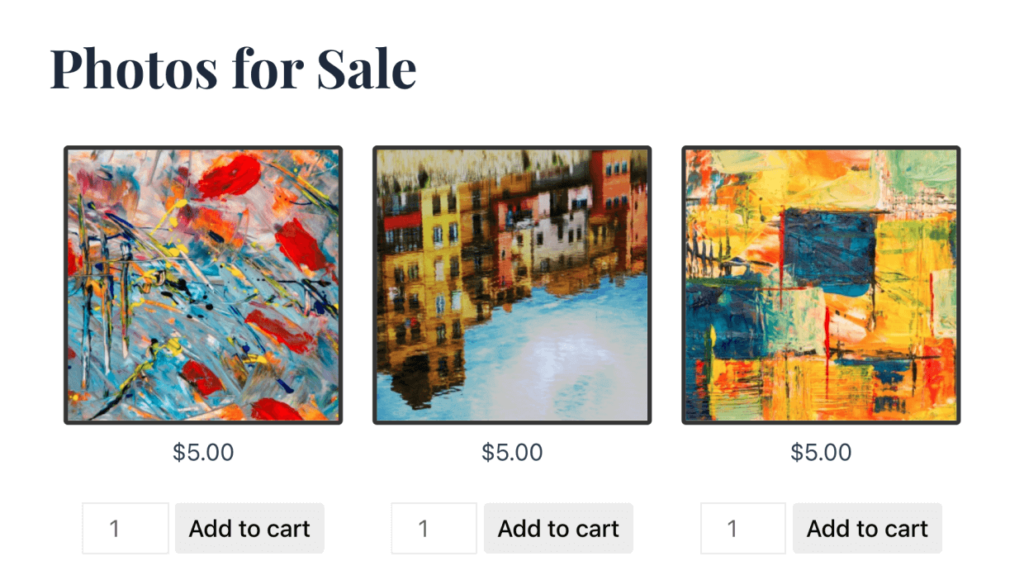
When your customers add an image, they’ll find it in their shopping cart, ready to purchase.
Pro Tip: You can use the Gallery Themes Addon to change how your photos and add-to-cart buttons look. Or, use the custom CSS Addon to style it up further.
That’s all! We hope this article has helped you to learn how to sell photos on WordPress.
Yes, you can make money selling digital photos. There are various platforms and methods available to sell your digital photos online. However, the best way to maintain control of your photography, artwork, or digital designs while maximizing profit is by selling digital products on your own website. Envira Gallery makes it easy to sell photos online with your WordPress website, even for beginners!
Selling photos from your own site can be very profitable once you build up a large collection.

Thad A.
Digital Marketing Expert, Design Entrepreneur,
and eCommerce Specialist
You can use other stock sites like Etsy and Adobe Stock to sell photos, but the profits may be limited. If you’re wondering which stock photo sites pay the most, head over to our guide on the Best Places to Sell Photos Online & Make Money.
Yes, the WooCommerce addon works the same way with Albums! You can turn on WooCommerce for your album and assign galleries to products or have Envira automatically create a new Woo product whenever you add a gallery to the album. Then, customers can view your album and add gallery collections to their cart.
If you’re selling each photo as an individual digital download, you need to have a separate Woo product for each one. However, you can assign a product draft to use as a template and let Envira Gallery automatically create new products for every photo that’s added to that gallery. That way, all the products will already be created with the title of the photo in place of the product name. They’ll also already have all the data you put in the draft template such as pricing, variations, and a description.
Unfortunately, you will still need to add each product’s download link, so that customers get the correct individual photo after purchase. That said, it’s still much faster than making a completely new product for every photo.
Yes, you can select all or multiple images in a gallery and press Edit. Then, use the WooCommerce product dropdown to assign all the photos to a specific product. This is a great option if you’re selling a photo that can be ordered in a variety of ways such as a physical prints, posters, digital copies, or tapestries. Just assign photos of all those different items to the same product and allow users to make their selection using separately priced variations.
WooCommerce has a built-in variable product option, which allows you to offer multiple options on the same product. For example, you may want to offer customers the option to buy your printed image with either a matte or glossy finish, or order the photo as a print in different sizes. Use the Attributes and Variations sections under Product data to add options to a product and edit pricing for different variations.
Absolutely! You can link galleries to your WooCommerce products to create beautiful product displays. While editing a gallery, click the blue pencil icon on any photo to open the Edit Metadata box. Here, you can use the WooCommerce product dropdown menu to assign the photo to any product in your store. You can also use the Select All option to assign multiple photos in a gallery to the same product.
You made it to the end!
Starting an online photography business can be a rewarding experience for both beginner and professional photo sellers. Having your own WordPress website from which customers can purchase photos directly means more money in your pocket and more eyes on your work.
Now that you’ve learned how to sell photos on WordPress, check out these other guides to help you get started:
Not using Envira Gallery? Get started today!
Don’t forget to follow us on Facebook and X (Twitter) for the best photography tips, resources, and WordPress tutorials.
Envira Gallery helps photographers create beautiful photo and video galleries in just a few clicks so that they can showcase and sell their work.
