Do you want to use WordPress custom image sizes? WordPress generates additional image sizes whenever you upload a photo, and your theme may also include images different from the default WordPress image sizes.
It can take a lot of time to edit your image and thumbnail sizes manually, and the extra image sizes that are automatically generated can take up space on your hosting server.
In this tutorial, we’ll show you how to stop WordPress from generating image sizes and how to add custom image sizes to your WordPress theme.
How to Prevent WordPress from Generating Image Sizes
When you upload an image to WordPress, it creates three default sizes: thumbnail, medium, and large. However, WordPress themes may also generate other image sizes.
Step 1: Check How Many Sizes Are Being Generated
To check how many image sizes are being generated, go to Media » Add New and upload an image.
Now, connect your site using an FTP client or cPanel. Go to the /wp-content/uploads/ directory. You’ll see all the uploaded photos sorted by year and month.
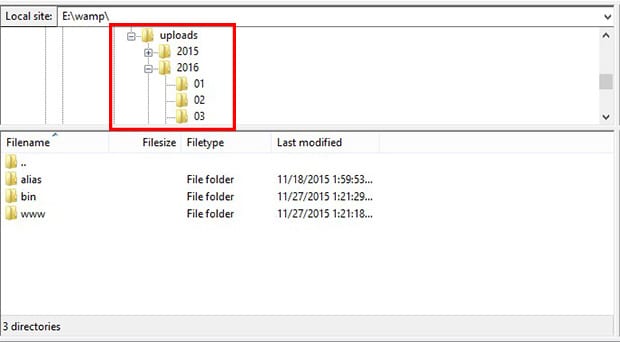
To learn more, check out Where Does WordPress Store Uploaded Images.
Now, you can see the number of copies generated by WordPress.
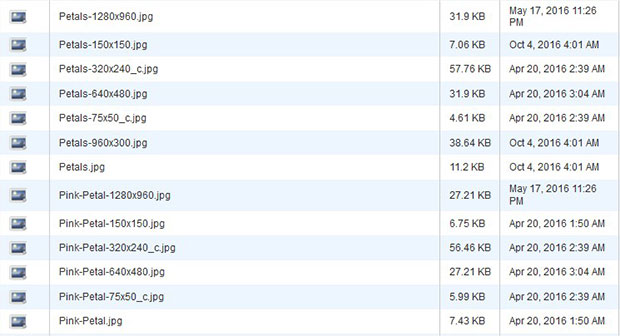
In our case, WordPress is generating 6 extra sizes for each image uploaded. These include the 3 default WordPress sizes and 3 sizes generated by our particular WordPress theme.
Step 2: Stop WordPress from Scaling & Generating Images
To stop WordPress from creating multiple default image sizes, go to Settings » Media. Then, change the values to 0 for the sizes you wish to disable.
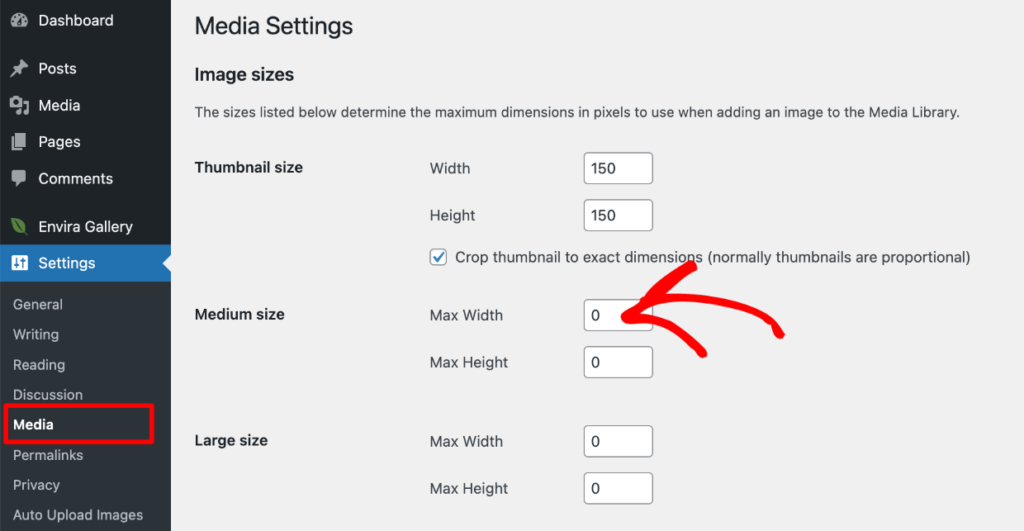
Press Save Changes at the bottom. With that, we’ve taken care of the default sizes generated by WordPress, but 3 sizes are still coming from our theme.
Step 3: Disable Image Sizes in Your WordPress Theme
To prevent your theme from generating other image sizes, go to Appearance » Editor and edit the functions.php file of your theme.
NOTE: Always proceed with extreme caution when editing your theme file directly, as any mistakes can break your site.
In this file, you will see a few lines of code that look similar to this:
set_post_thumbnail_size( 1200, 9999 );
add_image_size('homepage-thumb', 220, 180, true );
These functions, like set_post_thumbnail_size and add_image_size, are used in your theme’s file to create additional image sizes. Simply delete these lines of code to prevent your WordPress theme from making additional copies of your images.
That’s it! You can change your WordPress thumbnail sizes by editing these functions in your PHP file, but we’ll go over more about that in the next section.
How to Generate Custom Image Sizes in WordPress
The first thing you need to do is go to Appearance » Editor to edit your functions.php file. The majority of themes support post thumbnails, also known as featured images.
However, if you’re building a custom theme, you’ll need to add support for a post-thumbnail image size. Add the following code to your theme’s functions.php file:
add_theme_support( 'post-thumbnails' );
This code will enable support for post thumbnails, so you can use the built-in function, add_image_size(), to add your custom image sizes.
Step 1: Register Additional Image Sizes For Your Theme
Next, add your custom image sizes using the format below (double click the code to edit it and enter your own values):
add_image_size('name-of-size', width, height, crop mode );
Here are some examples:
add_image_size('post-thumbnail size', 800, 240, true ); // Hard Crop
add_image_size('homepage-thumb size', 220, 180 ); // Soft Crop
add_image_size('fullpage-thumb size', 590, 9999 ); // Unlimited Height
As you can see, we added a ‘post-thumbnail size’, ‘homepage-thumb size’, and ‘full page-thumb size’ to our theme. These are just the names we chose, but you can use any names you want for your image sizes.
Then, we designated the width and height. The first value is the width, and the second is the image height.
- Hard Crop Mode: In the example above, we added a ‘true’ value, which will crop the image to the exact size (800px by 240px in our case). This results in uniform images that are all the same size.
- Soft Crop Mode: Soft cropping is the default setting. Typically, it will resize the image by the width you set and keep the height proportional, using the height value as a maximum. This results in images that are the same width but may vary in height depending on the proportions of each image.
- Unlimited Height Mode: Setting a height value of ‘9999’ allows you to specify the width of images without limiting the height. For instance, this is useful for long infographics you want to fit to your content width.
Go ahead and customize these variables to whatever sizes you need for your particular theme, and Save your changes.
Step 2: Display Custom Image Sizes in Your Theme
Now that you’ve added your custom image sizes, it’s time to display them in your theme.
Simply edit the theme file where you want to display your custom image sizes and add the following code:
<?php the_post_thumbnail( 'your-specified-image-size' ); ?>
Change ‘your-specified-image-size’ to the name you assigned to your custom image size in the previous step. You’ll need to paste this code inside the post loop of your theme file. Then, repeat this process for any additional image sizes you want to display in your theme.
Don’t forget to press Save. You can add custom styling to ensure the images match your site, but this is all that’s needed to display additional image sizes in your theme.
Step 3: Regenerate Custom Image Sizes for Previous Photos
Even though you now have custom image sizes, these changes won’t affect any images that were previously uploaded to WordPress.
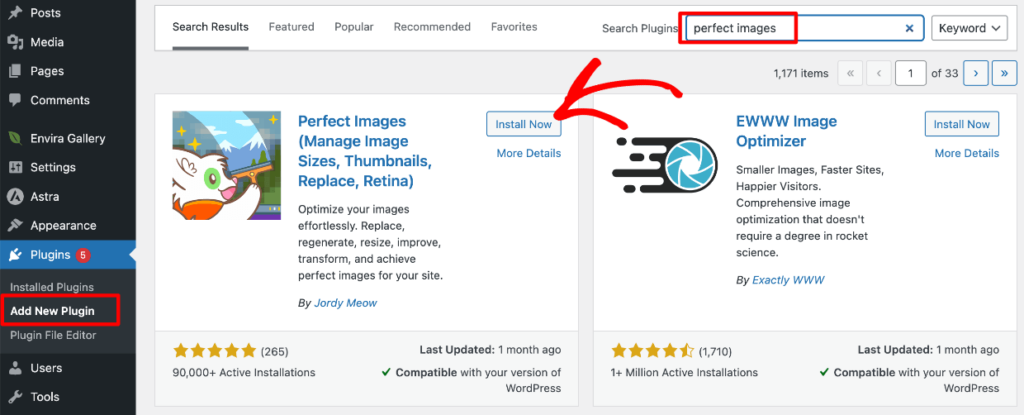
So, you’ll need to regenerate those thumbnails. The easiest way to do this is with a plugin like Perfect Images. It will regenerate all of your post thumbnails and retina images to the new image sizes and update the metadata for your photos.
Go to Plugins » Add New. In the search bar, type Perfect Images. When you see it, click the Install Now button and then Activate when the button changes.
Once the plugin is activated, go to Media » Perfect Images and wait for the plugin to scan your WordPress Media Library.
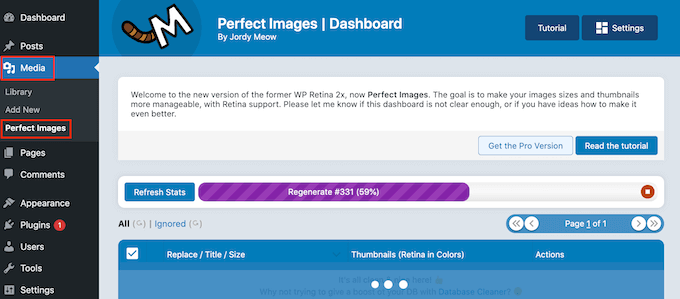
After it’s done, click the dropdown menu that says Bulk Actions and choose Regenerate All Entries.
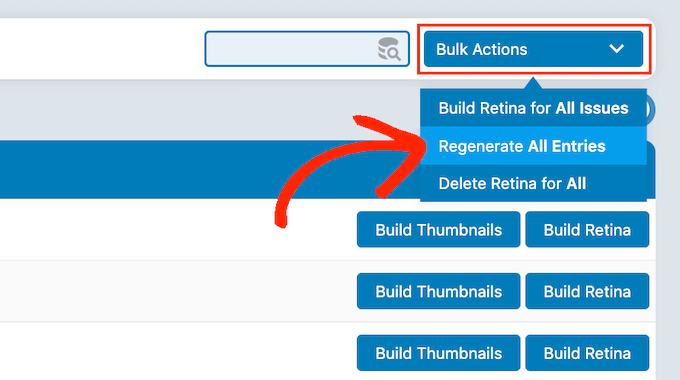
Now, all of your previously uploaded images will have regenerated thumbnails with the correct dimensions.
Step 4: Enable Custom Image Sizes For Your Post Content
We added custom image sizes to our theme files in the above steps. Next, we’ll apply these custom image sizes to post content.
In order to use your new image sizes in the WP content editor, add this code to your theme’s functions.php file:
function wpb_custom_image_sizes( $size_names ) {
    $new_sizes = array(
        'homepage-thumb' => 'Homepage Thumbmail',
        'singlepost-thumb' => 'Infographic Single Post'
    );
    return array_merge( $size_names, $new_sizes );
}
add_filter( 'image_size_names_choose', 'wpb_custom_image_sizes' );
When you finish, remember to press Save. Now, your custom image sizes will be available for post content, so you can insert photos into a post using your custom sizes.
Optimize Your Image Sizes with Envira Gallery
While managing custom image sizes in WordPress can be tricky, using Envira Gallery makes this process much simpler. Envira Gallery offers easy image resizing options, allowing you to choose the exact image sizes that work best for your galleries without the need for custom coding.
Plus, Envira Gallery ensures your galleries are fully responsive and optimized for faster load times. Plus, it’s packed with powerful features such as:
- Drag-and-drop builder with multiple layouts, including slideshow, fullscreen, masonry, lightbox display, and more.
- Built-in image compression
- Tags to organize images and create filterable galleries
- Video galleries
- Dynamic galleries to display content from other sources like blog posts, testimonials, Instagram posts, and more.
- Social sharing buttons on images, galleries, and albums
- And lots more!
Ready to take your WordPress images to the next level?
Get started with Envira Gallery today →
That’s all. We hope this article helped you to learn how to add custom image sizes in WordPress and stop WordPress from creating multiple image sizes. You may also want to check out our guide on How to Create a WordPress Featured Gallery to Highlight Content.
Not using Envira Gallery? Get started today!
Don’t forget to check out our blog and follow us on X (Twitter) for the best photography tips, resources, and WordPress tutorials.








This is very cool. One question I have is if I add the extra image sizes as you suggest in step 2, will this then allow Wordpress to choose which size to display based on screen resolution? If the site is responsive then the image size required would surely change for mobile, tablet and desktop. Apologies if this is too noob!
Hello Charlie, thanks for liking the tutorial. If your theme is responsive, then WordPress will automatically adjust the images according to content’s width. 🙂
Thank you very much, its work for me.. great post 😀
Hey Jhonny, we are glad it worked for you. Do follow us on Facebook and Twitter for more free WordPress guides and resources. 🙂