Photo manipulation is a complex slice of the photo editing world. Known also as photo compositing, this term applies to a vast amount of actions you can take to combine two images. By practicing photo manipulation, you can learn how to merge a picture with a background in Photoshop.
This article covers:
- Effects of Merging a Picture with a Background in Photoshop
- Easiest Ways to Merge a Picture with a Background in Photoshop
- Steps to Merging a Picture with a Background in Photoshop
- Best Tutorial for Merging a picture with a Background in Photoshop
To learn how to remove a background in Photoshop, you’ll need to have downloaded Photoshop. If you don’t already have it, you can get it through Adobe’s Creative Cloud Plan. This bundle also includes Lightroom for a total of $9.99/month.
Effects of Merging a Picture with a Background in Photoshop
The effects of merging a picture with background in Photoshop CS or Photoshop CC can vary vastly. It all depends what you want your final image to look like. You can blend images together through photo manipulation to create a realistic effect, and also to create a creative effect.
Blending Multiple Images Together in Photoshop
Smoothly combining two images together is easy with Photoshop’s Blending Modes. These Blending Modes allow you to combine multiple images to eliminate color, blend, or create a transparent background.
Photoshop has many types of Blending Modes to choose from that can give realistic or creative effects to an image. With Blending Modes, you can combine images with separate backgrounds or superimpose two images any way you like.
If you’re looking for an alternative to Blending Modes, Photoshop’s Layer Mask will do the trick. This mask allows you to temporarily erase areas of the photograph so the layer underneath shows through.
In some instances, the Layer Mask is the more helpful route, but in many cases, a Blending Mode can finish the job quicker.
Merging Images Without Losing Image Quality in Photoshop
The most important aspect to keep in mind when manipulating photos is the quality of the photograph. If your image contains small objects of lower quality resolution, then your final edit will not look realistic.
Converting your images into Smart Objects can prevent them from losing their detail when you resize them.
Before you even begin editing, check the resolution of your document. Typically, you’ll want your resolution to stay at the pre-programmed 300 — unless your final product is for a website. If you’re creating a web image, change your document resolution to 72.
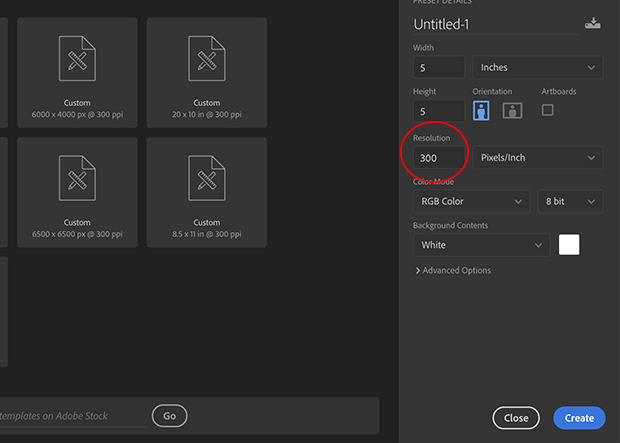
Mixing resolutions in a document can make a project trickier, so always know what the resolution of your image is. If a Smart Object can help your editing, don’t hesitate to create one.
Easiest Ways To Merge A Picture With Background In Photoshop
Photoshop provides multiple different ways to combine photos together during image editing. But, the question is, which processes are the easiest? Knowing the right file formats and tools to use is key to making photo manipulation fast and easy.
Simplest Way to Seamlessly Combine Images in Photoshop CC
Combining photos either realistically or by superimposing can seem intimidating, but there are many simple ways to execute this process. Photoshop provides options including Blending Modes that allow you to choose how to combine your photos. Using Blending Modes is the easiest way to merge a picture with background in Photoshop.
Other alternatives, like Photoshop Elements, might be an easier approach to photo manipulation for beginners than learning Photoshop CS or Photoshop CC. Photoshop Elements is essentially a simplified version of Photoshop, but isn’t as widely used.
Starting with Photoshop Elements can be useful, but you should consider upgrading once you’ve mastered the simplified.
If you’re new to Blending Modes, play around with them for a bit. Select different modes to see how creative a they can be. Discover which program process works best for your editing routine.
To use Blending Modes, select the Blending Modes options in the Layers Panel on the right side of the workspace. When you do, a drop-down menu reveals a number of different Blending Modes to choose from.
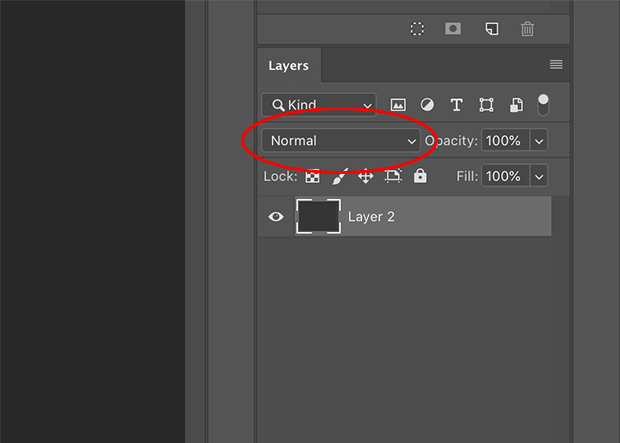
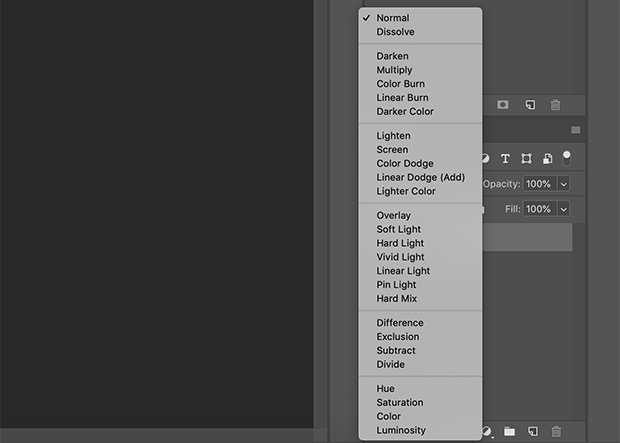
Every image editing situation will require a different Blending Mode, so the only advice I can give is to try them all!
The Best Image Format for Photo Editing
When completing a project in Photoshop CC, saving the file in a certain format does differentiate how to file will appear. Typically, the most common file format used when image editing is JPEG. Using this format is not discouraged, but depending on how you plan to use your edited photograph, you should consider saving your project in other formats, too.
Tagged Image File Format or TIFF, is a larger formatted file that allows a higher number bit count. TIFFs also compresses your files, and then allows you to reopen them in Photoshop in separate layers. This file format is the most advisable when compressing a file.
Although JPEG can be compressed into a smaller file size, TIFF files can be vastly larger than JPEGs, so they have better resolution and are more highly editable.
To save a file as TIFF, locate the top of the workspace and select File >> Save As…
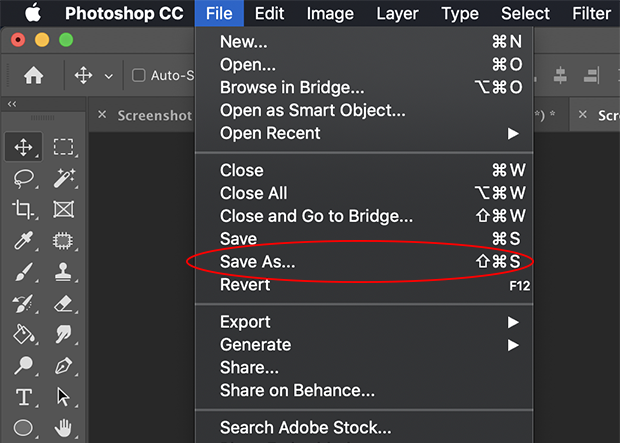
Once the Save As…window appears, select the Format drop-down menu.
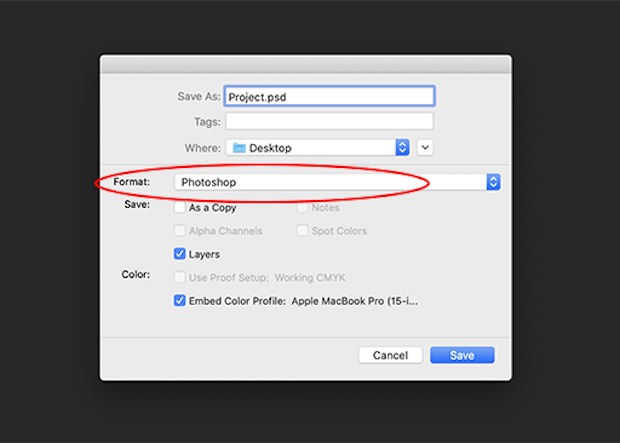
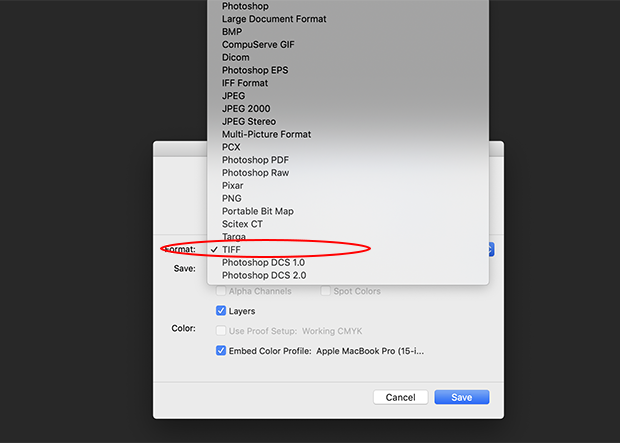
Lastly, select TIFF in the drop-down menu and click OK.
Steps for Merging a Picture with Background in Photoshop
So, how do you merge a picture with a background in Photoshop? Learning the important steps will help speed up your editing workflow. Whether you’re merging a photograph with a transparent background or solid background, using Blending Modes or Clipping Masks will make the job simple.
Tools for Image Merging in Photoshop
Working with all of the different types of tools that Photoshop provides can be overwhelming at times. Understanding the correct process and which tools to use for merging images will make a your process faster.
Smart Object and Blend Modes are the two most-used tools for merging images in Photoshop. The following method is one of the easiest ways to merge a picture with background in Photoshop.
First, open a photograph into Adobe Photoshop.
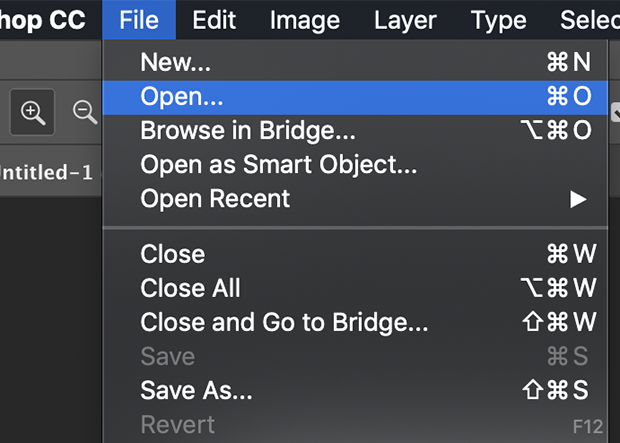
Now, drag and drop a new photograph into the project. This file will appear on top of the main background.

Select the new layer and right-click with the mouse to view a drop-down menu. Select Convert to Smart Object.

The photograph must be converted into a Smart Object before it’s scaled. As mentioned above, Smart Objects retain their visual information better than other formats. If you don’t convert your image, your photograph may appear pixelated after you scale it.
After you convert the image, small icon will appear in the corner of the layer preview indicating that the file is now a Smart Object.

Scale the image to your desired size by choosing Edit at the top of the workspace. Then select Free Transform.

Once you’ve sized the photograph how you want, hit the Enter button of the keyboard.
Now, click on the Blending Mode tab in the Layers Panel.

Mouse over all the different Blending Mode options to preview how each one looks. I’ve selected Darken as the blend mode for this set of images.

Here’s the final product:

Creating and Merging Layers in Photoshop
No matter the type of image editing you are performing, layers will always be useful. Working within one layer in Photoshop is risky and can make your work feel one dimensional. A Clipping Mask, also referred to as a Clipping Path, forces selected files to only be viewed within the distance of the layer beneath it.
Photoshop lets you know you’ve created a clipping mask with an arrow attached to the mask and pointing to the image it is masking. Using a clipping mask will make it easier to apply certain layers to specific areas instead of having to complete alternative steps.
First, open a photograph into Adobe Photoshop.
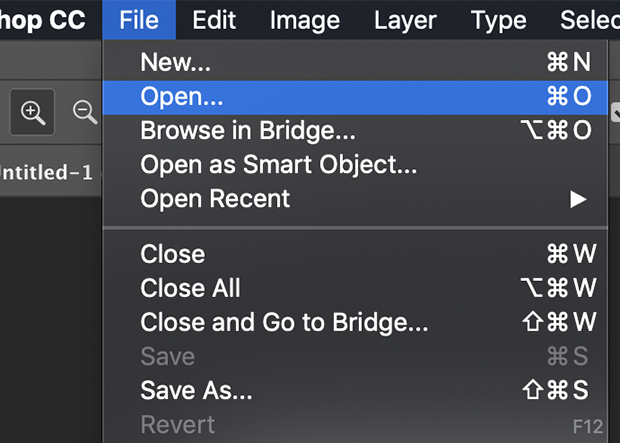
For this project, I want to replace the photograph in the frame with a different image.
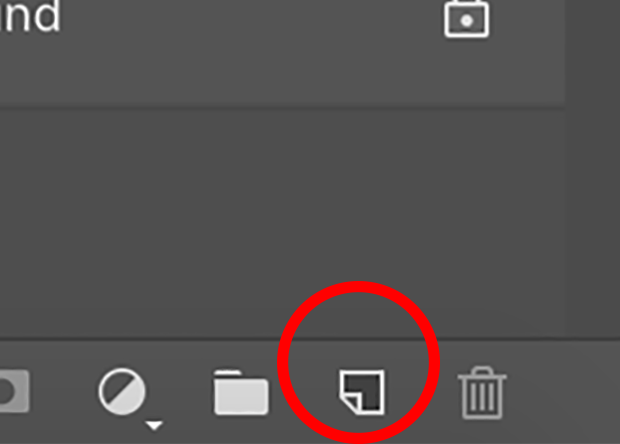
Create a new blank layer by selecting the square-shaped symbol at the bottom of the Layers Panel.
To create a placeholder for the photo, I’ll locate the Rectangle Tool on the left side of the workspace.

If the Rectangle Tool is not the defaulted tool, hold down the mouse to view a more extensive drop-down menu, and then click on the Rectangle Tool.

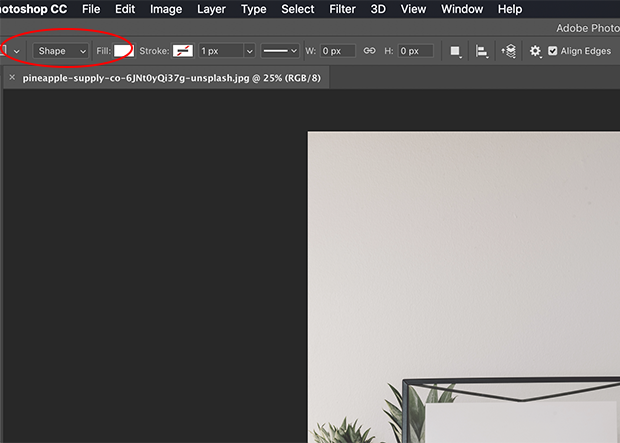
Find the Rectangle Tool options bar at the top of the workspace.
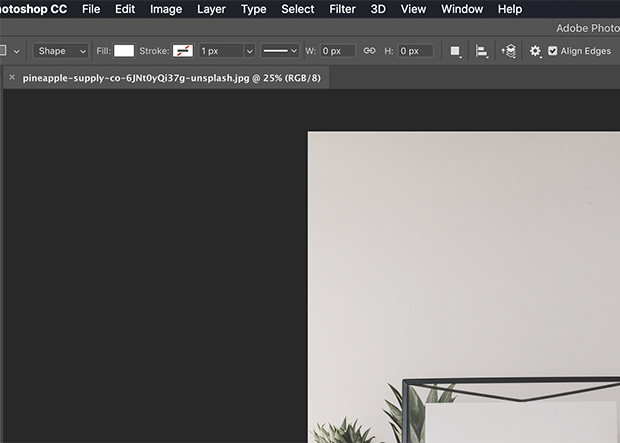
Since the frame is the area I want to fill with a new photo, I’m going to select Shape as the tool mode.
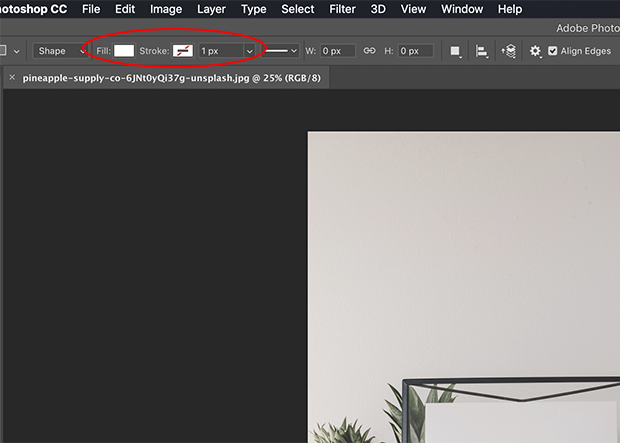
Set Fill as White, Stroke as None, and the Shape Stroke Width to 1 px. In this case, the coloring is not an important choice because it will be used as a filler.
Now, drag and drop a new photograph into the project.

To scale the image down to a smaller size for the frame, locate the top of the workspace. Then select Edit >> Free Transform. Now, you can manipulate the size of the image.

Scale the image down so that it covers the framed area.

Once you’ve scaled the image, position the mouse in between the new photograph and the white rectangle. On the keyboard, hold down the Option button to reveal the Clipping Mask cursor. In the Layers Panel, the Clipping Mask appears as a down arrow and a box.

With the cursor visible, click in between the layers to link them together. A down arrow will appear on the above layer indicating that they layers are now linked.

The image photograph now appears in the frame.

If the photograph still needs to be adjusted, select the Move Tool and click and drag the mouse until the photograph is positioned where you’d like.

How do You Alter Layers in Photoshop?
One of the most important aspects to know when working in Photoshop is how to create a Layer Mask. Layer Masks can be used with many different types of tools, and they allow you to undo editing actions so that you don’t permanently edit a layer.
Masks in Photoshop are adjusted with white or black paint and the Brush Tool. Simply paint black to temporarily conceal part of an image, and paint white to restore part of an image.
Using Layer Masks, you can easily create a transparent background or reveal a layer underneath a pre-existing one.
Let’s learn how to use Layer Masks in Photoshop:
First, open a photograph into Adobe Photoshop. Then, click the Mask symbol at the bottom of the Panel.

A white mask will appear next to the duplicate layer.

With the mask selected, click the Brush Tool on the left side of the workspace.

Double-check that the foreground and background colors are black and white.
If the colors are anything other than black and white, select the mini black and white box which will revert the colors to the default mode.

Brush the canvas with black. Notice that black paint erased a portion of the photograph. It revealed the white background underneath.

Notice how the layer mask has changed. On the white layer mask, we now see our black stroke.

To restore the area, click on the two arrows next to the Foreground and Background color boxes in the Tools Panel. This reverses the brush colors so white is active.

Now, brush with white over the canvas to eliminate the change.

Notice that the changes disappeared in the mask.

Best Tutorial for Merging a Picture with Background in Photoshop
Tutorials are an important aspect of the growing process as a creative. Learning “on the go” can make the work process longer and more stressful. By viewing a photo manipulation tutorials by credited sources beforehand, you can learn more quickly and make your process smoother.
Why is it Important to do a Tutorial Beforehand?
When starting in Photoshop CS or Photoshop CC, learning the correct process to complete a task and all of its complexities is important to become a better retoucher. Outsourcing to acquire more information is part of the process as a photo editor and will impress future clients.
If you want to find a photo manipulation tutorial to explore more photo compositing, there are many sources to choose from. Photo manipulation tutorials are not the easiest tasks to execute, but with time and patience, these projects will become easy.
Make sure that you are familiar with Photoshop’s tools before you start any photo manipulation tutorials. They can become confusing if you don’t know how to access the tools they mention.
Where Can You Learn How to Use Photoshop for Merging a Picture with a Background?
One of the best resources to find the best tutorial for merging a picture with background in Photoshop for a photo manipulation tutorial is Envira Gallery. Envira Gallery has some of the best tutorial for merging pictures in Photoshop and gives many alternative ways to complete a project.
Try following our tutorial on How to Change a Background in Photoshop to learn more about merging photos. This tutorial will teach different techniques on how to change a background in a portrait.
Another tutorial to try is A Guide to Layers in Photoshop. This guide will answer all of a creative’s questions about layers and why they are vital when working in Photoshop CS or Photoshop CC.
We hope this tutorial has been helpful! If you learned something, follow us on Facebook or Twitter and let us know! You can also join our email list for more photo editing tutorials and photography tips!


