Portrait retouching can seem like an intimidating task, but the right tools will make the job quick and easy. In this tutorial, we’ll cover how to smooth skin in Photoshop, as well as the basics of skin retouching:
- Effects of Smoothing Skin in Photoshop
- Easiest Ways to Smooth Skin in Photoshop
- Steps to Smoothing Skin in Photoshop
- Best Tutorial for Smoothing Skin in Photoshop
To learn how to create smooth skin, you’ll need to have downloaded Photoshop. If you don’t already have it, you can get it through Adobe’s Creative Cloud Plan. This bundle also includes Lightroom for a total of $9.99/month.
Effects of Smoothing Skin in Photoshop
Without a doubt, skin is the trickiest aspect of any portrait to edit. Editing skin too much can make the person appear fake. In order to retain a realistic texture when editing skin, you must understand how Photoshop’s tools work on skin.
Learning how to edit and retain skin texture in Photoshop is vital to successful portrait editing. The most popular tools used for digital retouching are the Spot Healing Brush and the Healing Brush Tool.
In essence, when you use the Spot Healing Brush, you select an area from the photo that Photoshop then uses to replace nearby pixels. Thus, the Spot Healing Brush relies on Photoshop’s intelligence to recognize and replace pixels.
The Healing Brush Tool is similar to the Clone Stamp Tool in that both require the user to select an area with which to paint over an undesired area.
Softening Skin Using Adobe Photoshop
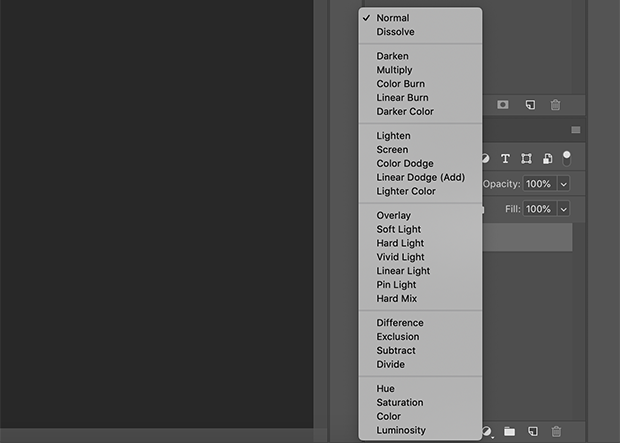
Blending Modes and Layer Masks are useful tools to use when retouching skin in an image. A Blending Mode allows you to apply different blending options and processes to a portion of a photo. These modes can help you blend your effects more naturally.
To apply a Blending Mode, simply select the drop-down menu.
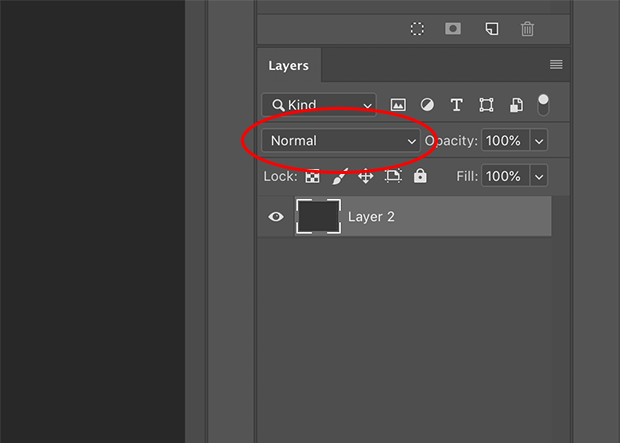
Every image editing situation will require a different blending mode, so the only advice I can give is to be adventurous try them all!
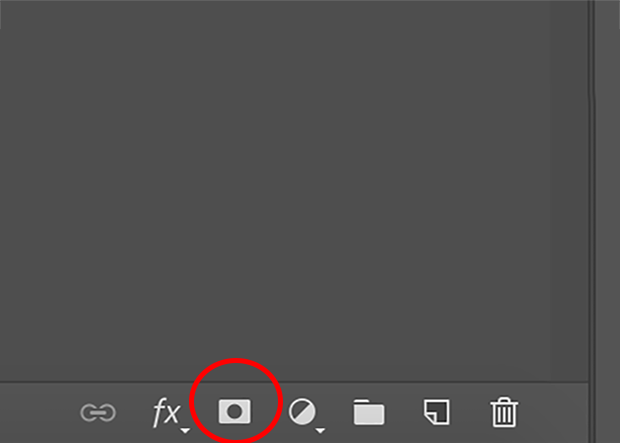
A Layer Mask is an attachment that allows you to make adjustments without permanently erasing the visual information contained in your original image. To create a mask, select the square symbol at the bottom of the Layers Panel.

Easiest Ways To Smooth Skin in Adobe Photoshop
Most people want their skin to look perfectly smooth and even in photographs. So, knowing how to edit skin naturally in Photoshop is a skill nearly every photographer will find useful.
The easiest way to touch up skin, including removing scars and acne, is by using the Spot Healing Brush. This tool shortens the process of skin retouching with a simple click of the mouse. Once you select a spot on the image, Photoshop deciphers which pixels are different from the surrounding pixels and changes them to match.
In cases where the Spot Healing Brush doesn’t replace all of the discolored pixels — like when you’re trying to erase a tattoo — you can try using the Clone Stamp Tool or Healing Brush Tool.
Both of these tools have similar capabilities when used as a stamp. Simply select a spot in the photo, then move it to a different location. This process is one of the easiest and most effective ways to smooth skin in Photoshop.
You can also consider using Photoshop Elements to retouch skin in your photos. This program is easier for beginners to use because it is essentially a pared-down, simpler version of the full Photoshop program.
Photoshop Elements is a great place to start, but you’ll want to upgrade once you’ve mastered the simplified tools. Adobe Photoshop has many more tools that you’ll want to learn down the road.
Removing Uneven Skin Texture in Photoshop
Stubborn scarring that cannot be removed by the Spot Healing Brush should be tackled with the Healing Brush Tool. With this tool, you can select smoother skin texture in your image and then use it to paint over scarring.
Make sure that you use a small brush tool when making your selection so that the alterations you make won’t be as noticeable.
You can also try using a filter like Gaussian Blur. This style of blur is popular when it comes to editing. Gaussian Blur applies a blur to the entire image and creates a “glow” over the image. Adding Gaussian Blur to the skin can help your editing, but too much will appear unnatural.
If you find that the Blur filter looks strange in some places, you can use a Layer Mask to isolate the blur to certain regions of the photo.
Why Bother Smoothing Skin?
There are many reasons why a client will want smooth skin in a photograph. The “definition” of smooth skin varies for every creative because some like skin with a glow and others want more of a “raw” approach.
Clients who have acne or scarring may want those blemishes erased in images of their faces. Skin blemishes are the number one editing request may photographers receive, but luckily it is pretty simple to execute.
Fashion has also had a huge influence on the creative world and influenced how everyday people see themselves. Some may request skin smoothing edits because they want to appear like the models they see on magazine covers, online, or while shopping. You shouldn’t disregard skin retouching to this extent, but let your client know that it will not represent an accurately realistic depiction of them.
Understanding a good balance between editing and not editing is key to becoming a successful creative.
Steps to Smoothing Skin in Adobe Photoshop
Learning the steps to smoothing skin in Photoshop is important for any photographer and photo editor. If you don’t take the time to learn these skills, you’ll lose precious time when editing, and you may not complete the edit to the highest standards for your client.
Using Photoshop’s Healing Brush Tool
In order to create smooth skin in a portrait, you have to know which tools to use. No matter the skin tone or texture, you can use the methods below on any portrait.
First, open your photo into Photoshop. I’m using a photo by Sarah Comeau via Unsplash.
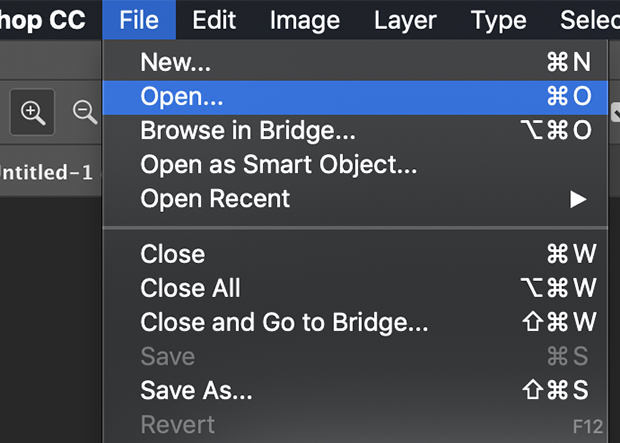
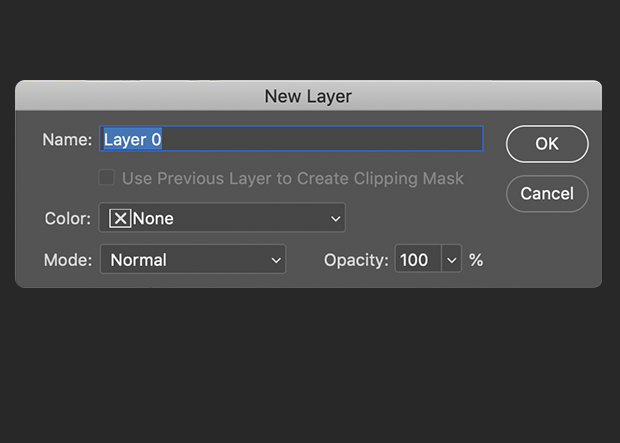
Double-click on the original photo to reveal the New Layer dialog box. Once the dialog box opens, select OK.
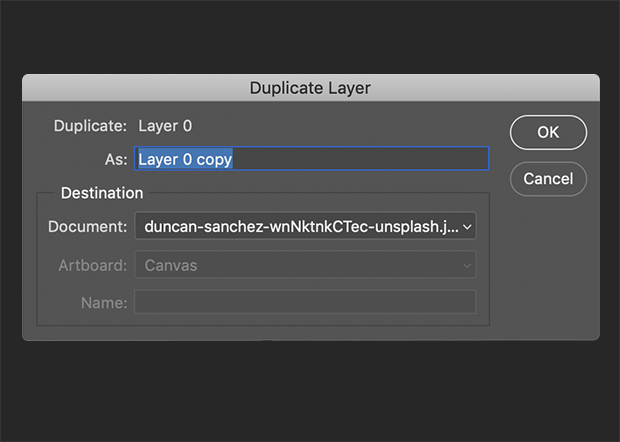
Now, right-click on the Background to reveal a drop-down menu and select Duplicate Layer.

The Duplicate dialog box will appear, then select OK.
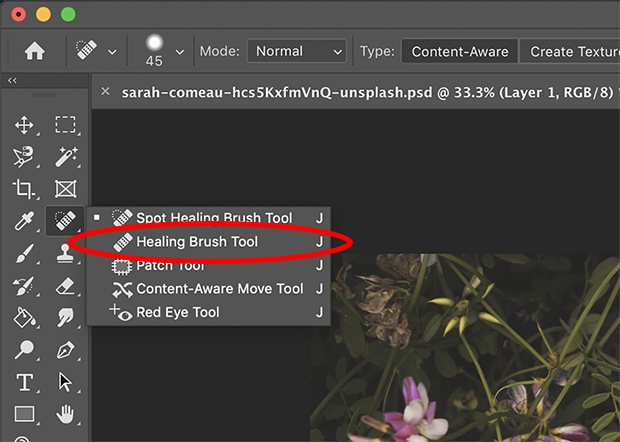
On the left side of the workspace in the Tools Panel, select the Spot Healing Brush. Hold down the mouse until the drop-down tab appears. Within the tab, select the Healing Brush Tool.
Notice the different customizable options that appear at the top of the workspace. Set the brush to 80 pxs, Hardness to 49%, and Spacing to 1%.
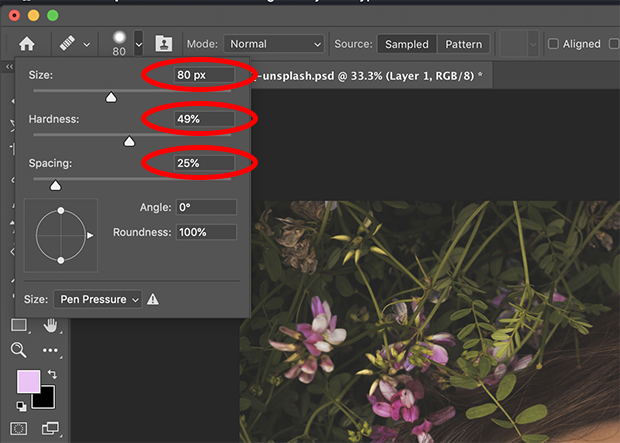
Make your brush small so that the adjustments you make to the skin won’t be obvious. Lower the brush’s hardness so that the alterations you make will blend smoothly with the surrounding unedited skin. The last thing we want is a prominent line between the smoothed skin and the natural skin!
Set the Blend Mode to Normal and the Source to Sampled so that Photoshop will use the image as the source.
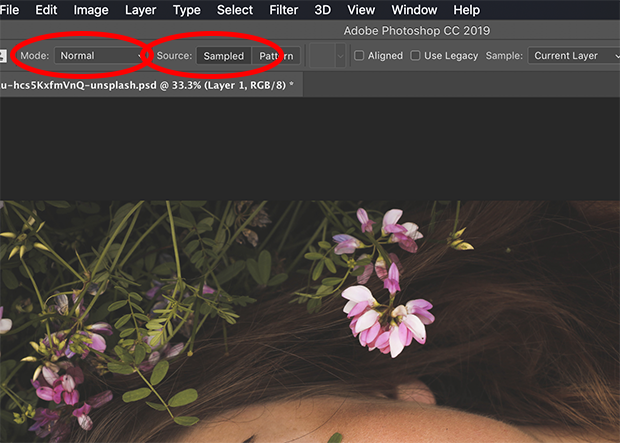
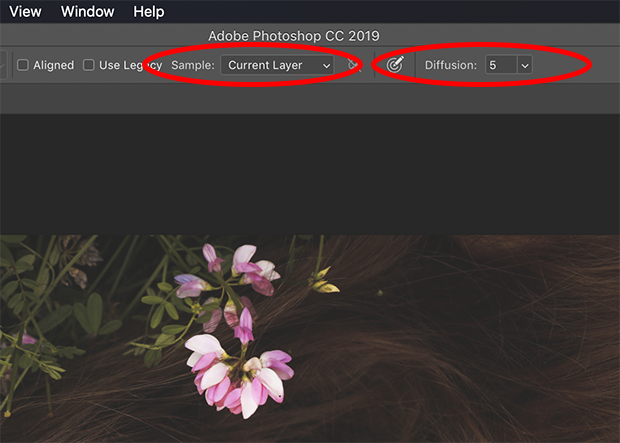
For this project, the Aligned and Use Legacy options can be unchecked. Select the Sample as Current Layer and set the Diffuse to 5. The Diffuse setting controls how quickly Photoshop will apply the new selection over the unwanted area.
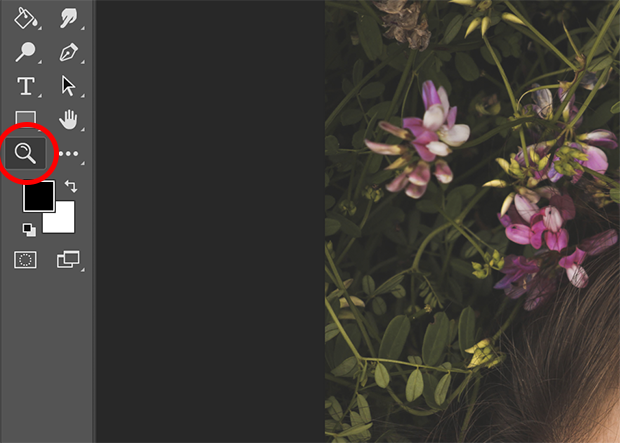
Now, select the Zoom Tool, located at the bottom of the Tool Panel.
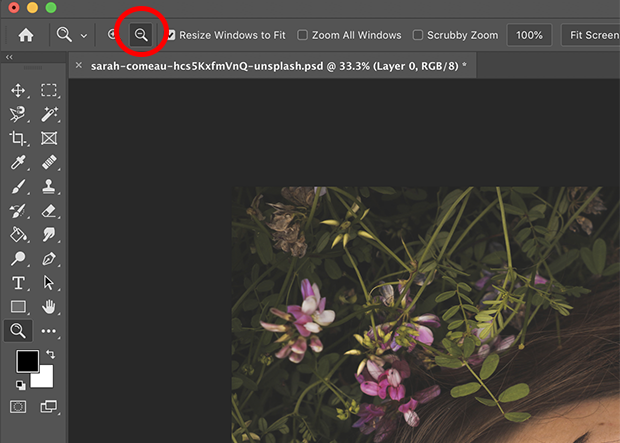
With the Zoom Tool selected, click over the image to zoom in. If you need to zoom out from the photo at any time, simply select the magnifying glass with a “-” in the center.
Reselect the Healing Brush Tool and select an area to use to replace the unwanted skin. You can do this by holding Option on the keyboard and clicking the mouse.
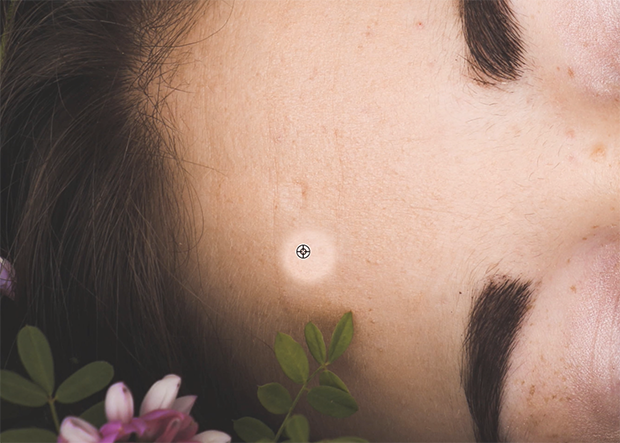
Notice how the mouse cursor changes as you select an area and relocate it to a different area.
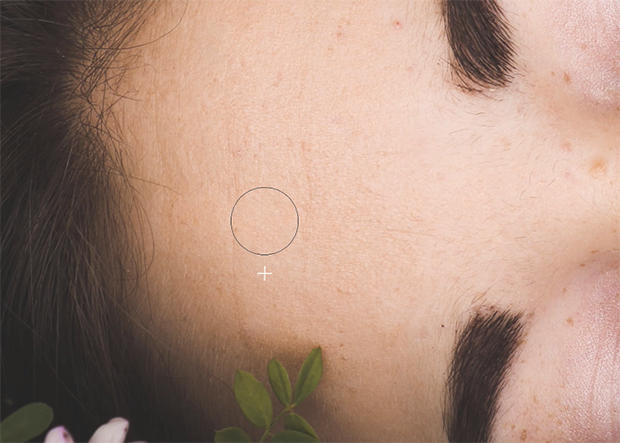
Once you’re satisfied with the area you adjusted, continue to make adjustments to the entire face. Remove acne, noticeable blemishes, and even stray pieces of hair.
Try organizing the workspace when editing by either circling the areas that need to be adjusted or work in sections. This will ensure that you won’t forget to remove any unwanted blemishes.
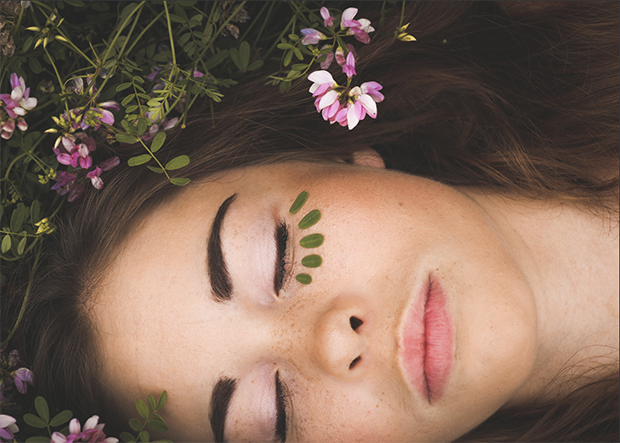
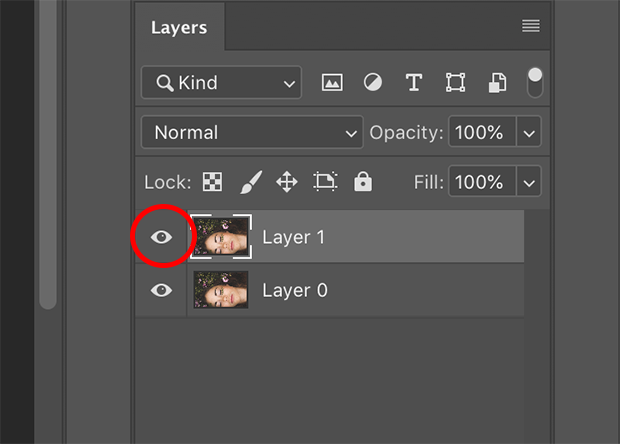
Once all the unwanted blemishes are removed, the photo is finished. To view the before and after, simply select the eye symbol on the top layer in the Layers Panel.
Editing Perfect Skin in Adobe Photoshop
Having perfect skin in a portrait is an element that many clients want. The key is knowing how to make skin look perfect without looking fake. Being able to edit an image realistically is highly valued in the photo world.
Follow these steps for a realistic look:
Open a photo in Photoshop, then double-click on the original photo to reveal the New Layer dialog box. Once the dialog box opens, select OK.

Now, right-click on the Background to reveal a drop-down menu and select Duplicate Layer.

The Duplicate dialog box will appear, then select OK.

On the left side of the workspace in the Tools Panel, select the Spot Healing Brush. If the healing brush is not already defaulted and hold down the mouse for the drop-down tab to appear.
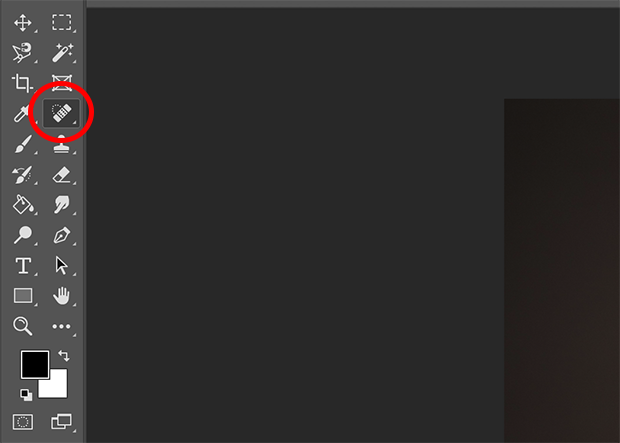
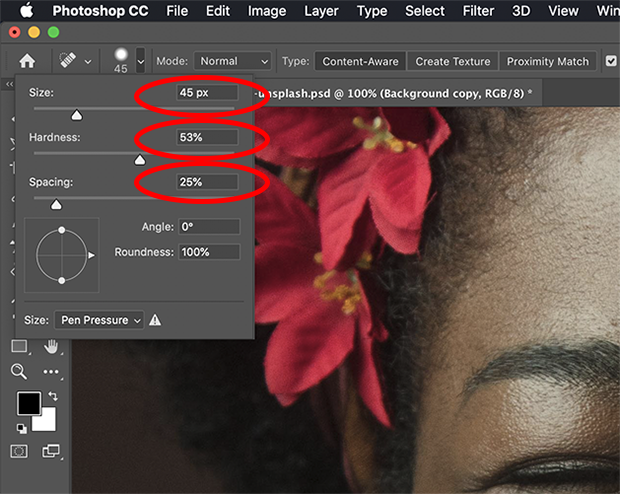
Notice the different customizable options that appear at the top of the workspace. First, we’ll need to apply a skin texture.Set the brush to 45 pxs, Hardness to 53%, and Spacing to 29%.
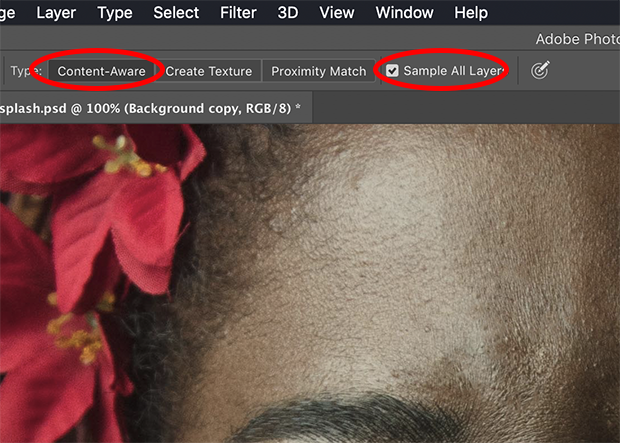
Check the box for Sample All Layers and select the Type as Content-Aware. This setting gives Photoshop permission to sample nearby pixels and use them to replace pixels that stand out from the rest.
With the blank layer selected, simply click the unwanted areas to make them disappear.
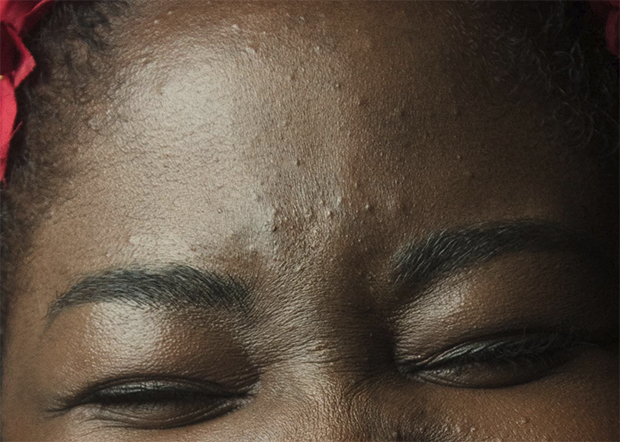
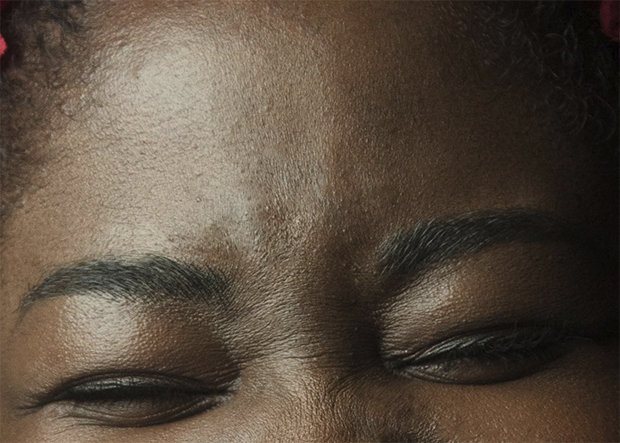
When the adjusted area looks good, begin making adjustments to the entire face. Try being organized when editing by either circling the areas that need to be adjusted or work in sections. Verify that the skin tone is not being altered dramatically when making alterations.
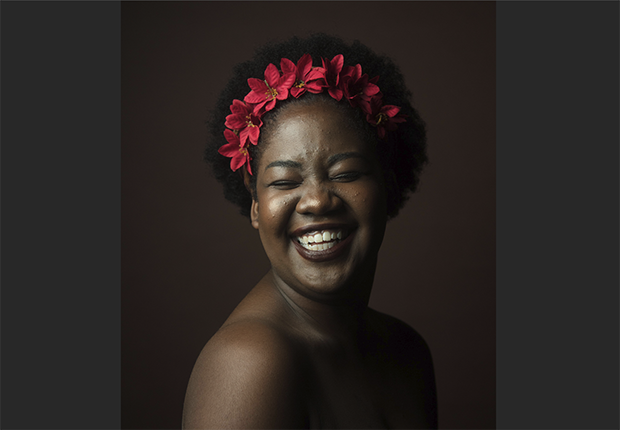
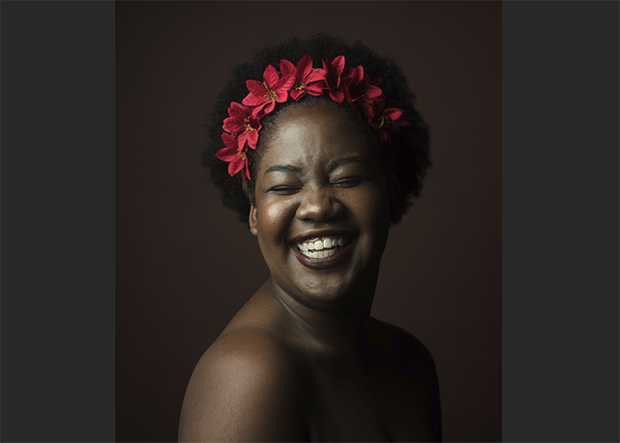
Now, let’s say that the skin needs to be softened just a little in order to appear natural again. To do this, select all of the layers while holding Command on the keyboard so all the files are selected.
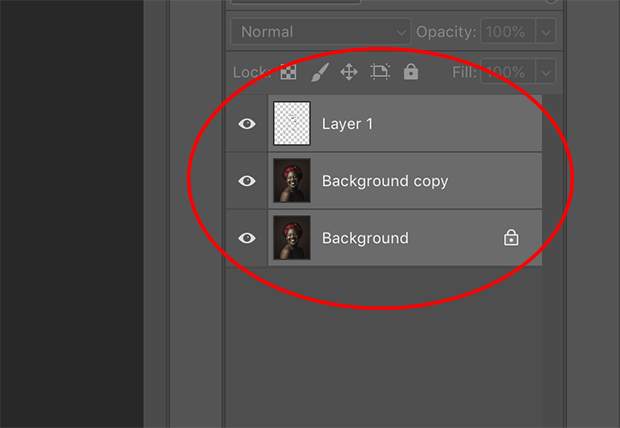
Right-click on the Background to reveal a drop-down menu and select Duplicate Layer.
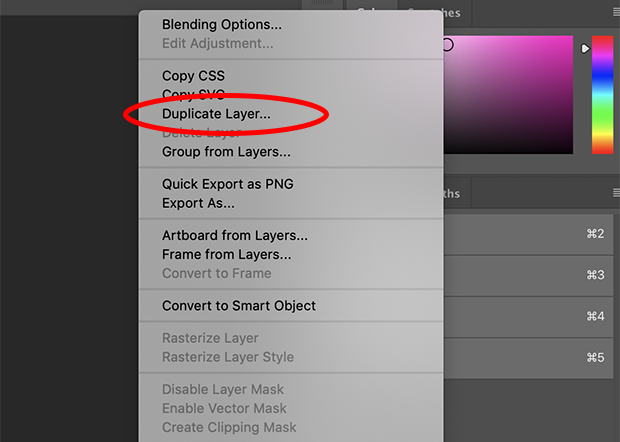
The Duplicate dialog box will appear, then select OK.

Notice how all of the layers have been duplicated in the Layers Panel.
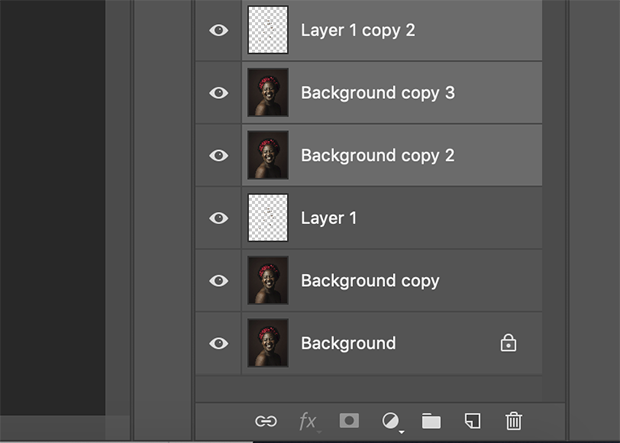
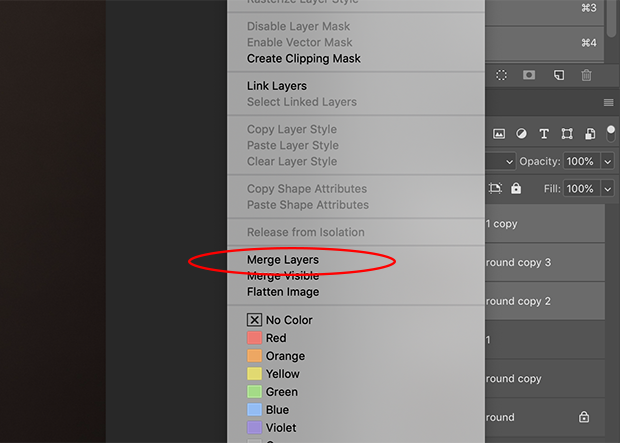
With the new copies selected, right-click on the files to reveal a drop-down menu and select Merge Layers.
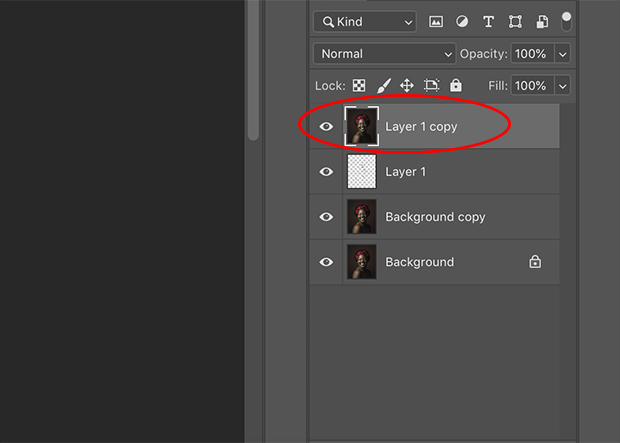
In the Layers Panel, all of the layers are merged into a single one.
To soften skin, locate the top of the workspace and select Filter >> Blur. Within the Blur drop-down menu, select Gaussian Blur.
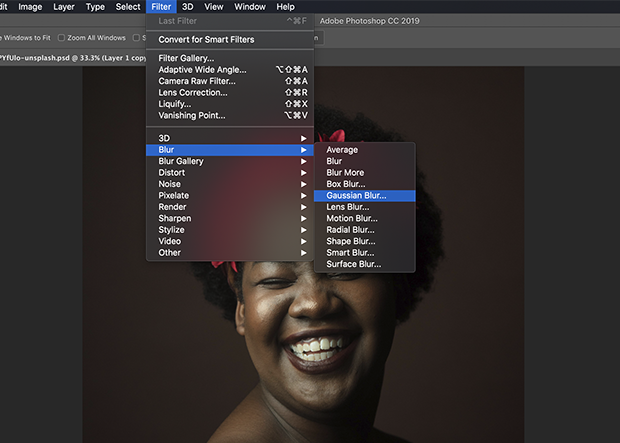
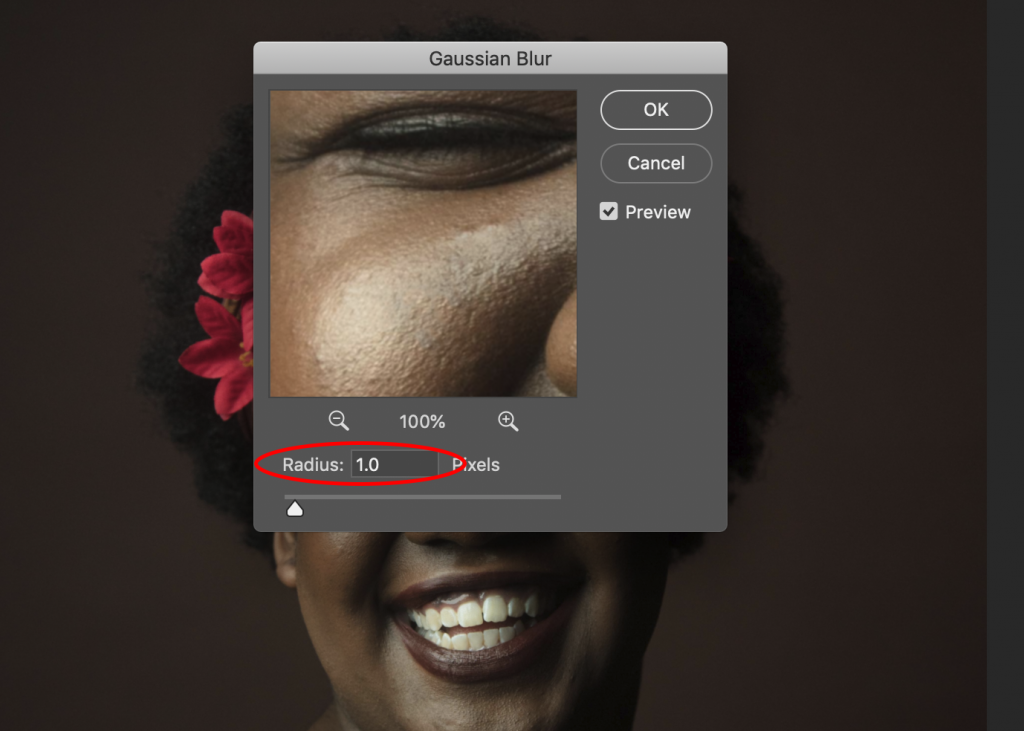
Once the Gaussian Blur dialog box appears, drag the mouse within the preview window to correctly position the preview over the face. You’ll want to zoom in so that the skin texture is visible. Adjust the Radius to be 1 px and select OK. It is advisable to stay around 1 px so that the adjustment looks realistic.
Now, notice that the blur was applied to the entire photo. Because we only want to apply the blur to the skin, we’ll need to create a mask. Masks are located at the bottom of the Panel, marked by a rectangle icon with a circle in the middle.
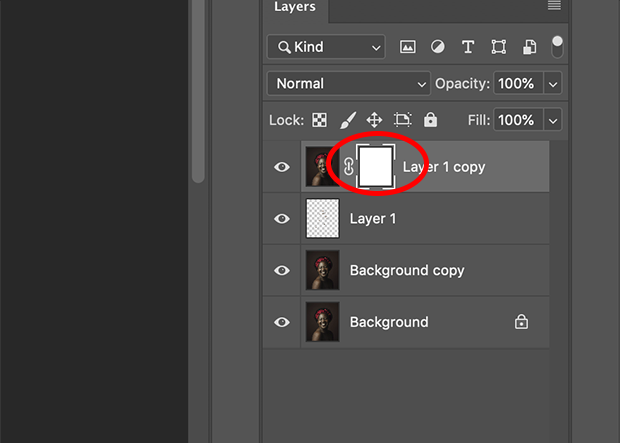
The new mask will appear next to the blurred layer.
With the mask selected, locate the top of the workspace select Edit >> Fill…
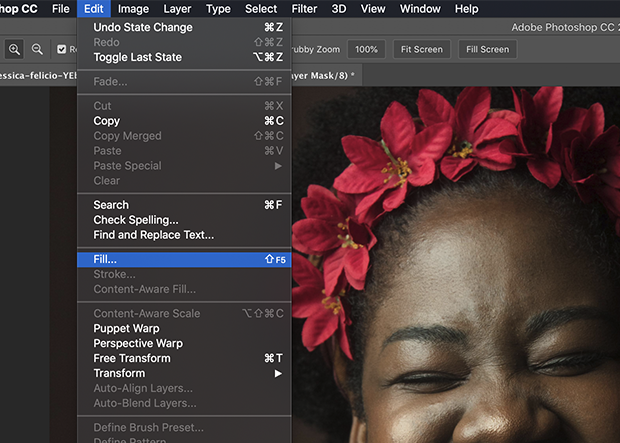
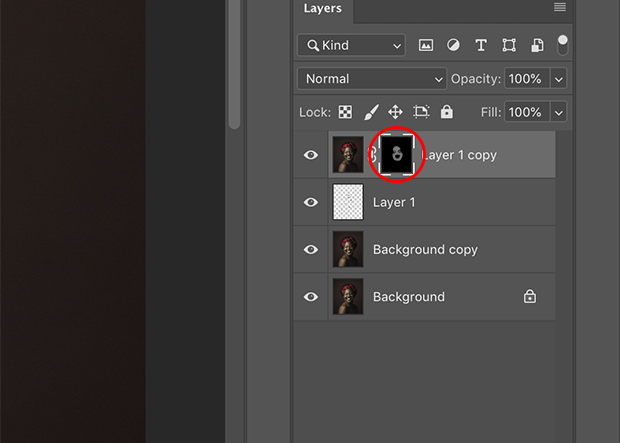
The Fill dialog will then appear. In this case, since we only want the skin to be softened, we want to fill the mask with black so that we have less selecting to do later on. Set the Contents to be Black, Mode set to Normal and Opacity to 100%. Once the options are selected, click OK.
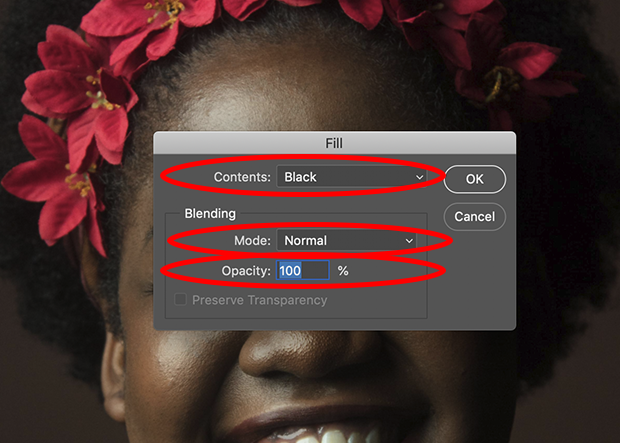
The mask is now filled with black.
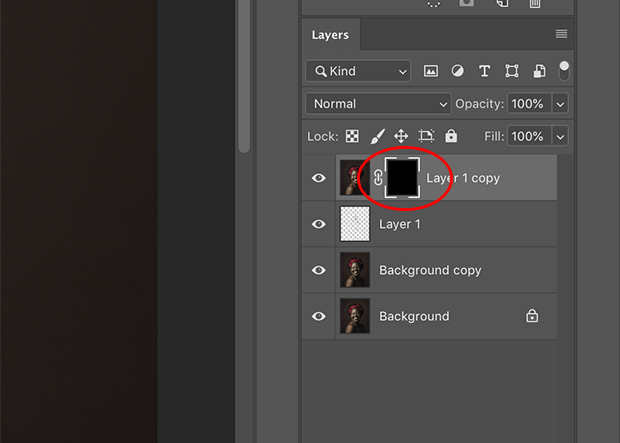
Now, select the Brush Tool on the left side of the workspace.

Set the Brush Tool to 400 px and Hardness to 24%.
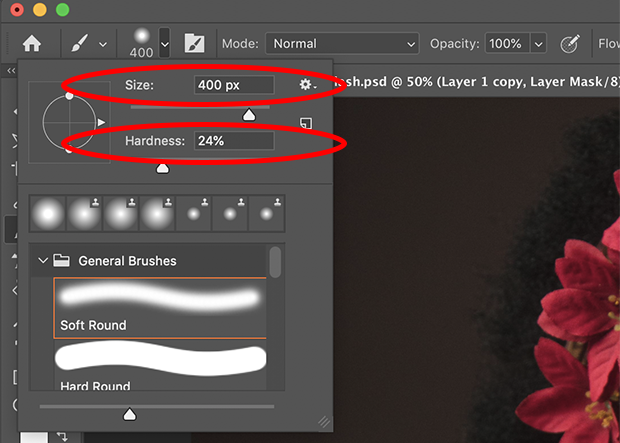
Double-check that the foreground is white and background color is black.
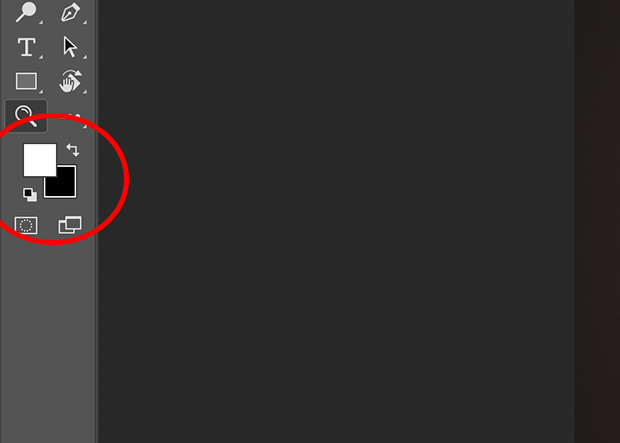
Brush the canvas with white on the subject’s skin so that the blur only applies to the face. Any adjustments will be visible on the layer mask. Avoid blurring the eyes, mouth, and eyebrows so the entire face isn’t soft.
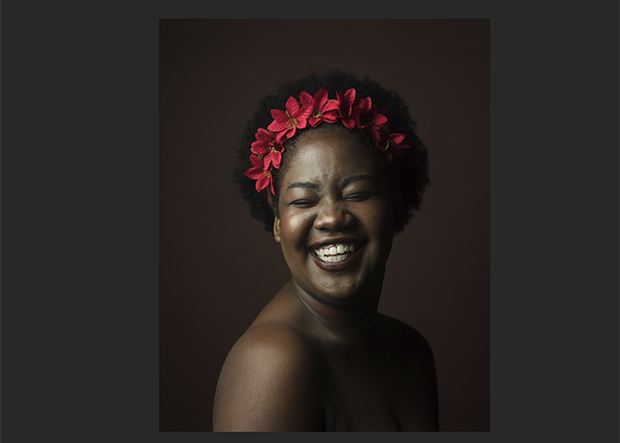
Once completed, view the finished product.
Best Tutorial For Smoothing Skin In Photoshop
Completely understanding the tools to complete a task in Adobe Photoshop is a necessity. Once you understand the importance of Photoshop’s tools, then you can do even more extravagant edits.
Understanding Adobe Photoshop is like learning a different language, which means practice is key. Trying a tutorial before jumping into a retouching project can be extremely helpful, especially for Photoshop beginners.
If you learn advanced photo editing tasks incorrectly to start, it will be even more difficult to re-learn it the right way.
Where to Find Tutorials for Smoothing Skin in Adobe Photoshop
One of the best resources to find the best tutorial for smoothing skin in Photoshop is Envira Gallery. Envira Gallery has some of the best tutorials for face retouching. You can also find alternative information about Photoshop Elements, Lightroom, and more at Envira Gallery.
Two tutorials to consider both cover important retouching aspects. Wedding photography heavily involves skin retouching, whether it be in images of the wedding guests or the bride and groom. Following the Wedding Portrait Retouching tutorial will assist in all of your digital retouching needs.
If you want to go the extra mile in learning more about removing skin blemishes in Photoshop, then read the How to Remove Blemishes in Photoshop tutorial.
No matter how many skin blemishes or what type of tone of skin appears in your image, it is always possible to make alterations. These types of skills take time and practice to develop, but Adobe Photoshop makes anything possible. Happy editing!
If you enjoyed this tutorial, follow us on Facebook and Twitter for more photo editing tutorials and photography tips. You can also sign up for our email list so you never miss another post from Envira Gallery.


