If photography is important to you, showing it to others will be one of your goals. It’s a natural way to share your ideas and skills with other people. However, you can’t throw a set of images up on an unsuitable website and call it a day. You’ll want to build a photography website that focuses on – and enhances – your work.
For WordPress users, the process can be straightforward. You’ll want to have two broad elements in place: a theme and a suitable gallery plugin. The Kadence theme and Envira Gallery plugin make for a great combination.
Over the course of this post, we’re going to show you how to build a photography website using Kadence and Envira Gallery. Throughout, we’ll discuss the elements you’ll need to succeed, along with tips and tricks along the way. Before this, let’s talk about why you should build a photography website in the first place.
Why You Should Build a Photography Website
It’s a logical assumption that a photographer will want to display work for others to see. It’s natural to want to share what you’re proud of. What’s more, given that there are nearly four billion internet users, there are a lot of eyes to draw to your work.
However, uploading images to any repository that accepts them is not the best way to find users. There are a few reasons for this:
- First, you’ll want to show your images to those interested. In most cases, social media users aren’t using a platform to find your specific work, although using platforms such as Facebook and Instagram do have benefits.
- The biggest drawback of a social media (or dedicated photography) platform is that it can use your images without your consent.
- What’s more, the followers, like counts, and other engagement factors aren’t ‘yours’. Instead, those users exist on the platform. If you leave, there’s no guarantee they will come with you.
Because of this, you should consider whether to build a photography website. Here’s why we would recommend it:
- You will control how you use your images on the site.
- By extension, you also control the engagement of other users and your work.
- There are plenty of ways to build a better relationship with users that social media can’t provide.
- You can sell your work in a direct way, and keep much more of the income your photos generate.
You’ll notice a theme running through each of these points. On the whole, a photography website is yours, and as such, you get to decide how its run. What’s more, all of the responsibility for success lies with you. This can sound overwhelming, but it gives you the best opportunity to present your work well, and sell it in some cases.
The Key Facets of a Good Photography Website
While it might sound formulaic, many photography websites share similar traits. In fact, you’ll find all of the below as facets of all good photography sites:
- A minimalist design, to make the photos the center of attention.
- Tasteful presentation of the images, to help better convey the quality of your photography.
- Further insight into you as the photographer or the emotion behind your work.
- A way to contact you, if the need arises.
These are the fundamentals you’ll want to have in place, but other sites will also include more, or expand on these. For example, lots of websites will display social media or other portfolio links somewhere. You may even look to run a dedicated blog, to offer further insight into your mindset behind a specific gallery or project.
We’ll discuss some of these elements later, although you’ll want to think about how to implement each of these good practices on your own website too. Before this, we’re going to discuss what you’ll need to build a photography website, beginning with where to host it.
What You’ll Need to Build a Photography Website – A Domain and Hosting
There are two phases to go through when you build a photography website. The first relates to the technical considerations you’ll need for your site. Here, we mean:
- Web hosting. This is how you’ll ‘store’ your site and its files. It’s a necessity if you want to build a photography website.
- A domain name. Consider this your home address. It’s the wording ending in .com or .net (although there are others) that users will input to get to your site.
Both of these can make or break your photography website, so you’ll want to consider them with care. Your hosting in particular is the core of your site, so look to spend as much as you can afford on good quality hosting.
As for your domain, there are two parts – the words and phrases that make it memorable (the label), and the Top-Level Domain (TLD). The latter comes from a defined list, such as .com or .net. You’ll find all sorts of TLDs that relate to different niches:
- .co. It’s an alternative to .com that lots of sites use when its preferred domain name isn’t available.
- .io. Lots of tech companies use this as it refers to inherent functionality in the space
- .photos, .photography, .pictures. We don’t need to explain who might benefit the most from these TLDs – you!
While you might read that a .com is the ideal TLD to obtain, the reality is that this isn’t true – although you’ll want to match the TLD to the intent. For example, you might not want to opt for a .org or an .io TLD for your photography website. However, a .blog extension could work depending on your goals.
Our advice is to finalize your branding, then look into a suitable TLD. Once you begin to promote your site, the TLD will become part of the branding, and ingrain itself into the public consciousness.
What You’ll Need to Build a Photography Website – WordPress, Kadence, and Envira Gallery
Once you have your hosting and domain in place, you should look to how you’ll publish your site. There are lots of solutions on the market, although we’re going to cut straight to the chase in this post.
We’re going to recommend three ‘cogs’ to make up the whole wheel: WordPress, the Kadence theme, and the Envira Gallery plugin. We’ll explain each of these next.
Why You’d Want to Use WordPress to Publish Your Website
When it comes to publishing your website, WordPress is the one we’d recommend. This is for a number of reasons:
- The Content Management System (CMS) is open-source, which means the core code (and many themes and plugins) are free.
- While you have almost everything you need to publish your website out of the box, for times you need extra functionality, there are thousands of themes and plugins. These dictate the look and feature set of your site; many themes and plugins are free, but some also come with a cost.
- WordPress is secure by default, and uses typical practices (and more) to make sure your data remains safe.
- There’s a huge community of users and developers. This is a big reason for the popularity of WordPress. It means you’ll have answers to practically any question you have about the platform and how it works.
- Many hosts support the platform, so you’ll have lots of choice when it comes to where you will build your photography website.
There are lots more reasons, but in a nutshell, WordPress is the premier platform for hosting your website.
To circle back around to themes and plugins, you’ll need them to build your site’s design and functionality. While there are lots of plugins that you’ll want to consider (and some can be essential), we’re going to focus on our chosen theme, along with a plugin to help you build image galleries with ease.
Introducing Kadence
It’s fair to say that most free themes don’t cut the mustard with regard to functionality and flexibility. Those that do stand out. The Kadence theme is one such example, as it provides a super-fast, super beautiful design that you can customize and expand upon:
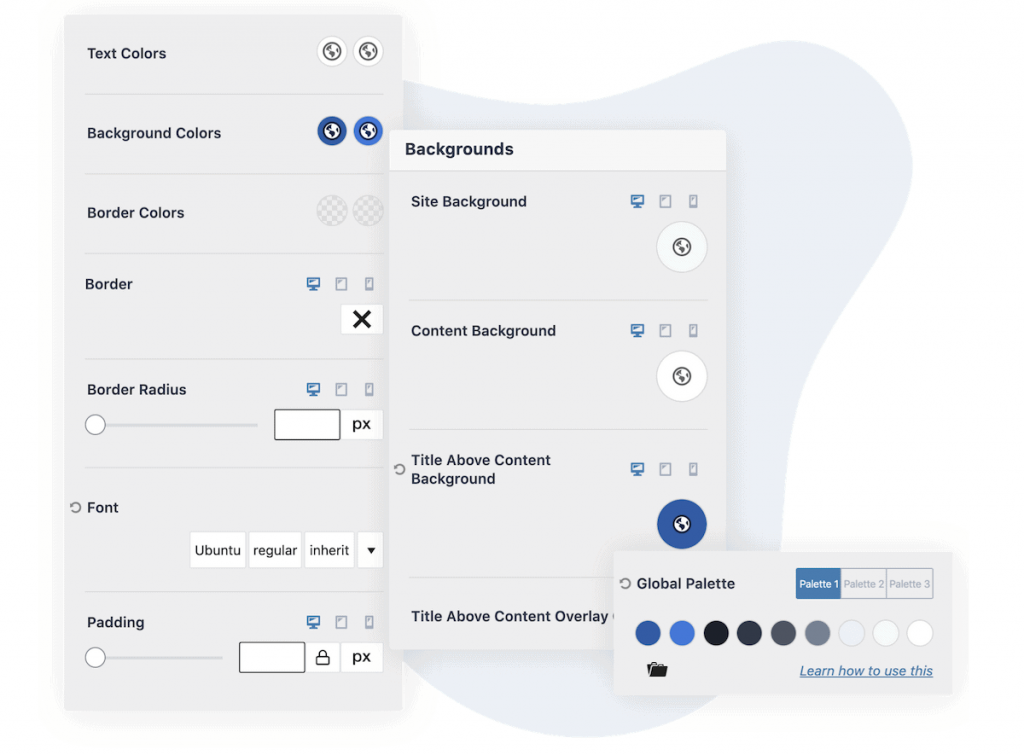
For example, you’re able to adjust your site’s typography and color scheme to help match your design to your desired branding. In addition, you can arrange your layout in a few different ways. While these affect the global layout of your site, there’s also a dedicated header and footer builder to alter these sections of your site too.
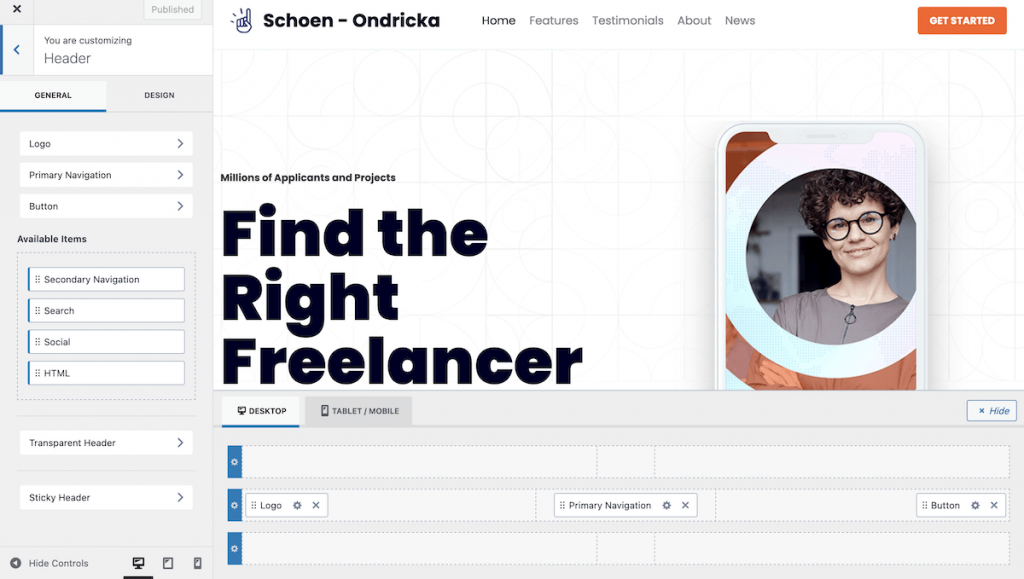
These work using a drag and drop editor, and the whole process will have you building custom headers and footers in minutes.
While the core Kadence theme is free to download and use, there’s also a premium version starting from $79 per year. However, in this tutorial, we’re going to stick with the free edition, as this will provide everything we need to build a photography website to be proud of.
Introducing Envira Gallery
With a theme in place, you’ll want to have a way to create and display images with more flexibility than WordPress will offer by default. A photographer will have specific needs, and Envira Gallery can meet them:

The plugin can help you create image and video galleries, and does so through a drag-and-drop editor. To make sure your design looks professional, there are a host of other options to choose from, across everywhere you can edit within WordPress.
You can also watermark all of your gallery photos, and add download protection. Combined, they give you the best chance to retain some control over users stealing your images.
Search Engine Optimization (SEO) is important for obtaining a good search ranking. As such, Envira Gallery offers ‘deeplinking’ and pagination functionality too. This makes the plugin an ally in your quest to reach the top of the Search Engine Results Pages (SERPs)!
There are premium versions of Envira Gallery that start from just $29 per year. This means there is a tier for everyone, regardless of budget. However, in this post, we’re going to use the Envira Gallery Lifetime version. This is close in functionality to the Pro version, but lets you use Envira Gallery on an almost unlimited number of sites (among other niche features).
How to Build a Photography Website Using the Kadence Theme and Envira Gallery in 4 Steps
This tutorial will look at the basics you need to build a photography website. As such, we’re going to assume you have hosting and a domain ready to rock and roll. What’s more, we’re not going to discuss the installation of other plugins: our focus is on using Kadence and Envira Gallery here.
However, if you need a refresher on some of the other aspects of building a website, we have an in-depth post on the subject. We recommend reading that article in tandem with this one in order to cover all of the required bases.
1. Install and Activate Both the Kadence Theme and Envira Gallery
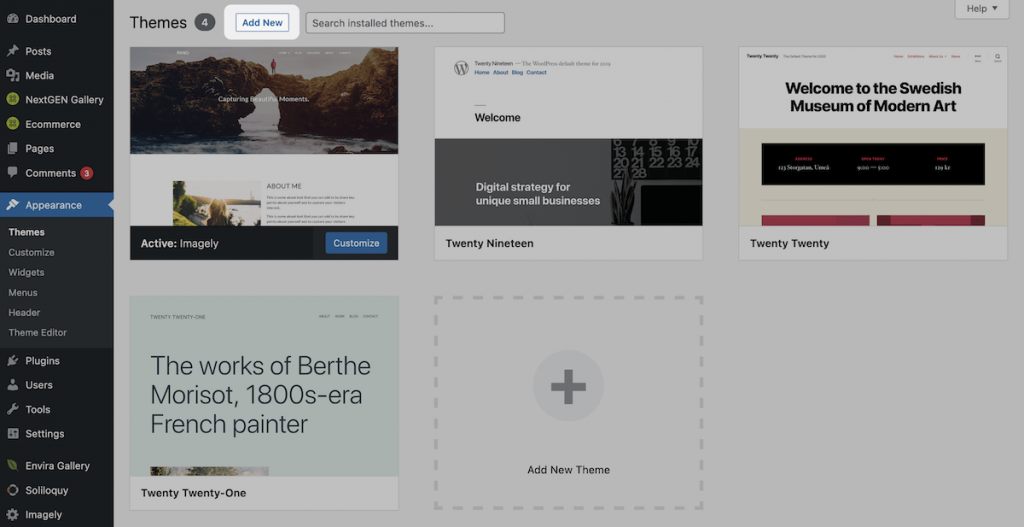
The first step is to install and activate your theme and gallery plugin. Starting with your theme, head to your WordPress dashboard, and open the Appearance > Themes screen. Here, click the Add New button at the top:
This will bring you to a version of the WordPress Theme Directory. Here, search for “Kadence” using the designated field, and let WordPress find the theme:
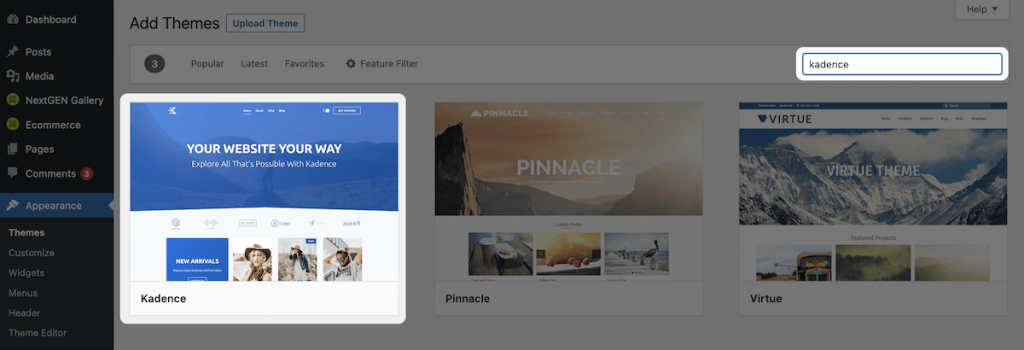
If you hover over the panel for Kadence, you can click the blue Install button. This will cause WordPress to download and install the theme.
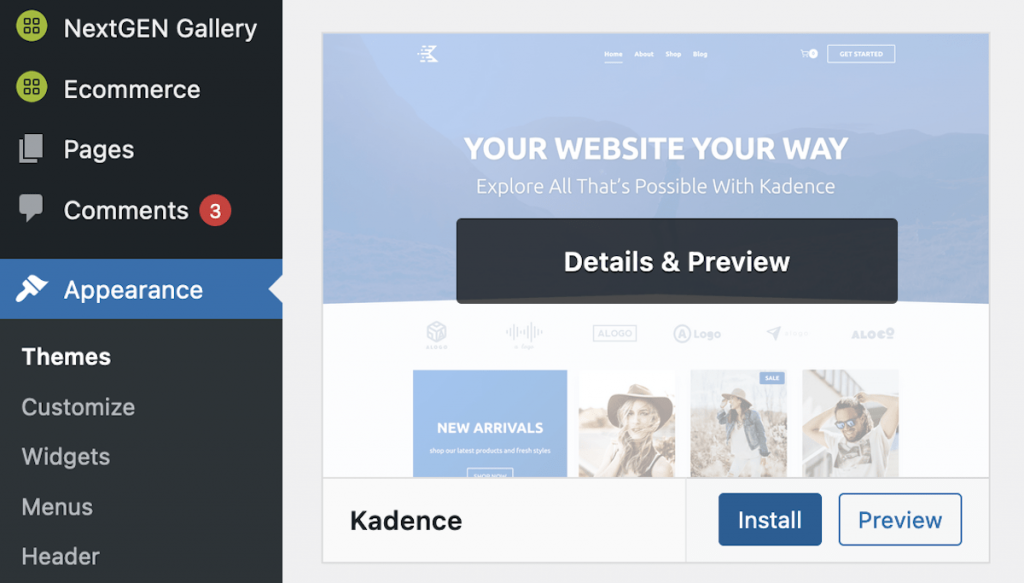
The button will change to read Activate, and you should click this to set Kadence as your primary theme.
As for Envira Gallery, we don’t have to run through this process in too much detail, as we cover it elsewhere. However, it’s worth noting that you won’t need to install the Envira Gallery Lite plugin – everything you need will be in the premium version.
Once you have these in place and activated, you can move on to choosing a design for your site.
2. Set Up Kadence and Choose a Design That Will Best Suit Your Goals
When you first install Kadence, you’ll see a notice at the top of the screen asking whether you’d like to choose a starter template:

If you click the blue button here, this will download and install the Starter Templates plugin. This is free and lets you choose from a selection of designs to help you on your way to a professional photography website.

When the installation process finishes, you’ll need to choose your desired page builder. The Kadence Starter Templates plugin lets you work with the default Block Editor or Elementor. For this tutorial, we’re going to use the Block Editor.
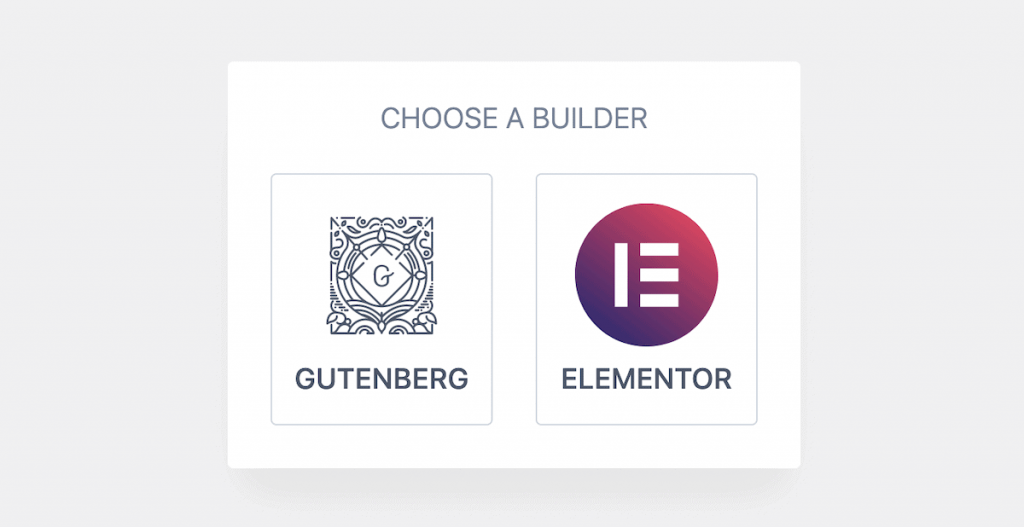
You’ll then see a collection of website templates, covering a number of different niches. You can click any of these, but we’re going to choose the Freelance template. This will open in a custom editor, where you can select a color scheme and font family (although you don’t have to make a choice here):
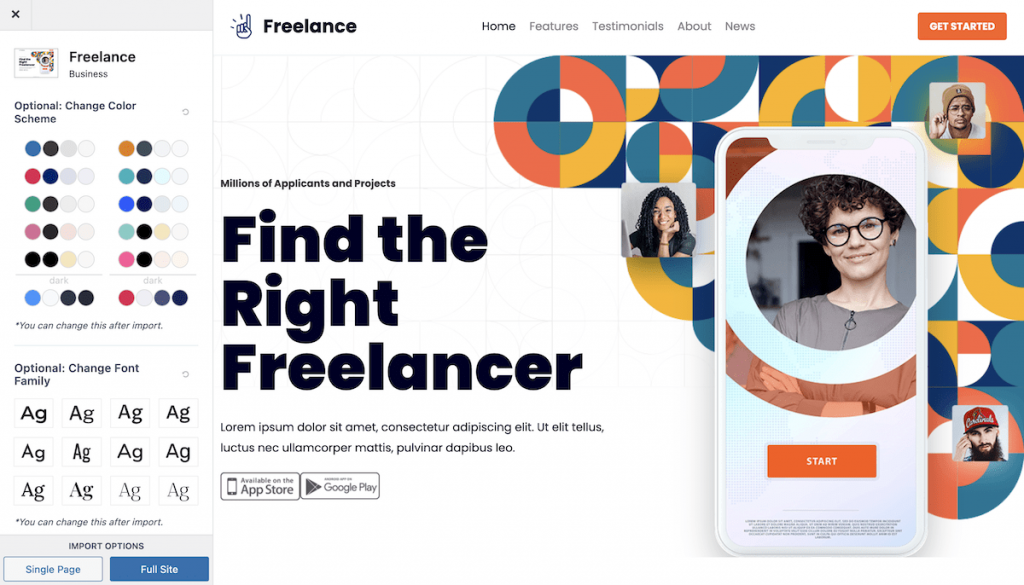
At the bottom of the preview, screen are two buttons to choose whether you import a single page (i.e. the one you’re looking at) or the full site template. We’re going to choose the blue Full Site option, at which point, a dialog screen will appear:
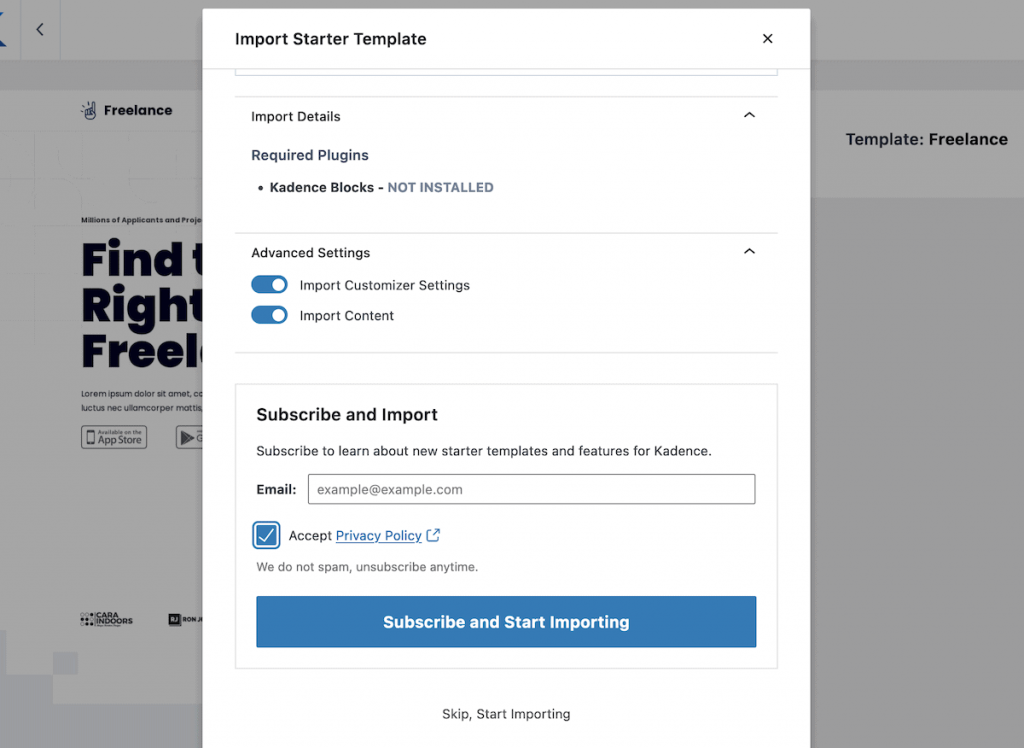
You should check over the settings here as you may need to authorize the install of another plugin to help add Blocks to WordPress. Also, you can choose to import Customizer settings and content, along with confirming the privacy policy.
When you’re ready, you can click the blue button to continue, and Kadence will import all of your content:
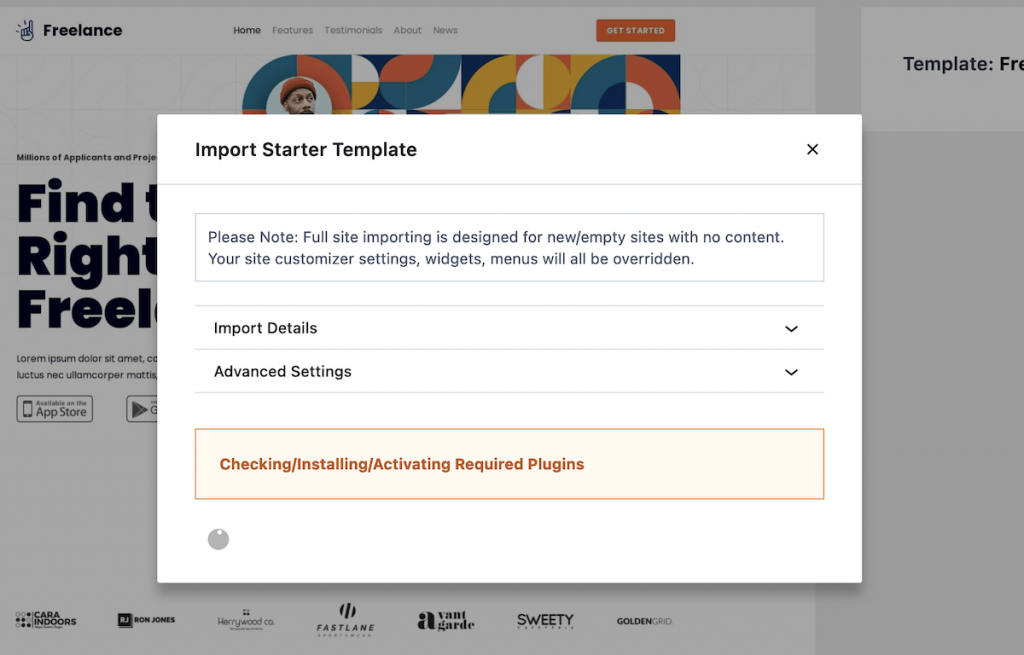
At this point, the import will complete and you’ll be able to view your site. While we don’t need to do any more for this step, you will also want to check out the Appearance > Kadence screen at some point:
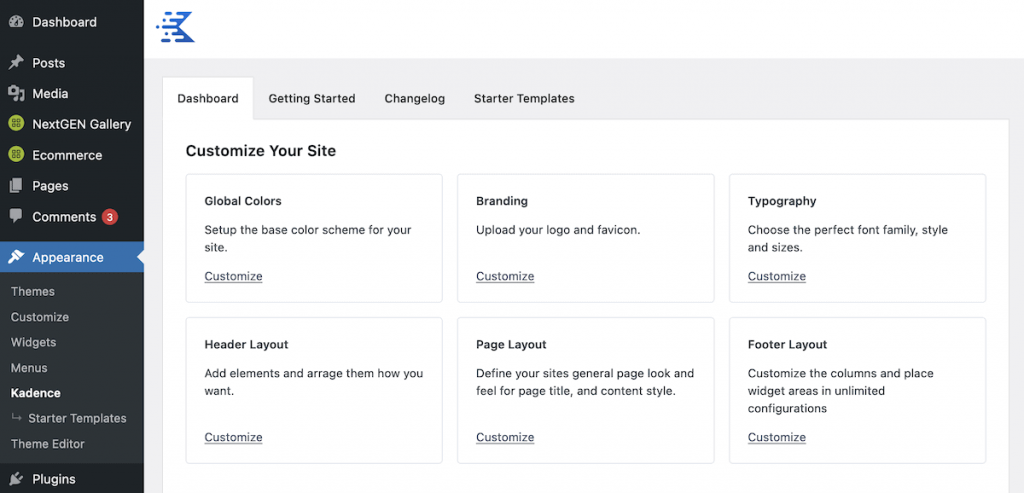
This is full of options to help you set your site up further. For example, you can change the global color scheme, your typography, the layouts for different areas of your site, and more. As you finalize your design, this screen will help you tweak it to perfection.
3. Add Relevant Pages For Your Site
Before we get into building galleries, let’s take a quick detour to another avenue of your site’s design. It’s a good idea to look at the various other pages on your site unless you want to run a one-page design. In most cases, your site will have multiple pages. We recommend you at least set the following:
- A home page that contains some of your work, and links elsewhere.
- There needs to be a way to contact you, that’s easy to use and find.
- In order to ‘humanize’ your online presence, an About page is a great idea. This tells the visitor about who your are and why you take photographs. It helps to give visitors extra insight into you and your methodology. You shouldn’t underestimate the impact an About page can have.
- A dedicated portfolio or project page is a good idea, as this gives you space to showcase your best work. We’d recommend doing this as one of the first pages you add.
We cover how to add new pages to your site and add them to a menu in our general post on creating a WordPress website. As such, we won’t go through the exact process here.
However, you may also want to consider whether you want to implement additional pages on your site at this stage. For example, you may want to add an events calendar, a blog to help you market your site or an online store.
4. Set Up Envira Gallery, Create Your Image Galleries, and Place Them Onto Your Layout
Your images will be the center of attention on your site, so you should give them due care and attention. Much of the fine details will be the domain of Envira Gallery. Once you install and activate the plugin, you’ll want to head to the Envira Gallery > Settings screen:
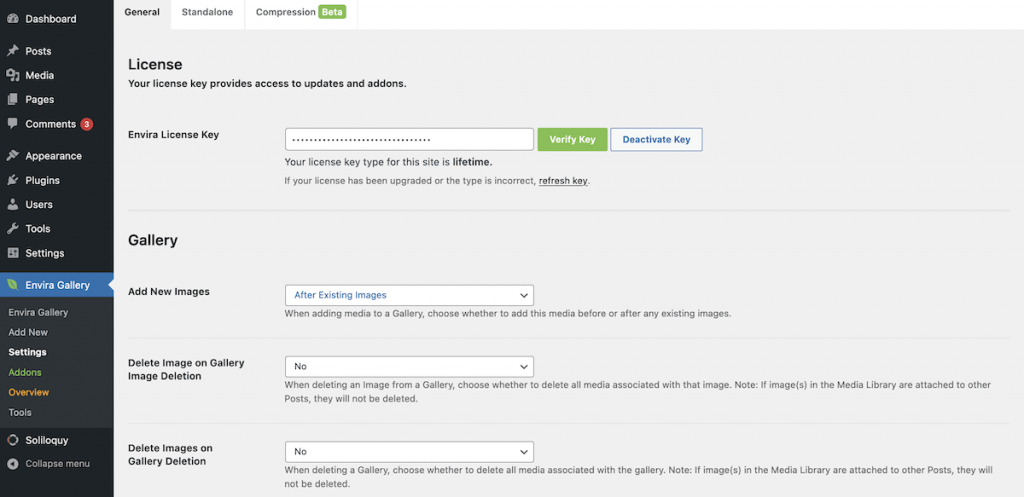
There are only a few settings here, relating to how you organize your images. For example, you can choose where you add images when you import them – either before or after. Also, you can opt to delete images when you delete the associated gallery.
There’s also a Standalone tab, which lets you set up a dedicated URL category ‘slug’ for your galleries:
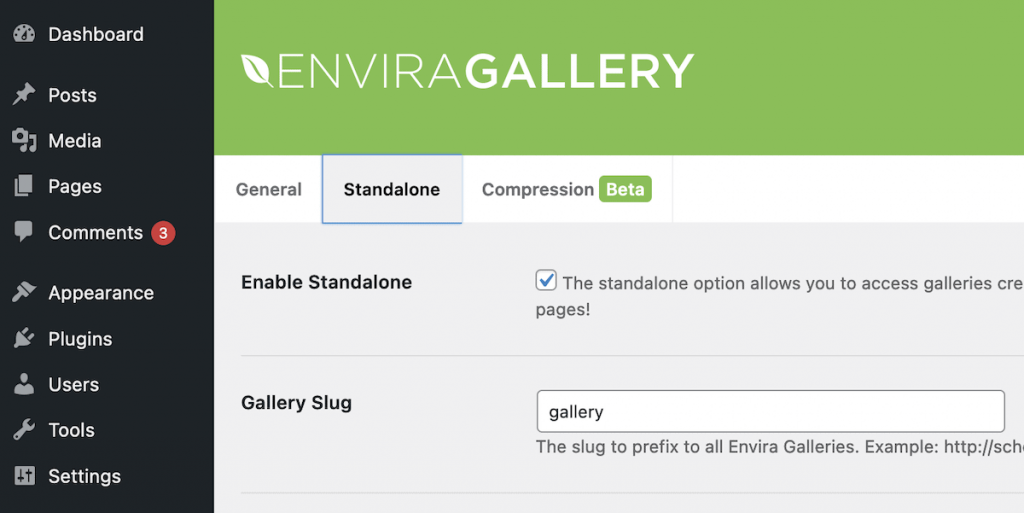
You’ll also find a Compression tab, which lets you optimize the file size of your images using Envira Gallery:
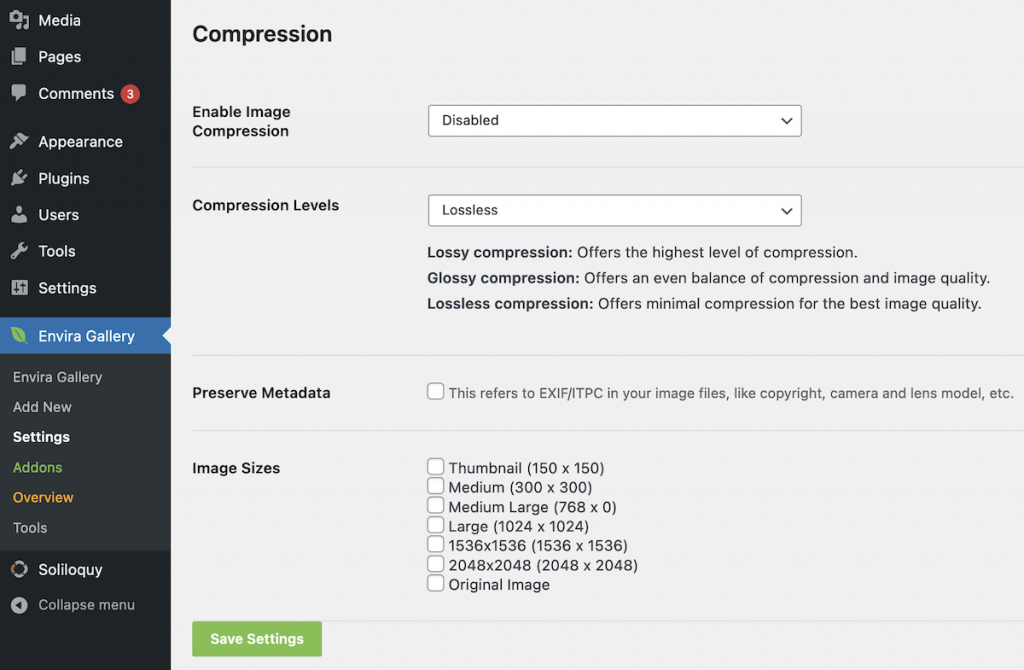
By default, this option is off, but you can choose to use it. You get to select from three levels of compression, and there’s a trade-off between file size and quality.
When you’re ready to add a new gallery to your site, head to the Envira Gallery screen and click the Add New button:
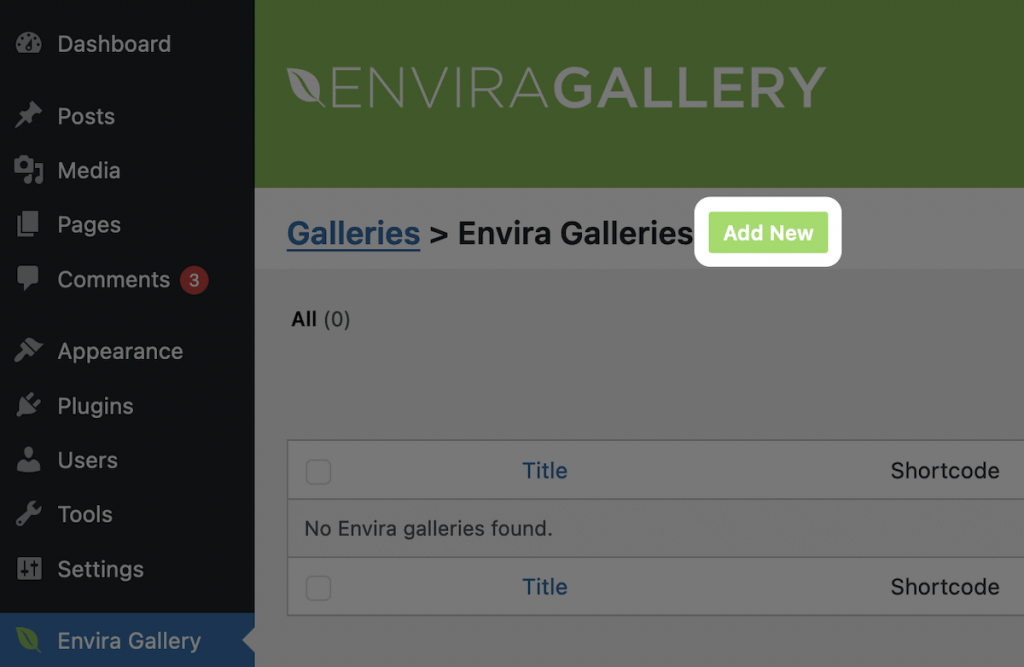
This screen will offer you a couple of options. The first is to upload files from your computer or select them from the Media Library…
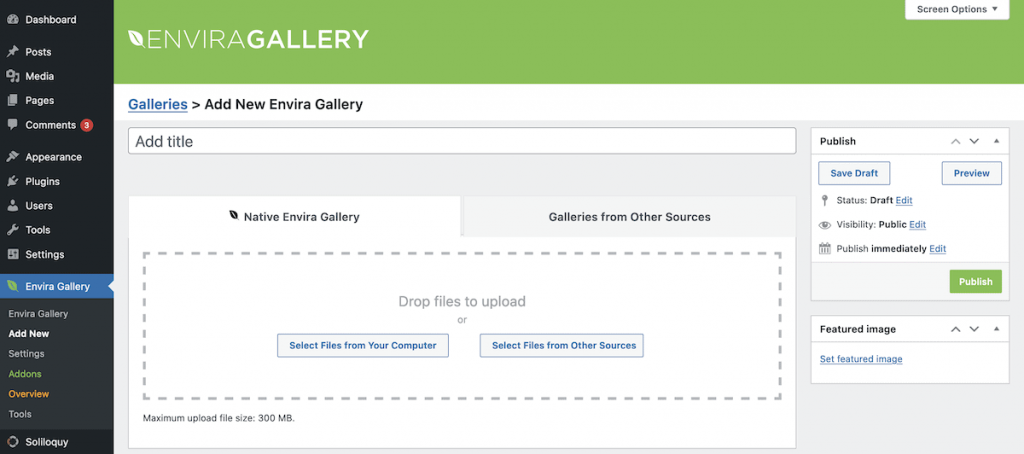
…while the other lets you build a gallery from either an Instagram feed or WordPress’ featured content:
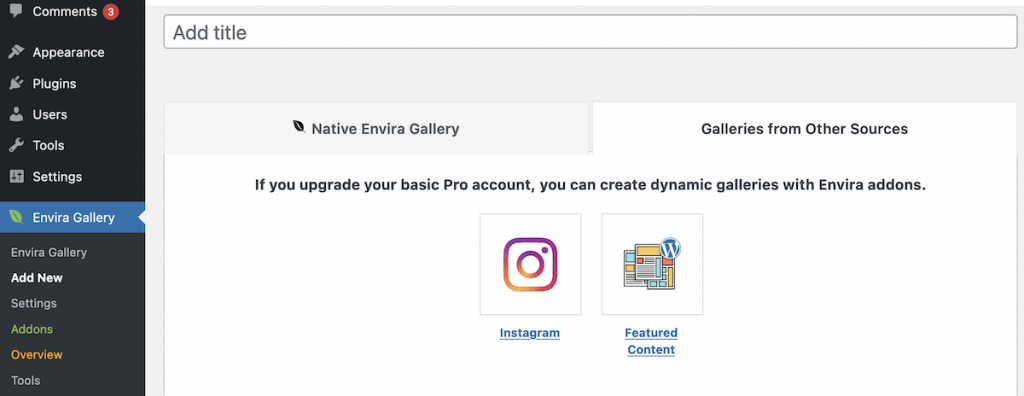
We’re going to add images from the Media Library here, using the familiar interface. Once you make your selection and confirm, you’ll see the images within the Gallery metabox:

We encourage you to look over the rest of the metaboxes before you click Publish – Configuration lets you change the gallery layout, among a whole bunch of options to customize the gallery design.
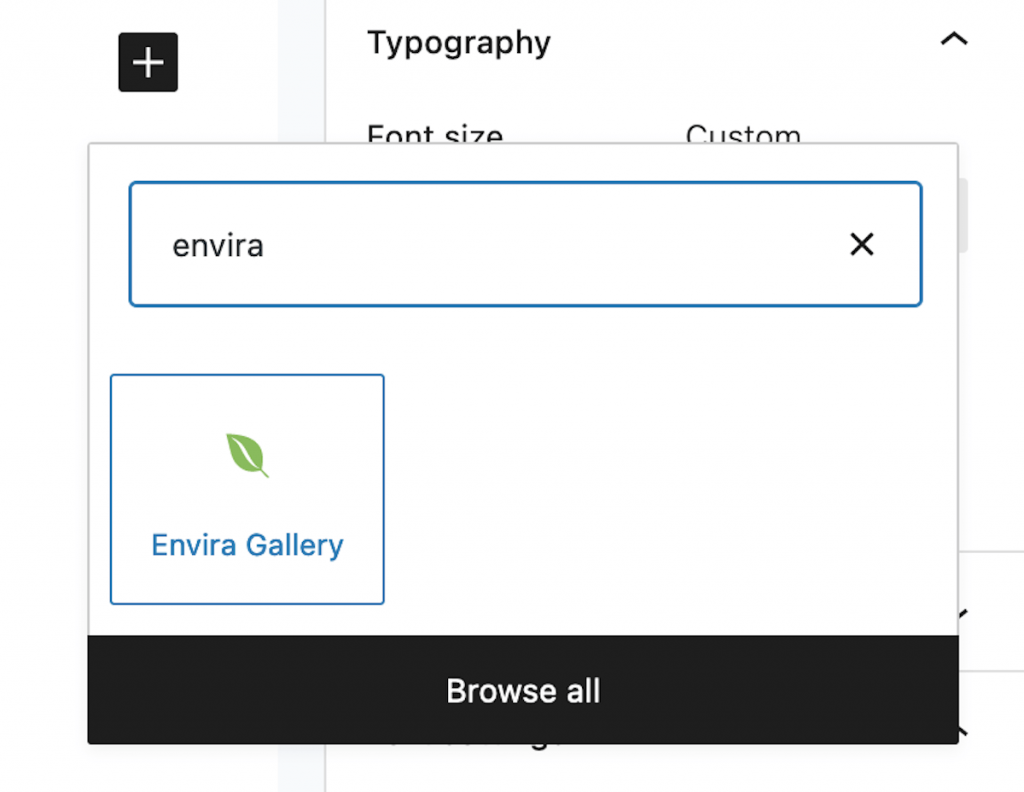
To add your gallery to your site, open a page within the Block Editor, and choose the Envira Gallery Block:
From the dialog, select the gallery of your choice, and you’ll see it appear within your page:
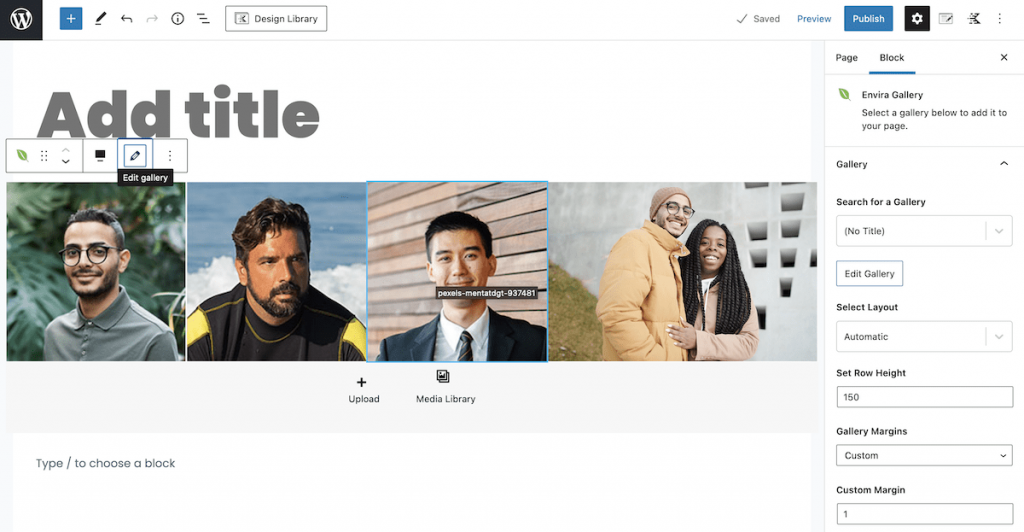
If you check out the Block Editor sidebar, you’ll see a number of options to help refine your gallery:
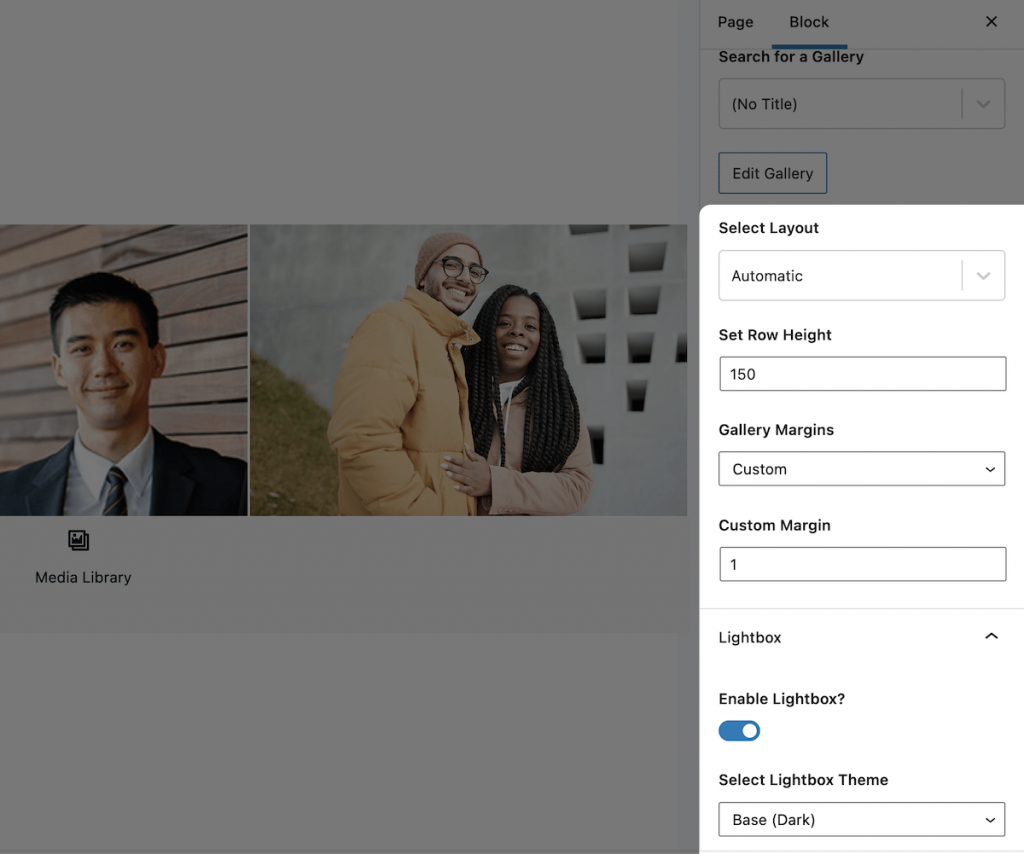
Your choice here is up to you based on your design and goals. However, once you choose the Publish button, your gallery will be available to view on the front end.
Wrapping Up
Photography is a medium to share, and a website is the best way to reach a lot of people at once. Using WordPress, the Kadence theme, and Envira Gallery, you can create a professional website to showcase your photography. What’s more, you control how it looks and works – it will give you the most flexibility to display your images to visitors.
Do you want to build a photography website, and will Kadence and Envira Gallery help you? Let us know your thoughts in the comments section below!








My career photography