One of the Envira Gallery plugin’s greatest strengths is how customizable it is, even for users who don’t have any coding experience! What’s even better for power users is that, if you do know some CSS, you can take that customization even further.
With the CSS Addon, you can add custom CSS options to specific galleries to shape, format, and mold exactly how you want them to appear on your website pages. Here, we’ll cover how to install and use the CSS Addon for Envira Gallery.
Requirements
- Any Envira license (Pro or higher)
- WordPress 4.9+
- Envira Gallery 1.3.4.1+
Installation
The CSS Addon, like any other addon, can be installed in one of two ways: either through the Envira Gallery dashboard or manually from the Envira Gallery page. For help learning how to install and activate Envira addons, follow our instructions here.
Remember, in this instance, you’ll want to activate the Envira CSS Addon.
Setup
Step 1 – Create or Edit Your Gallery
The CSS Addon allows you to create custom CSS code for your gallery. This works on a per-gallery basis.
In order to customize your gallery, you first have to have created one! Either create a new Envira Gallery, or select an existing gallery to customize with CSS. You can follow along with our documentation for creating your first gallery to get started.
Step 2 – Add Your CSS
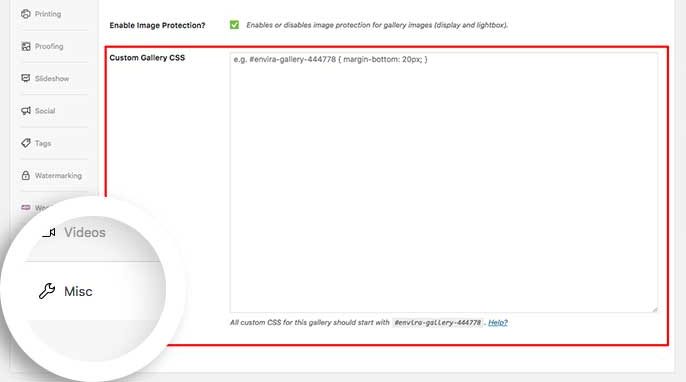
Once you’ve created a new gallery or chosen one to customize, select that gallery and click the Misc tab in the settings panel on the gallery edit page.

Scroll down to the Custom Album CSS field, located below the Enable RTL Support feature:

Here’s where you’ll enter your custom CSS. Note: the instructions state that you should label your custom CSS sections with #envira-gallery-xx (where xx is the internal number of your gallery). This ensures that customizations you make to your gallery only apply to the gallery you’ve edited. Remember, CSS customizations are applied per gallery.

The customizations can be as simple or advanced as you want. For example, you can create gallery-wide changes to the margins. In CSS terms, a “margin” is the outside space of an element… When you have larger margins, you create more space around the outside of the gallery.
So, if you add the following CSS to your gallery, you’ll create a 40-pixel space around the gallery on all sides:
#envira-gallery-xx { margin: 40px 0; }
Likewise, if you add the following CSS to the field, you’ll create a border 5 pixels thick around each image inside the gallery:
#envira-gallery-xx .envira-gallery-image { border: 5px solid #222; }
Of course, these are just two of the customization options available to you with the CSS addon. Really, the possibilities for tailoring your Envira Gallery are endless.
Step 3 – Publish or Update Your Gallery
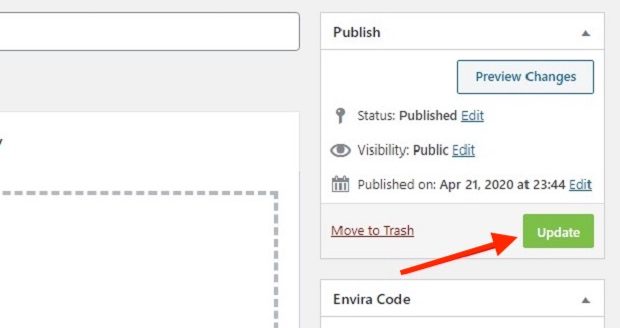
Once you’re happy with the customizations you’ve made to your Envira gallery, simply publish your new gallery or update your existing gallery by clicking the Publish or Update button. These buttons can be found in the same location on the right-hand side of the screen.

Finally, click Publish or Update on your gallery to save the changes.
The customizations and adjustments you can make with the CSS Addon are pretty limitless. With that in mind, here are some sample styling guidelines you can use to help you fully leverage the power of Envira Gallery and custom CSS.
FAQs
Q: How can I get started writing CSS for Envira Gallery?
A: CSS is its own coding language with a ton of options and rules. Your best bet, outside of learning the specific Envira Gallery rules, is to learn the basics of CSS here. But, if you’re looking to learn CSS with the sole intention of customizing your gallery, try this tutorial instead.
Q: Why isn’t my CSS change showing?
A: Check that you’ve added your CSS to the Custom Gallery CSS field and not the Custom Gallery Classes field (shown below).

Q: Is this the only way to add CSS?
A: Nope! You can use the WordPress customizer to add Additional CSS to change your galleries or even customize your theme. Check out our guide on How to add custom CSS to the WordPress Customizer.
Q: Does custom CSS work for albums, too?
A: Absolutely! On the Misc tab of an Envira Album, you’ll see the same options to add your CSS. Simply follow the same steps as those outlined above to customize your Envira albums with CSS.


