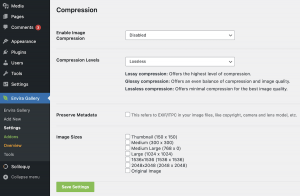
Compressing images means that it will save space on your server making image file sizes smaller than when you uploaded.
To enable compression, go to Envira Gallery in your WordPress admin, and then Envira Gallery settings.
Next, go to the Compression Table, and enable image compression for either Envira Gallery Images or All Media Library Images.

Now you have to choose your compression level.
- Lossy compression offers the highest level of compression.
- Glossy compression offers an even balance of compression and image quality.
- Lossless compression offers minimum compression for the best image quality.
If you’re a photographer, we may want to decide to preserve the metadata in your images, details like copyright, camera model, and lens model.
Finally, choose what image sizes you would like to compress.
Now you can create a new Envira Gallery, upload images and instantly save space on your server making your website run faster.
Access to the Compression Tool requires a paid Envira Gallery license. To upgrade from Envira Gallery Lite, visit our website.
We hope the Compression Tool helps you create your best and fastest photo galleries with the Envira Gallery plugin!


