


Sports photography requires high shutter speeds. During the day, and under bright floodlights, this isn’t a problem. In less than perfect light conditions, how do you photograph action?
Prime examples of low light situations that still require high shutter speeds are indoor sports, night time or evening games, or games in low light arenas.
There are a lot of ways to keep your shutter speed up, especially as you gain more comfort with the exposure triangle.
Modern technological advances have been great for sports photographers. Large aperture, fast focusing lenses help tremendously with sports photography.
Modern mirrorless cameras have also given photographers even better sensors and process for low light shooting.
There are, however, other ways to get great shots in low light. Fancy mirrorless cameras and expensive lenses are fantastic, but they arrive with a hefty price tag.
Hence, we will also be delving into methods that allow you to compensate for these expenses both in the field, and while editing your images.
Here is how you are going to learn to shoot sports photography in low light:
- Challenges of Photographing Sports in Low Light
- Best Camera Settings for Low Light Sports Photography
- Tips and Tricks for Shooting Sports Photography in Low Light
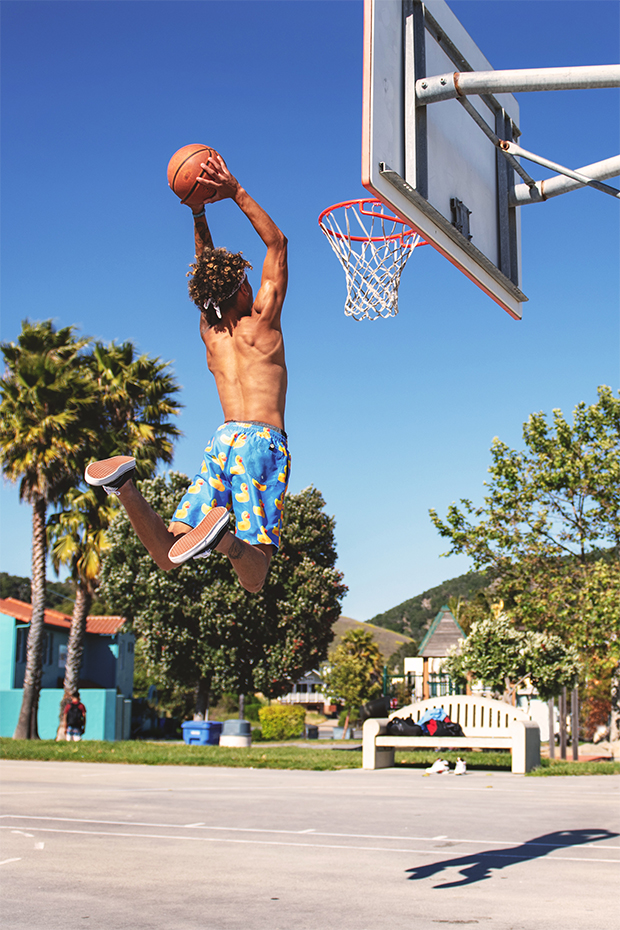
Take this fantastic example of a low light shot:
How did the photographer take this? Try to figure it out as you read this guide! Pay specific attention to how the motion is frozen, how much light is in the shot, and where the photographer was.
What lens do you think they used? What was its focal length and aperture? How did they choose their settings?
Imagine that the photographer had to guess their settings. What modes and key settings did they change? What was the most important setting for this shot?
Together, these different elements should compile a strong understanding in photographing low light action. While the primary application of this tutorial is sports photography, these methods can be applied to other types of photography.
This tutorial will teach you the basics of sports photography, before you delve into these technicalities.
The Challenge of Low Light Sports Photography
Shutter speed, shutter speed, shutter speed. When you are taking photos of action, your shutter speed is key. In general, professional sports photographers maintain a very high shutter speed, with professional sports DSLRs or mirrorless cameras often going down to 1/8000th of a second.
Action can still be frozen with relatively lower shutter speeds. Something like 1/800th of a second can still capture motion. This is ten times longer than 1/8000, but might result in some blur.
While these medium shutter speeds can freeze action in larger objects, like people, fingers and extremities may still suffer from motion blur. You want to maintain a higher shutter speed.
Finding the Best Shutter Speed for Low Light
It is time to tune in on your shutter speed. Depending on the type of sports photography you are shooting, this can vary. Many indoor sports like basketball or boxing have moments where the action slows down, and you can still get favorable shots.
For example, someone hanging off of a net after dunking, or someone at the apex of their jump. In boxing, time almost slows down for a second after someone is hit. These emotional moments make up for what they lack in motion with emotivity.
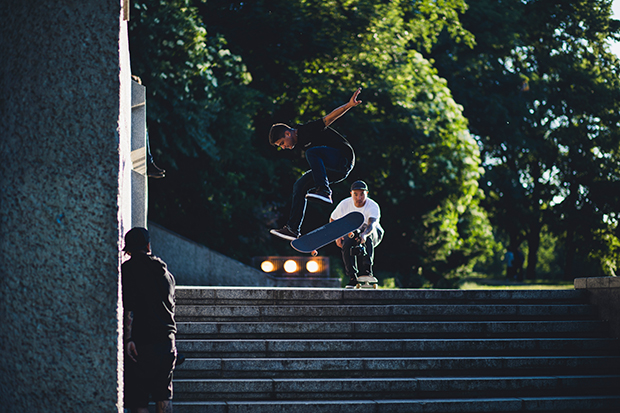
Here is an example of such a moment:
This moment displays intense action. It may also be the moment the athlete is at the highest point in his jump, therefore he has slowed down. Furthermore, at this point in the athlete’s arc, their limbs are moving less.
This combination of factors led to perfectly sharp, frozen action. While these are great, there are many other times in sports photography where waiting for a moment like this is not the road to success.
In times where this strategy does not work, there are several things you can do. You can raise your ISO, but you’ll have to deal with the noise from high ISO levels — more on this later.
The other option is to use a lower aperture, although you probably already are.
These changes in settings allow you to manipulate your shutter speed. Taking advantage of the control a DSLR or mirrorless camera gives you is an acute skill that sports photographers need to learn. It is vital in indoor sports.
Getting Good Images in Low Light
Sometimes, you need to bite the bullet. You may not have access to the myriad of four or five figure professional lenses that sports photographers use. Instead, choose to capture the action to the best of your gear’s ability.
You may not have that fancy mirrorless camera that shoots 20 frames a second at 100,000 ISO and allows ridiculous shutter speeds.
Image stabilization isn’t necessary to capture a great image. Instead, focus on what you can achieve, and practice until you outlearn your own kit.
Indoor sports suffer here especially, because, sadly, the lighting is often lackluster. Shooting in a RAW image format rather than jpeg is especially important.
There are several things that the RAW file formats allow you to do:
- Avoid more noise by pushing your image
- Better use of luminance to remove noise from images, as shown in this tutorial
- Ability to change white balance
- Local edits that can take focus away from noise or imperfections in the freezing of motion
Changing contrast, haze, or other variables with global adjustments is a great way to help fix an imperfect low light image.
Luminance is one of these adjustments that can help get rid of overall noisy photos. Luminance is especially useful because you can target certain areas of images with it.
Indoor sports often have weird lighting, so this is where white balance comes into effect. White balance adaptations allow you to compensate for strange lighting across images. Not having access to full white balance editing results in weirdly-tinted images of some entire sporting events.
Local edits allow you to move the focus to key players, or motion, and focus on them rather than problematic parts of an image. Moving the audience’s focus in an image is a great way to have them ignore problems from poor image stabilization, low shutter speed, or high ISO.
Why is it so Hard to Get Awesome Action Images in Low Light
There are several reasons that you may be struggling to get that perfect image at a low light event. Don’t blame your gear first. Instead, ask yourself what you could have done differently.
What is stopping you from getting that perfect low light image?
One key problem a budding sports photographer may run into is the inability to quickly navigate and manipulate their settings. Indoor sports often require the ability to know what shutter speed would have been best for the situation. If you can’t quickly adapt to the action, practice!
Another issue that you may be running into is not knowing how lighting dynamics change. If you are shooting an event that goes through twilight, using a semi-manual mode may be helpful. A mode like shutter priority or automatic ISO in manual mode will help.
The reason this will help is that it will remove focus from your camera. If you are trying to keep up with lighting, then you will fail to keep up with the action. Instead, if you let your camera keep track of some of the lighting, and make sure to shoot in a RAW image format, you might be able to pull off much better sports photographs.
Image stabilization, while not particularly useful at faster shutter speeds, can be important here.
If you are trying to get crowd or wider event photographs, image stabilization can help you dilute your ISO by a couple stops of light. Using image stabilization here may make some of your shots more successful.
Certainly, many new mirrorless cameras and DSLR’s come with in body image stabilization. Lenses with image stabilization are not required either, but it is more useful on lenses which cover various focal length options in this case. This is not a feature that you should prioritize over others.
More important features include:
- Frames per second: the amount of photos you can take per second in shutter priority
- Lens choice, especially a variety of focal length options
- ISO range: how high your ISO can go without producing negative effects
- Sensor size, from a crop sensor like Micro 4/3 or APS-C to full frame and beyond
- Megapixel count, although many professional sports cameras cap out around 24 megapixels
How Camera Settings Impact Your Images
The three main camera settings are ISO, shutter speed, and aperture.
Earlier, we learned that shutter speed is the king of sports photography. Now, we are going to look into how you can best manage your shutter speed.
Before dialing in your settings, make sure that you are metering correctly. Select a metering mode such as spot metering which will allow you to meter for an athlete.
The most important part of your image should be exposed correctly. If the most important part of an image is an athlete, making sure that the athlete is correctly exposed will allow you to best apply edits to them.
Twilight or indoor sports photography will lend itself to this by providing a high contrast dark background to your subject. This means that your audience will automatically focus on what is correctly exposed.
This is great for sports photographers, as it allows you not to have to deal with problematic distractions in the background of poorly lit venues.
Why Shutter Speed is so Important
Shutter speed is simply the measurement of how fast your camera’s shutter opens and closes. Camera sensors on both mirrorless cameras and DSLRs read out pixels on your sensor in the same way.
Camera processors, although more developed in mirrorless cameras, can only handle a certain amount of processing. This means that even modern camera sensors read one pixel at a time. This is important to understand so that you can understand why faster shutter speeds are required.
Traditionally, simple methods to measure minimum shutter speeds were devised. Often, these would be measurements involving your lens’s focal length and the light available. This is different in sports photography because you aren’t taking photos of the light available.
Sports photographers aim to capture action. With a longer focal length, actions occupy more of your sensor. Hence, a slower shutter speed with a longer focal length means that if motion is faster than the speed of your shutter, blur will occur.
Blur can be a stylist choice, but it is difficult to make blur appear natural. Instead, blur often makes images appear amateur. To combat blur from this problem, you simply increase shutter speed.
In low light action photography, you want your shutter to travel more quickly than your subject. When shooting slower sports, like children’s, or even a high schooler’s games, this means you can allow yourself a lower shutter speed.
On the other hand, with faster sports and projectiles, shutter speed must remain high.
This culminates in shutter speed being of the utmost importance. Lowering it significantly without artistic direction significantly impacts the quality of your photography.
Shutter speed should become the default and most important setting to keep in mind, especially while manipulating aperture and ISO.
The Importance of Aperture in Low Light Photography
Aperture has quite an important function in sports photography. In sports, it is important to have as much light as possible, as shutter speed devours light. Having a larger hole in your lens, no matter the focal length, contributes to a higher shutter speed.
Secondly, aperture allows separation. Normally, you can choose a large aperture as a method of separating an athlete from the background. Adversely, you can choose a smaller aperture to keep a larger situation in an image.
This fantastic image shows how aperture can be a tool to tell a story of an athlete, as well as guide us to a subject. What would have happened if this image was shot with a longer focal length, or with a wider depth of field?
These stylistic choices impact your photography. Being decisive about them will allow you to better understand creative differences and approaches. This is similar to choosing a focal length for portraiture; ask yourself why.
If you are looking for lenses that will allow you to up your sports photography game, check out this guide.
Low Light Sport Photography and ISO
Cranking your ISO can be painful. Noise is not pleasant, especially in sports photographs. So many sports photographers embrace the clean, noiseless image. How can you?
One key thing is to know how far you can stretch your camera’s ISO. Many full frame mirrorless cameras will allow a higher ISO before suffering from impactful noise.
Knowing how far you can push your ISO before it negatively impacts your image, or cannot be fixed in Photoshop is important.
Similarly, it is important to know when you should be adjusting ISO. Increasing your ISO should be reserved as the last part of your exposure. If you want a certain shutter speed and are already at the correct aperture, you should change ISO.
Tips and Tricks to Shooting Sports Photography in Low Light
Once you have understood how you can manipulate and leverage your camera settings to take a great low light photo, there are more extensive techniques which you can apply to these images.
Some of these techniques have more limited use cases, while others have rather broad applications.
Another disparity between several of these techniques resides in the different difficulties and amount of experience required to execute.
Photo Editing is a Sports Photographer’s Best Friend
The journalistic and editorial qualities of sports photography make it seem much less editing intense than other forms of photography. While this is true, and you will not be manipulating images heavily, you will need to learn how to manipulate light well.
Dodging and burning images correctly is important. Luminance masks and blending modes are equally great additions to your tool reservoir. Improving your photos with a variety of these complex methods can make up for a lot of the problems which may arise from low light photography.
Furthermore, learning some basic graphic design work and adding design elements to your photographic portfolio can lead to better use cases for images.
Several photo editing software exist for your editing needs. Adobe’s Photoshop and Lightroom provide comprehensive editing and a slew of editing tools. Skylum Luminar is great for people just starting in photo editing.
Working on implementing other creative direction can make you stand out from other, more traditional, sports photographers.
Additionally, you can implement black and white edits to dramatic photos for a more artistic appeal. This aesthetical choice can often be used alongside grain to give your photography a vintage look. This style is especially pleasing as a break from your instagram grid, or similar online platform.
Lastly, I highly suggest retaining a similar style for the majority of your public portfolio. Consistency is key, and those that like your images will hire you if they see you can reproduce the same great work.
This means that your images from low light events must flow along with those from events with clearly better lighting circumstances.
Panning Can Be the Ace Up Your Sleeve
Panning while taking an image can allow you an incredibly low shutter speed. This is personally one of my great tricks for low light shots.
If there is simply not enough light available to get one image that I can blow up and use without noise, this technique is where I go.
Instead of freezing motion, panning allows someone to capture motion in the background, rather than the foreground. Imagine a long exposure, where someone walks while the photo is being taken. That person would typically be blurred.
However, if the camera moves equivalently to the person, the background and other, immobile, subjects are blurred, while the foreground character remains in shape.
For incredibly speedy sports, this is also applicable. This sample image shows how effective panning can be to get a crystal clear image in less than ideal circumstances:
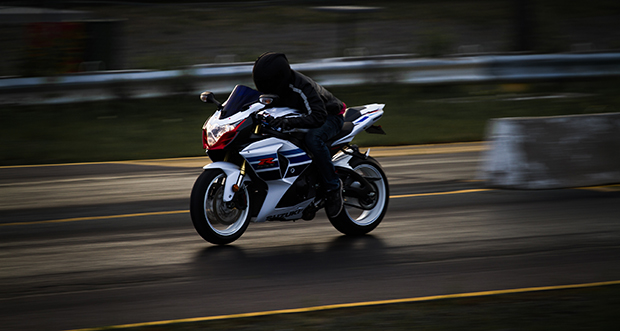
Depending on the speed of your subject, your shutter speed can be rapidly lowered. For subjects that have more extremities that may blur, you will want a shorter shutter speed. For larger, or more stable, subjects, you can get away with a far longer shutter speed.
Know When You Can Use Other Lighting
Sometimes, the light available is simply not enough. You might not even be able to focus. In these rare occasions, you have few options.
Strobes and similar lights are not really an option. These can be incredibly distracting, and even dangerous to athletes. However, at games with poor lighting in dark circumstances, asking to set up continuous lighting in a certain part of the field is a great way to get some better images.
For example, you may be at your kid’s soccer game. In this scenario, it would not be ridiculous to offer lighting the goals with flood lights, to allow yourself to take better photos, and for the children to see.
This won’t, of course, pass in many other places. Few events will ever allow lighting, but if the rules are unclear, reach out to the organizers. Many times they will fill you in on what you can do to improve the situation for yourself.
Was this low light sports photography guide useful? If it was, please follow us on Facebook and Twitter for more photography tutorials.


