


You just took your next great image. Or you would have, but you open it in Photoshop and you realize that to get it as sharp as it is, you pumped your ISO. How do you remove all that grain or noise out of your image using Photoshop to post it to your portfolio?
Thankfully, Photoshop provides fantastic tools which you can leverage to cover different degrees of grain. I will also be providing information on how you can lower your grain for your future images, and how different techniques can be used in different settings.
Digital noise is technically different than grain. “Grain” often refers to film grain and generally increases with higher speed (ASA/ISO) film. Film grain is a cool effect to add some creativity to your images.
Grainy photos, however, may not suit a clean modern and professional portfolio. Tailoring your portfolio to specific look is great for business, and grainy photos may very well be outliers.
This tutorial teaches you a fun way to make your digital photos embrace a more traditional, film grain, look.
Here is what I am going to be covering in this tutorial:
- Causes of Grain In A Photograph
- Easiest Ways to Remove Grain in Photoshop CC
- Comprehensive Guide to Editing Out Grain
- Best Tutorial For Grain Removal
If you don’t already have Photoshop, you can get it and more in Adobe’s Creative Cloud Plan for $9.99/month.
Causes of Grain In A Photograph
Learning your camera settings and their implications is a great way to eliminate or reduce grain in future photographs. There are several key causes of grain in a photograph that you should aim to avoid. If you are looking to learn about what causes your camera sensor to create grain, read ahead.
If you are just trying to get noise out of grainy photos in Photoshop CC, skip this section!
On the other hand, if you want to learn about specific camera settings that will lend to great images, feel free to read any of the following tutorials:
- The Best Camera Settings for Weddings
- Choosing the Best Camera Settings for Landscapes
- Infant Photography: The Best Camera Settings for Babies
- The Best Camera Settings for Portraits: Tips for Shooting Great Portraits
What is Noise or Grain?
Noise or grain in a photograph appears when your camera’s sensor needs to amplify the light available to show an image. Changing how your camera is taking that image can reduce the noise present.
Grain is another word for noise, although it sometimes alludes to the grain from film. However, removing grain and noise in Photoshop is often a similar process.
A common cause of grain in a photograph is a high ISO. There are many ways around using higher ISO’s, and keeping your ISO as low as possible is a great way to reduce all grain.
This first method will be particularly useful for photographs with smaller grain size and density. Later on, I will cover a similar process with more steps to removing grain in Photoshop CC.
Avoiding Noise 101
How do you avoid taking a grainy photograph? There are several functions on your camera that can limit this.
A lower shutter speed reduces light, meaning that your camera might need to bump its ISO to compensate. A smaller aperture increases depth of field, which is the area in focus. But this also lowers the amount of light hitting your camera’s sensor.
Knowing when to change aperture and the speed of the shutter is fundamental to understanding how you can lower your camera’s ISO.
If you are shooting on an automatic mode, such as your regular camera app on a phone, or the one built in to your digital camera, you don’t have as much control.
On a phone, download an application that allows you to change these settings. On a digital camera, try using a mode that allows you to change ISO. Or, you can simply limit your Auto ISO to something lower than the maximum.
You can use your camera’s manual to find Auto ISO limitation functions. Also, take test shots and see the highest ISO you can use without heavy grain. Knowing what your camera can handle lets you know what you can and can’t achieve.
Here is a quick checklist for when you are in the field:
- Shoot at the lowest possible aperture
- Lower your shutter speed and ISO by the same amount of stops
- Continue this lowering process until you are at the lowest ISO possible or the image becomes too blurry for use.
Sometimes, grain is unavoidable. Lowering your shutter speed to the point of a blurred and unusable shot is a mistake. Remember that a noisy shot is better than a blurry one.
What Makes a Photo Less Sharp?
There are several causes of loss of sharpness in images. Noise and grain are both common problems, but here are some other smaller details to keep an eye out for in your photography:
- Missing Focus
- Especially at lower apertures on longer focal lengths, missing the small depth of field available will make your image less sharp.
- Diffraction Softening
- This occurs when you are taking images at an aperture which is too small. Not going above f/11 is a great way to keep images sharp.
- Lens problems
- Some lenses are older or have mold and dust inside them. Some are not made to the same standard as others. Using a tested sharp lens is a great way to make sure that the lenses are not interfering with your images!
- Low Megapixel Count
- A digital camera with a low megapixel count can still make great images. Problems occur when those images are blown up to large sizes, and these images then suffer as a result of their low resolution.
There are of course some areas where not everything can be controlled. Photography is often about giving and taking. Shooting an athletic event, dancing, theatrics, or anything fast paced will require a fast shutter speed and high ISO. But, a lot of the time, the quality of an image will depend less on lack of grain in these fields.
Easiest Ways to Remove Grain in Photographs
One of the easiest ways to remove grain in photographs is using Camera RAW functionalities. While this does work with .jpeg format images, a RAW file format will make this process better.
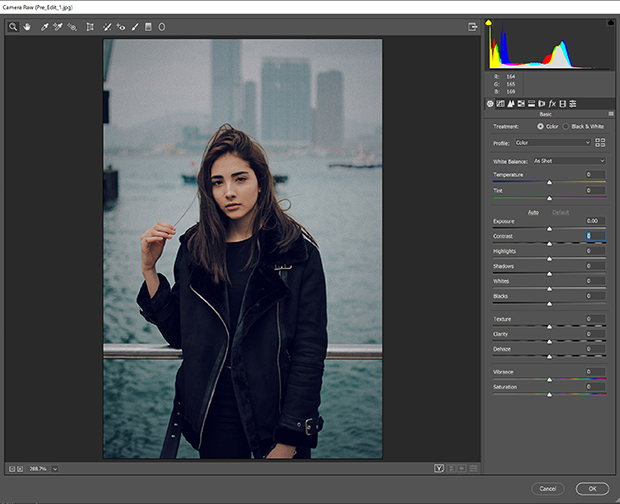
Certainly you do not need to be using Photoshop for Camera RAW edits, and you can use many other programs with similar functionalities. This is the image we are going to edit using Camera RAW in Photoshop CC:

Removing Noise from an Image in Camera RAW:
After you have opened your image, create a new layer by using the keyboard shortcut Control + J or Command + J. Another way to do this is by selecting your layer and Right Click >> Duplicate Layer. Learning these simple keyboard shortcuts makes Photoshop CC a much more efficient program!
Now, make your layer a layer mask. To do this, either Left Click the layer mask icon, or Layer >> Layer Mask >> From Transparency.
With your new layer selected (not the layer mask), use the keyboard shortcut Control + Shift + A or Command + Shift + A to add a Camera RAW Filter to the image. This window should open up:
Go to the Detail tab and add some luminance. Don’t worry about lost details in eyes and specific areas, that’s why we created a layer mask! After I added luminance to the photo, this is what the image looked like:

Now, set yourself up with a layer mask editing brush. Press D to change back to a black and white palette, then press X to have a black brush selected. Change the brush opacity to 50% by leveraging the slider in your toolbar.
Selecting the layer mask part of the layer you created, paint on black to reveal some of the original layer. This way, you can return more detailed areas of the photograph while keeping the digital noise overall reduced.
After painting on my layer mask to where I wanted it, this is how the photo came out:

Notice how some of the texture in the eyes, hair, and clothing is restored, but we still have the clean, non-grainy look going for us. This is what we are aiming for.
More Drastic Digital Noise and Grain Removal
There are stronger forms of editing out digital noise, but they also require more work in Photoshop. This is for larger grain size as well as grain density. The main method we are going to be using involves several steps.
We will be targeting grainy photos in an attempt to reduce noise. Reducing noise in this method will allow you to resharpen areas more effectively than the previous method!
Finally, these are the steps to removing grain in Photoshop CC:
- Removing Larger Pieces of Grain or Dust Particles
- Creating a Noise Reduction layer
- Smart sharpening for a sharper photo
This is the photograph we are going to be working with in this section of the tutorial:

Easiest Ways to Remove Grain in Photoshop
Firstly, I needed to remove the dust and scratches present. These can happen for a variety of reasons. Scratches on your sensor, lens, or dirt in similar places can cause blemishes in your image.
Even a slow shutter speed and debris floating around will cause issues. These could have also been from scratched film, but they’re not too hard to get rid of.
I used a combination of three tools to complete the steps to removing grain in Photoshop:
- The Spot Healing Brush (Keyboard Shortcut: J)
- Another tool called the Clone Stamp Tool (Keyboard Shortcut: S)
- The Content Aware Fill tool in Photoshop CC (Edit >> Content Aware Fill)
This is the photo after despecking its entirety:
Making your Noise Reduction Layer
Now that I have removed the larger problematic pieces using the easiest ways to remove grain in Photoshop, I can duplicate my layer. This is done as it was previously, using Control + J or Command + J. Alternatively, Right Click >> Duplicate.
With my new layer, I am going to apply the Reduce Noise filter, by pressing Filter >> Noise >> Reduce Noise. Using a higher strength and making sure to preserve details somewhat, I came to the following less grainy photograph:
While this achieved a similar effect to the Camera Raw Filter used above, it preserved much more detail in areas like the jeans and sweaters. However, it did not retain as much of the background details, giving a stronger out-of-focus bokeh effect.
Now, create a New Layer Mask as you did above. You can brush on light amounts of black to return even more details. Do not go overboard, or else you will lose what you have gotten so far.
Creating a Smart Sharpening Layer
Duplicate your layer again. Apply your layer mask to the layer by Right Clicking >> Apply Layer Mask. Finally, apply a Smart Sharpen… filter to your almost non grainy photo.
To apply this filter, go to Filter >> Sharpen >> Smart Sharpen. I recommend sitting somewhere between 200% and 250% on the slider. Leverage all the sliders until you have a sharper image, but not to the point where the grain is once again visible.
Make sure that you are selecting Remove >> Gaussian Blur. This step removes a lot of the problematic blurriness created above.

Finally I create another New Layer Mask, and make sure that only the areas I want are painted on. A lot of this process is subjective to deciding which areas the grain is both prevalent and concerning in.
This is the final photo I arrived to with this process:

What this process does not offer that a Camera Raw Filter does is speed and reliability. Using the Luminance slider in the Sharpen tab will always help a photo have less grain. Sometimes, this comes at the cost of over-smoothing to achieve this look.
Best Tutorial for Removing Grain in Photoshop
There are a lot of tutorials for noise reduction out there, so here is a short list of some of the best resources for this process. Finding the best tutorial for removing grain in photoshop is more about finding the tutorial that suits your images. There is not a catch-all method for noise editing!
Best Tutorial for Removing Grain in Photoshop
Photoshop Essentials has a fun quick tutorial covering some faster methods for removing grain. Because it is so fast and simple, this could be an easy way to show gradual grain reduction.
If you’re looking for a tutorial that teaches you how to avoid grain to a higher degree, this is a fun tutorial on Digital Photography School. I would urge you to remember that a blurry image is worse than a noisy one!
This tutorial on tutvid uses some in depth methods that require a bit more tinkering to get working properly. I do suggest this for cityscapes or landscapes, although you shouldn’t be getting much grain if you have a tripod.
Other Tutorials For Getting Around Grain
Replacing a background with a cleaner shot can do wonders for the grain of a photo. Since a lot of high ISO images are shot in darker settings, having a cleaner black or charcoal can help a lot. This tutorial teaches you how to make a background transparent for replacement.
For a more full replacement, check out this tutorial. It covers a lot of quick ideas for replacing backgrounds for your most grainy photos.
In a similar vein, getting around hair can be very annoying. Some haircuts have bizarre angles that don’t align themselves well with pixels. This is a tutorial for perfectly cutting out some hair!
Fun Ways to Use Grain
As I alluded to earlier, there are some great ways to use grain creatively. Achieving a film look is particularly compelling on Instagram today. You can achieve similar looks without having to spend time in a darkroom.
The tutorial I mentioned earlier on how to emulate film is a great starting point. That tutorial covers a lot of the basics of achieving a film grain look. If you’re after an even older and grittier feel, this tutorial has you covered.
Instead, if you are going for that sweet faded matte look that is always classic and popular, check out this tutorial. This is particularly a good step up if you are used to using things like VSCO to edit images currently.
Lastly, as a Photographer you likely have access to both Photoshop CC and Lightroom CC. There are many Lightroom CC presets that add film looks. This list definitely has a couple!
Noise removal is a tool that you need to tinker with! There is no way to remove grain that will be perfect for all images, so learning these basic grain removal techniques will help you out in the long run.
If you have either enjoyed or learned something from this tutorial, follow us on Facebook and Twitter for more fun and fast photo editing tutorials.


Just a big thank you for posting this. Unlike so many of the “solutions” posted online, yours actually works, and the techniques are explained simply and clearly. Much appreciated.