Need to play around with the transparency of your latest image?
Making an image transparent – even partially, can give you endless ways to enhance your material. For instance, you can overlay images to create unique compositions, place a logo against any background, and combine images to create new product mockups.
However, the question for many beginners in the photo editing world is how do you make an image transparent?
The simple answer is Photoshop. If you don’t have it yet, you can get Photoshop here, from Adobe’s site.
Photoshop is a popular image manipulation tool that allows you to add transparency to your photos in a range of different ways. Today, we’re going to look at several methods you can use to add transparency to your pictures, including:
Ready to get started? Let’s go!
Simple Ways to Make Images Transparent in Photoshop
Option 1: Making Layers Transparent
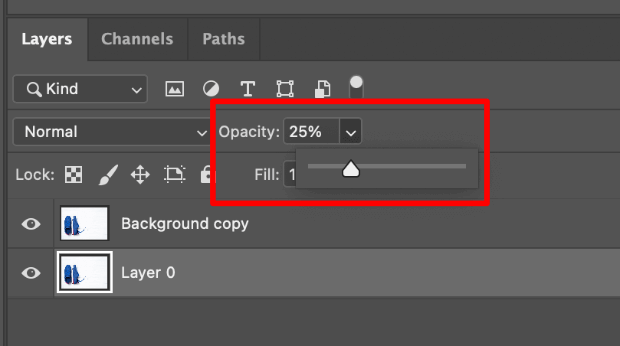
If you’re wondering how to make a picture transparent, one easy option is to learn how to make layers transparent. When you make a layer transparent, you can add it to other images, or place it onto products without worrying about background edges and opacity. For example, you might want to add a transparent logo as a watermark on your photos.
- Select the layer you want to make transparent by clicking on the Layers tab.
- Select the opacity level in the box that appears at the top of the Layers. The default is 100%, but you can take it as low as 0%.
- Save and download the image as a PNG file to preserve transparency.
Option 2: Removing the Background
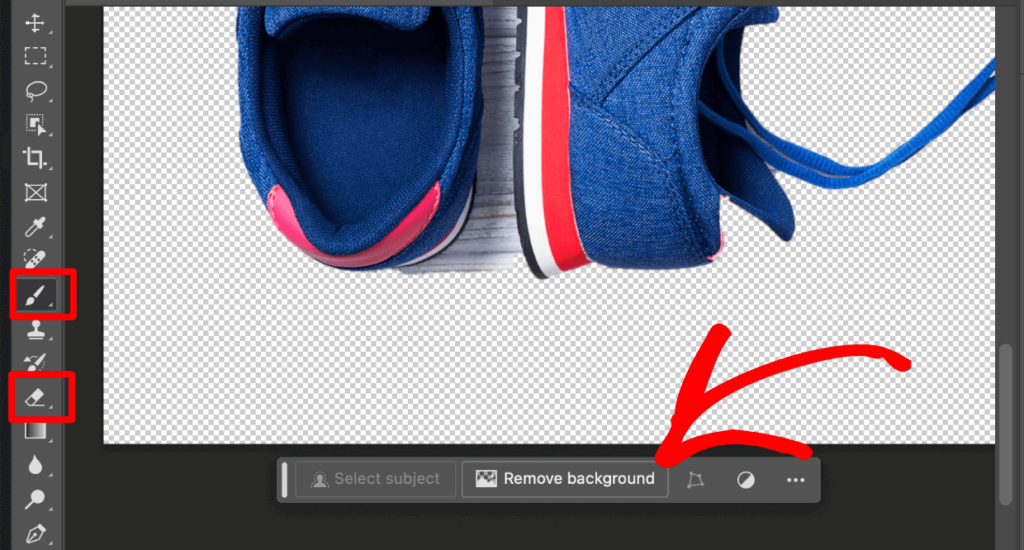
Maybe you want make the background transparent in Photoshop while keeping the focus of your image clear and opaque. That way, you can combine pictures or move the subject of your image elsewhere. To help you do this quickly, Photoshop offers a handy transparent background maker that will automatically remove backgrounds.
With the correct layer selected, click the Remove Background button below the image. Once you have a transparent background, you can easily refine it using the Add to mask and Subtract from mask buttons to paint over areas you want to restore or remove.
Alternatively, you can also use the Brush tool on the left-hand side of the image to add back any elements from the photo that shouldn’t have been removed and the Eraser or Magic Eraser to make additional areas of the picture transparent.
Option 3: Creating Transparent Selections
If you want to merge or combine pictures, then you might need to make parts of your layer transparent. To do this, you’ll need to select your layer again like above, but make sure that the layers underneath that image are transparent. Select the area you want to alter using the selection tool, then:
- Copy the area to a new layer by right-clicking and choosing Copy via Layer.
- Delete selected area from your current layer using the Delete button.
- Paste your copied selection into a new layer.
- Go to the new layer with your copied selection and lower the opacity on that layer.
Selection Techniques to Make a Background Transparent
There are a number of great tools to use for making selections and creating different layers in Photoshop. Any change to the background of an image, such as making it transparent, separating the subject from the background for targeted edits, or putting the subject on a solid background like white starts with selecting the subject.
Once the subject has been selected, you can remove the background or change it to anything you want. So, now that you’ve learned the basics on how to create images that are transparent in Photoshop, let’s take a look at several individual tools that help you create selections and make transparent backgrounds.
The following tools are listed in terms of increasing complexity, but make sure to try them all out! Some techniques work better for certain subjects than others.
Automatically Select Subject
If you want the easiest way to select a subject, Photoshop offers a menu option called Select Subject. With just one click, this tool uses AI to identify and select your subject.
- Open your image in Photoshop.
- Click the Select Subject button.
- Refine the selection as needed using the Quick Selection or Magic Wand tool.
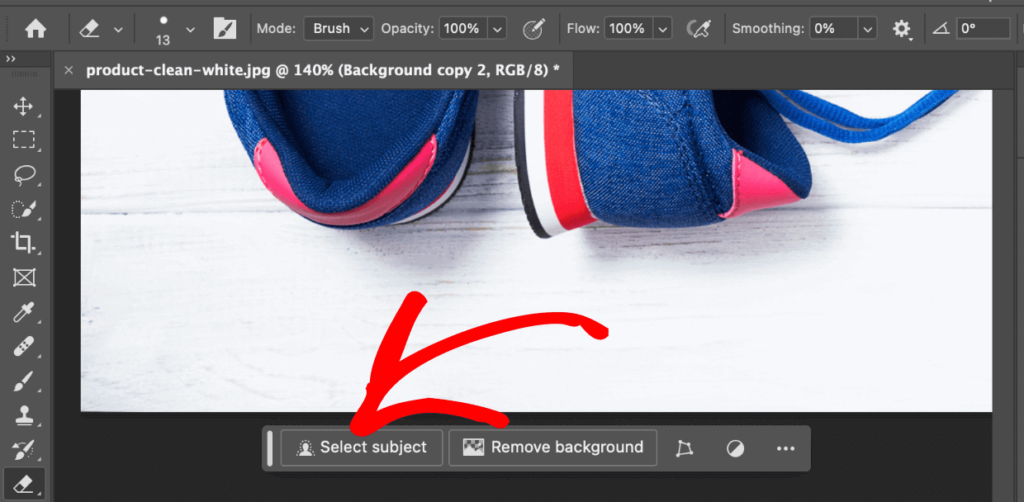
For some subjects, particularly people, this tool can do a great job. For others, it needs a lot of refinement. However, it works well with any of the other tools for refinement. It’s a great starting place for making any selection before you move on to making areas of the picture transparent.
Magic Wand Tool
The Magic Wand tool selects similarly colored regions. It’s particularly useful for subjects with strong contrast against the background such as a tennis ball against a blue sky or a bright, full moon against the night sky.
- Click the Magic Wand icon in the toolbar (shift + W).
- Set the tool to Add to Selection at the top to allow multiple clicks.
- Click on the areas you want to select, adjusting the Sample Size and Tolerance as needed.
- To deselect unwanted areas, hold down the Option key (Alt) while clicking.
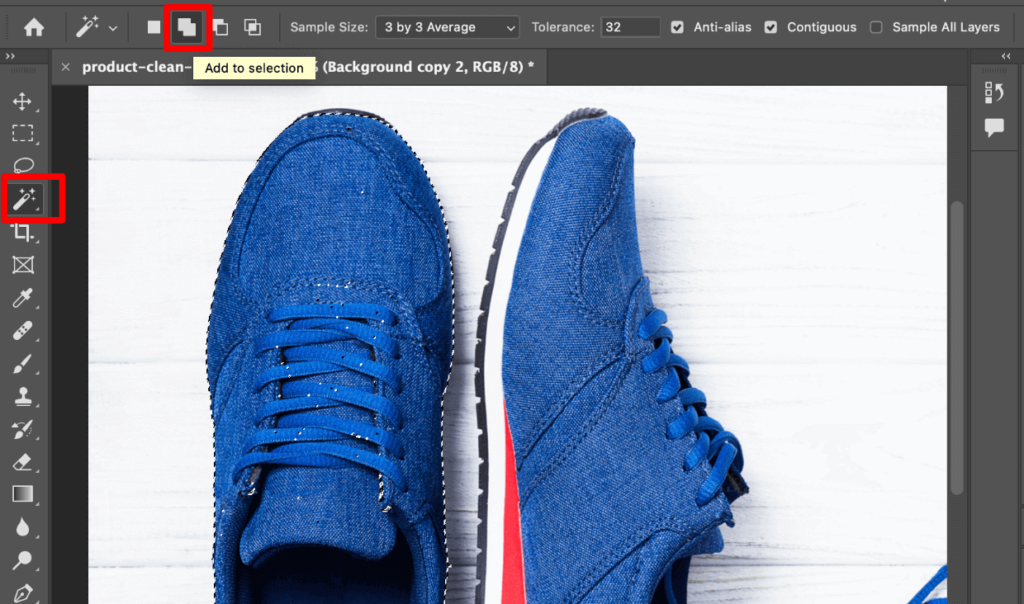
Once your subject is fully selected, click Select » Inverse from the top menu and then hit Delete to make a transparent image background.
Quick Selection Tool
The Quick Selection tool works like a brush, selecting similar-looking areas as you drag it across the image. It’s similar to the magic wand but works better for more photos that are more complex or have multiple colors.
- Click the Quick Selection icon in the toolbar (shift + W).
- Check the box to turn on Enhance Edge for refined edges.
- Drag across your subject to select it.
- To deselect unwanted areas, hold down the Option key (Alt) while dragging.
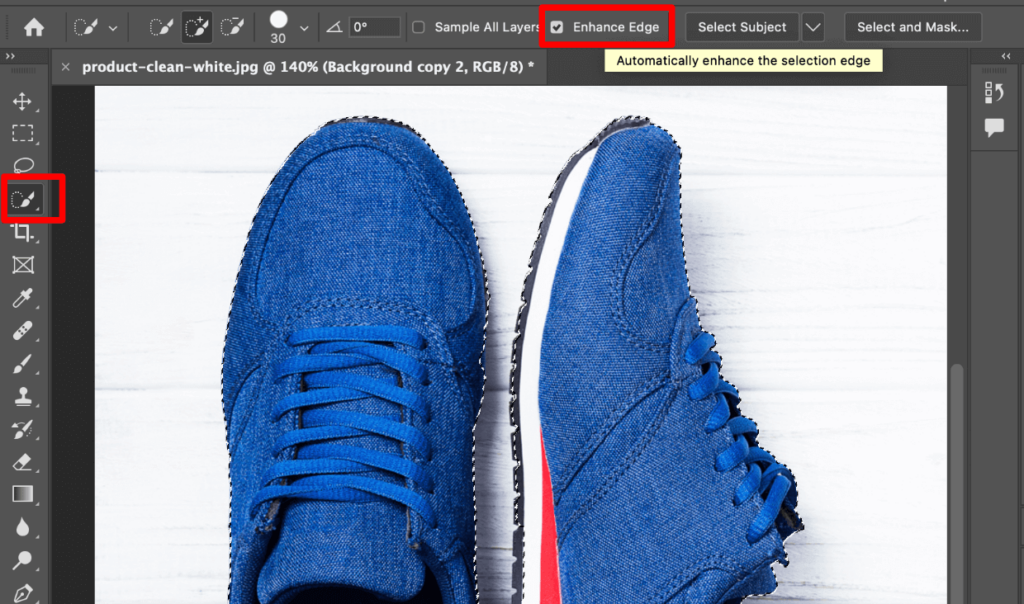
Once your subject is full selected, click Select » Inverse from the top menu and then hit Delete to remove the background.
Lasso Tool
Sometimes, it is just too hard to use an automated tool to make the selection. If you have a blurry subject, either from motion or shallow depth of field, automated tools don’t know where to stop. Or, if your subject is against a similarly colored backdrop, the automated tools can get confused and select the background as well.
For these tricky subjects, making a manual selection with the Lasso tool is one of the most effective ways to remove the background.
- Click the Lasso icon in the toolbar (shift + L).
- Set it to Add to Selection, which will allow you to easily go between adding and subtracting from the selection.
- Draw an unbroken line around your subject.
- To deselect unwanted areas, hold down the Option key (Alt) while drawing an unbroken line around the area you want to remove.
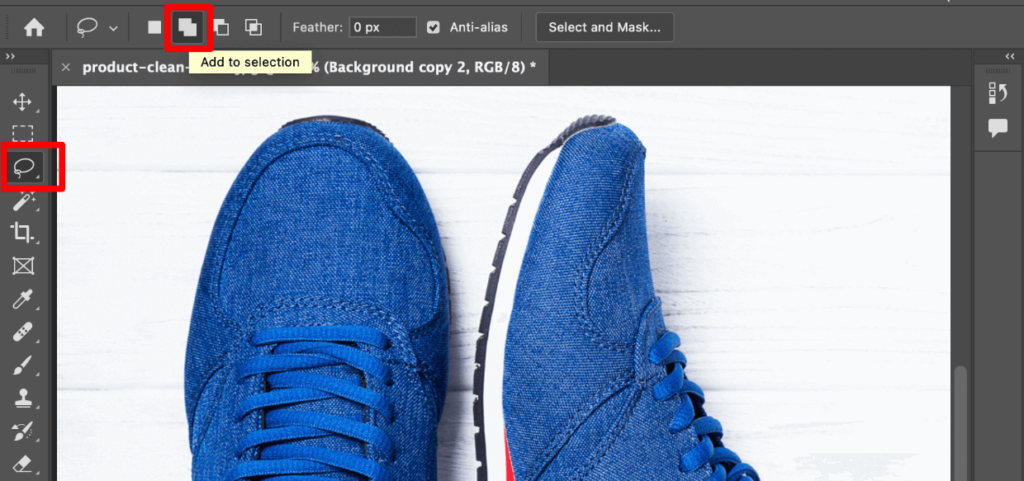
Just like you did with the automated tools, click Select » Inverse from the top menu and then hit Delete to create a transparent background.
Color Range Tool
Photoshop has one last tool to help select subjects against a contrasting background, the Color Range tool. It’s particularly useful when you have multiple similar colored subjects against a contrasting background, like a bunch of flower blossoms that you don’t want to select individually.
- Click Select » Color Range from your top toolbar.
- Uncheck Localized Color Clusters if you want to the tool to search the whole image for the colors you click rather than just the colors around where you click.
- Adjust Fuzziness to control how similar colors need to be for selection.
- Use the Eyedropper to select the main color of your subject.
- Use the Eyedropper + to add additional colors to the selection.
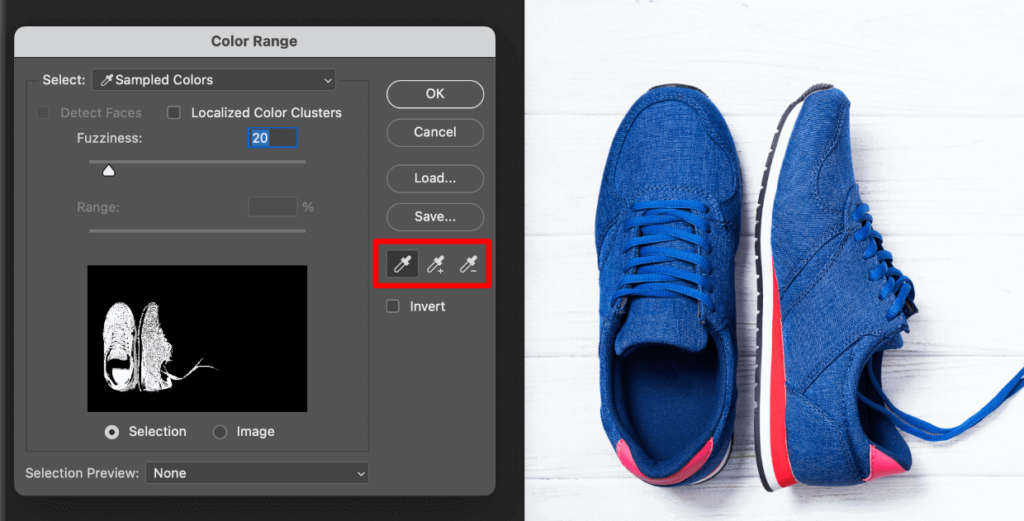
You can see a preview of the selection in the black and white box. When you’re happy with how it looks, click OK to make the selection.
From here, you can create a transparent background by inverting the selection via Select » Inverse from the top menu and then the Delete key. After that, you can clean up any stray areas with the Eraser tool.
Saving Photos with Transparency
Once you’ve learned how to make a picture transparent in Photoshop, it’s important to make sure that you can use those images without them accidentally taking on a new background when you open the file. The key is to make sure that your layers don’t merge when you’re saving your Photoshop file.
To preserve transparency, you need to save your image in the right format. Here are the best options:
- PNG: The most common format for transparent photos on the web. It supports full transparency and is widely compatible.
- TIFF: Ideal for print projects, it maintains high quality and supports transparency.
- PSD: Photoshop’s native format, perfect for ongoing projects where you need to preserve layers and transparency.
When saving your new transparent photo, click on the Format drop-down menu and select the format you want. Choose a location where you’ll be able to easily find your image and hit the Save button.
If you can’t see a PNG file option, then you may be editing your image in the CMYK format, which means that you’ll need to convert it into the RGB mode, so you can save as a PNG file. Don’t save as JPG as this will eliminate all of your hard work.
Frequently Asked Questions
Can I make a picture transparent in Photoshop Elements?
Yes, Photoshop Elements offers similar tools for creating transparency, though some advanced features may be limited.
How do I make a transparent gradient in Photoshop?
Create a new layer, use the Gradient tool with transparency enabled, and adjust the opacity as needed.
Can I add transparency to a JPEG file?
While you can edit a JPEG to have transparent areas in Photoshop, you’ll need to save it as a PNG or other format that supports transparency to preserve the effect.
How do I remove a white background in Photoshop?
Use the Magic Wand tool to select the white background, then delete it. For more precise results, try the Quick Selection tool or Pen tool.
Are there alternatives to Photoshop for creating transparent photos?
Yes, there are a number of free Photoshop alternatives and free transparent background makers. Many online transparent image makers provide simple PNG backgrounds with full transparency. These tools often have a simple interface and can be convenient for quick edits. However, they may have limitations in terms of image quality, file size, or advanced editing features. Additionally, when using an online PNG maker, it’s important to review the tool’s privacy policy, as you’ll be uploading your images to their servers.
There you have it!
Learning how to make a selection or image background transparent in Photoshop was probably much easier than you thought! Now you can use your transparent photos to create a stunning selection of pictures to add to your growing portfolio!
Ready to showcase your newly created transparent images? Check out Envira Gallery, the best WordPress gallery plugin for photographers. With Envira, you can easily create beautiful, responsive galleries that perfectly display your transparent PNG images.
Get Envira Gallery today and take your website images to the next level!
If you enjoyed this article, be sure to check out How to Remove Flash Glare in Photoshop.
Don’t forget to follow us on Facebook and X (Twitter) for the best photography tips, resources, and WordPress tutorials.


Picmonkey is still my go-to app though it offers limited features in the free version.
However, after Picmonkey I love Lightroom for its mult-editing features. Besides, its interface is simple and intuitive.
Thanks for adding this app on this list.