Envira Gallery Blog
Digital Photography Tips, Tutorials and Resources
Digital Photography Tips, Tutorials and Resources
Last updated on May 28, 2024 by [email protected] Reader Disclosure
There are multiple ways to isolate an object from a background. This technique is used for many different aspects in photo editing. You may wonder, how do you remove a background in Photoshop?
By removing a background in a photo, you can emphasize the main subject so that it is more prominent. Companies who sell their products online use this technique frequently. Here are some important aspects to learn when removing a background Photoshop.
To learn how to remove a background in Photoshop, you’ll need to have downloaded Photoshop. If you don’t already have it, you can get it through Adobe’s Creative Cloud Plan. This bundle also includes Lightroom for a total $9.99/month.
Understanding different instruments and how they affect an image is important to know before beginning the editing process. Knowing which instruments to avoid or which ones to choose is an important factor when starting out.
Here is some key information to know before starting to remove a background:
Background removal to isolate an object or subject can seem like a difficult process but in actuality is easier than one might think. By removing the background of a photograph, this opens up different opportunities to customize the background.
At first, removing the background will seem a little challenging but with repetition, the task will become easier.
The type of process chosen to complete the task will also determine how difficult the process will be. For example, if an individual takes a photo of a cat, creates a layer mask on the original photo, and brushes out the unwanted areas, this will make the task more time-consuming.
Photos of furry pets or people with a lot of hair can be more difficult to isolate. The process can become time-consuming because each individual strand of hair needs to be included. In these types of cases, using the Quick Selection Tool will be the easiest ways to remove a background in Photoshop.
The Quick Selection Tool is one of the best instruments to use because of its reputation for selecting objects with a busier background.
In other instances, photographs that have a more solid color surrounding the main object will make the selection process quicker. Different types of photos will have different process of removing a background in Photoshop.
There are several different ways to remove a background of a photo. The most common tools to use to remove a background are the Magic Wand Tool, Quick Selection Tool, Background Eraser Tool, and the Pen Tool.
Although each of these tools does the same task, they complete that task in different ways.
Background removal while using the Background Eraser Tool, completely deletes the selected areas permanently. Using a mask is the most advisable path to take because the actions made won’t be permanent, unlike the Eraser Tool.
When removing backgrounds from photos, stay away from the Background Eraser Tool. I do not advise using the Eraser Tool because it cannot be used with a mask, and so its actions can’t be undone.
Fortunately, the Magic Wand and Quick Selection Tools work well with layer masks. Always have a way to undo alterations to a photo even if an individual finalizes them.
Masks are a vital part of editing in Photoshop. Before you begin removing areas in a photo, make sure you understand how to use masks. Before commencing on a project, tackle the trickier tasks so then other projects in the future will seem easy.
Although Photoshop’s removing process isn’t for everyone, there are some alternate options to choose when removing a background from a photo. Follow these tips and instructions to tackle outlining a photo.
Layers are a vital part of working in Photoshop along with the order of the layers. Think of layers like making a sandwich. The bottom piece of bread will be less visible but will support the main part of the photo while the top piece of bread will be the most visible.
In Photoshop, you can apply Blending Modes to layers, which changes the situation for each layer but revolves around the same idea.
Different types of tools have the capability to remove the background of an object. Instruments such as the Quick Selection Tool, Lasso Tool, and Eraser Tool, give Photoshop some control over how the photo will look as an end product.
All of these methods require an individual to select areas but are not as precise and customizable as the Pen Tool. Using this instrument may not seem like the easiest way to remove a background in Photoshop but can give the best results.
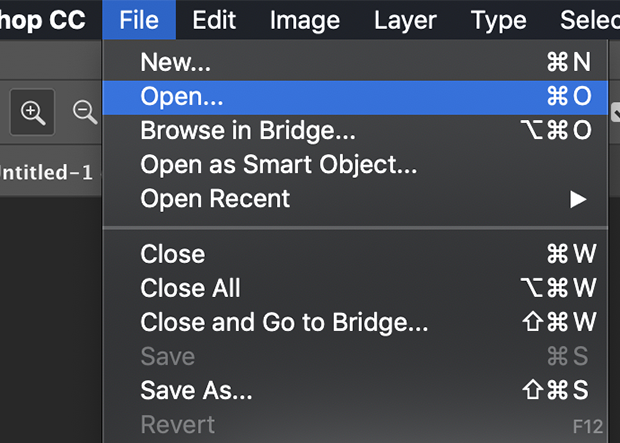
First, open a photo into Photoshop.
On the right side of the workspace, locate the original background layer in the Layers Panel.
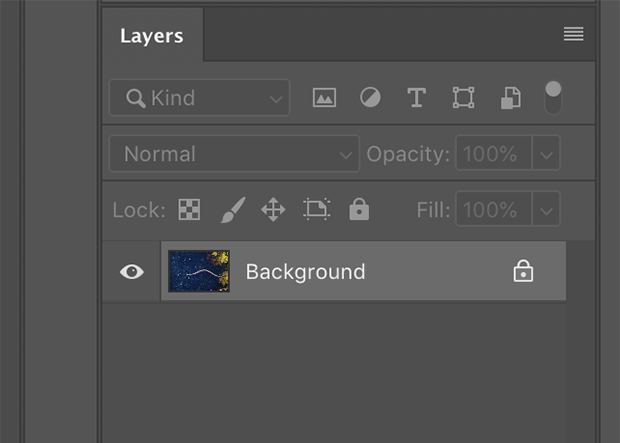
First, duplicate the original layer. Working on the original layer will make the task more difficult if needing to revert to the original file.
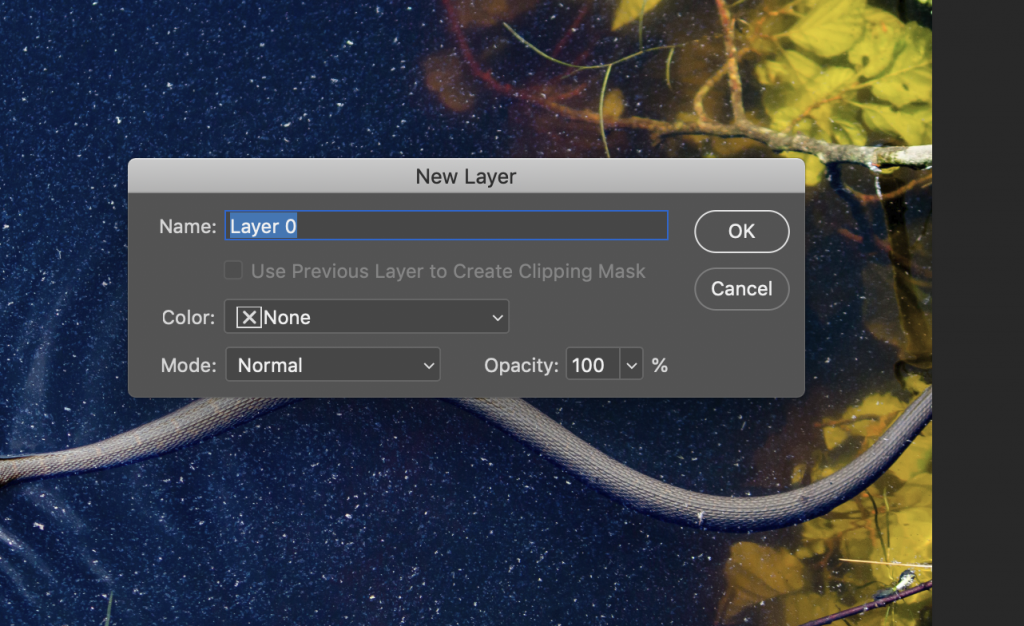
Double-click on the file to reveal the New Layer window and select OK.
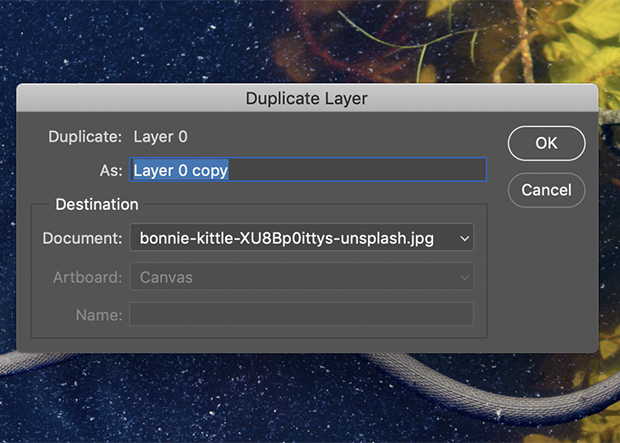
Now, right-click on Layer 0 to reveal a drop-down menu. Select Duplicate Layer.

The Duplicate Layer window will appear, then select OK.
Navigate to the tools panel on the left side of the Photoshop workspace. Within the panel, find the Pen Tool.
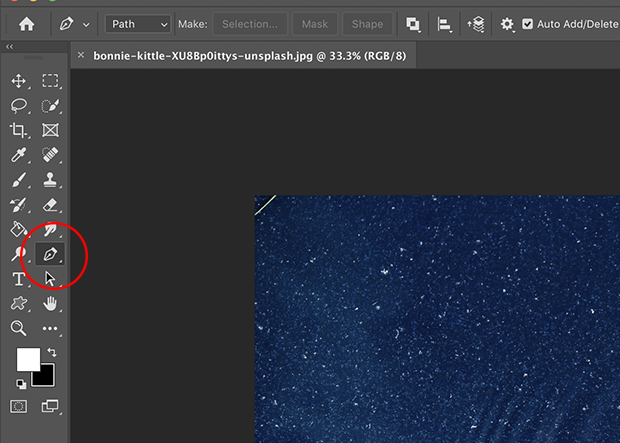
Once located, select the pen-shaped symbol and hold down the mouse to view the drop-down menu. Photoshop offers multiple pen tools, including the “generic” Pen Tool.
The Pen Tool operates manually, which means that Photoshop does not apply AI to decipher where to place anchor points. This gives creatives full control over deciding the design of the object.
For this project, select the top pen.

Before you begin altering your image, make sure to change the tool’s settings so that they apply to your project. Notice the different options available at the top toolbar. First, decide if you are creating a Shape or Path.
In this case, we want to remove the object, not create a shape of the object. Select Path to remove the object.

Now we need to customize Path Operations. This option notifies Photoshop how the lines we create should interact with each other. Two overlapping squares signify the Path Operations option. It is located next to the darkened “Shape” button.
Select the Path Operations button.
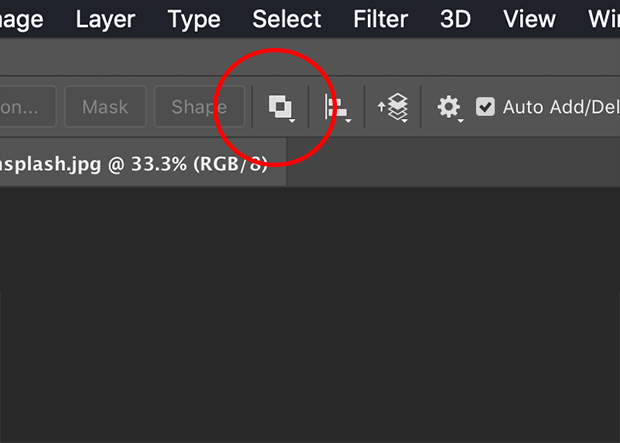
Once selected, a drop-down window will appear. For this project, select the Exclude Overlapping Shapes.

The last option to select is the Add Anchor Point and Delete Anchor Point checkbox.
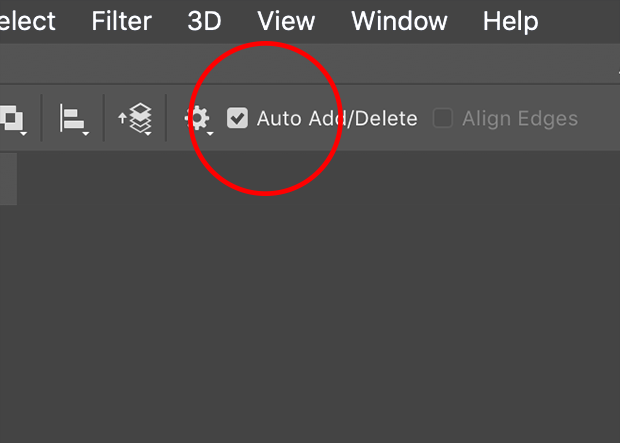
This allows you to add or delete anchors to any line that the pen has made. Anchors are identified by a blue square that appears throughout the created path.
Once you select all of the appropriate options, click on the canvas to place a starting point for the Pen Tool.
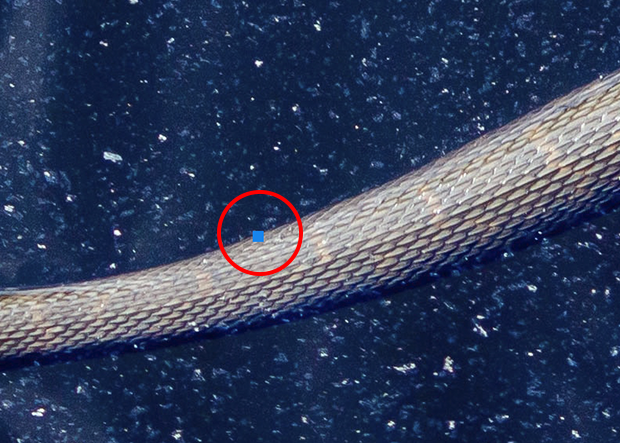
When creating more anchor points throughout the object, position the line so that it is slightly overlapping the image.
If you need to create a curve, select another point and hold down the mouse.
While holding the mouse, hold down the Command button on the keyboard and drag the mouse down. Notice how a curve appears within the line.

Once you finish outlining the object and connecting the anchor points, right click with the mouse over the outlined area. The cursor should have a “*” located next to the pen-shaped symbol.
With the original file selected, right-click the area to reveal a drop-down tab that offers different options. In this case, select Make Selection… and the Make Selection window will appear with different ways to customize the selection.

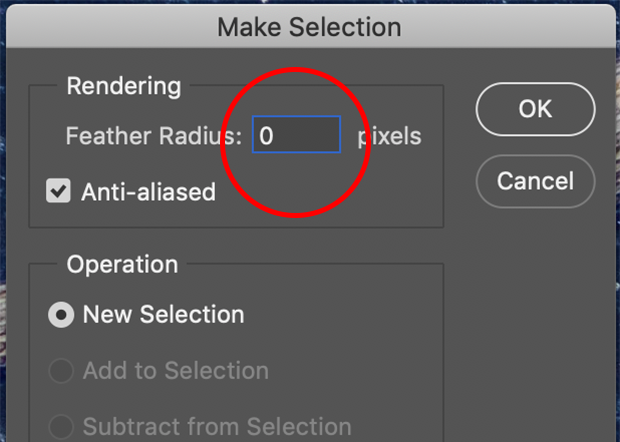
Within the Feather Radius section, set the pixels to 0. This will ensure that the edges won’t be soft.
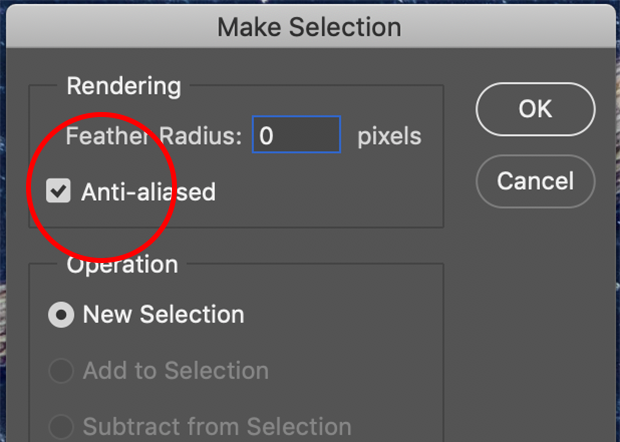
Select the Anti-aliasing box to ensure that the edges will be smoother and the color transition will be smoother.
Under Operations, select the new area to become a New Selection. Once all of the options are selected, hit OK.

A moving dotted line will appear around the outlined area.

With the area still selected, create a new layer mask which is located at the bottom of the Layers Panel.
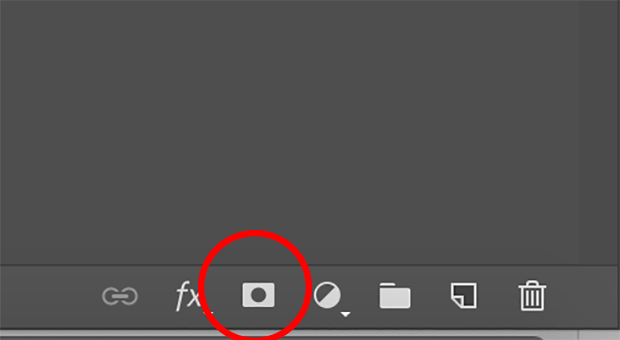
A layer mask allows any area within that layer to be temporarily removed or visible at any time.
When the new layer mask is created for the layer, make the original layer that is underneath the layer invisible.
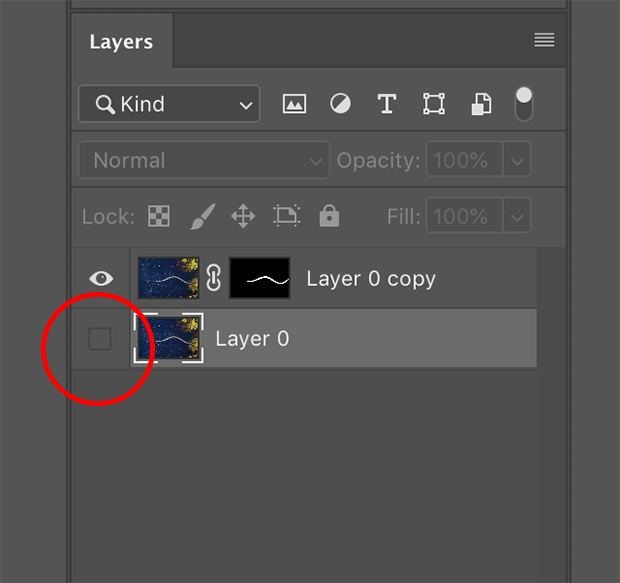
The object with a transparent background will appear. The bottom-most layer can be deleted if desired.

Notice how the layer mask shows the outlined and not outlined area in black and white.

One of the most popular Photoshop plug-ins for removing a background to an image is the Mask Pro plug-in. This popular program not only has been recommended by creatives but by Advanced Photoshop Magazine. Essentially, this plug-in is comparable to an instant Eraser Tool.
This program is helpful when editing large batches of photos or large quantities of detailed work. Also when an online store needs to consistently present products on white background, this program will cut down on the amount of time of editing.
Learning the steps to removing a background are important when it comes to editing. Understanding how each instrument reacts to a photo and what is the best instrument to use is vital. Along with understanding the most tedious situations, learning the fastest ways are also key elements.
One of the fastest ways to select an object, to then be put on a transparent background, is by using the Magic Wand Tool. The process of background removal with the Magic Wand can have different time variants. Depending upon the complexity of the background will decide how quickly the background can be removed.
If the background is more of a solid color, then a few simple clicks will select the background. In a case where the background is busier, then the Quick Selection Tool will be a better recommendation.
First, open a photo into Photoshop.
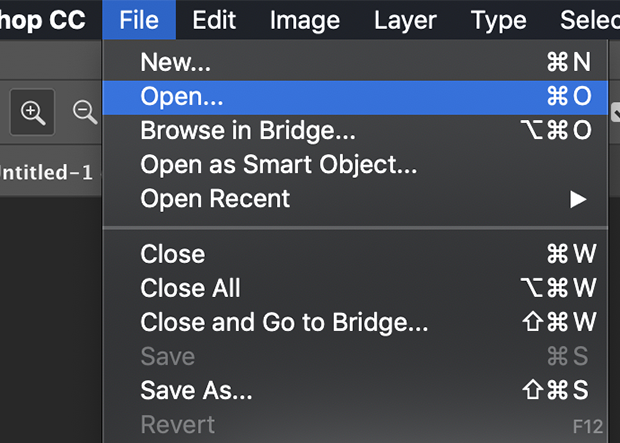
Like before, duplicate the layer by double-clicking on the file to unlock to layer.
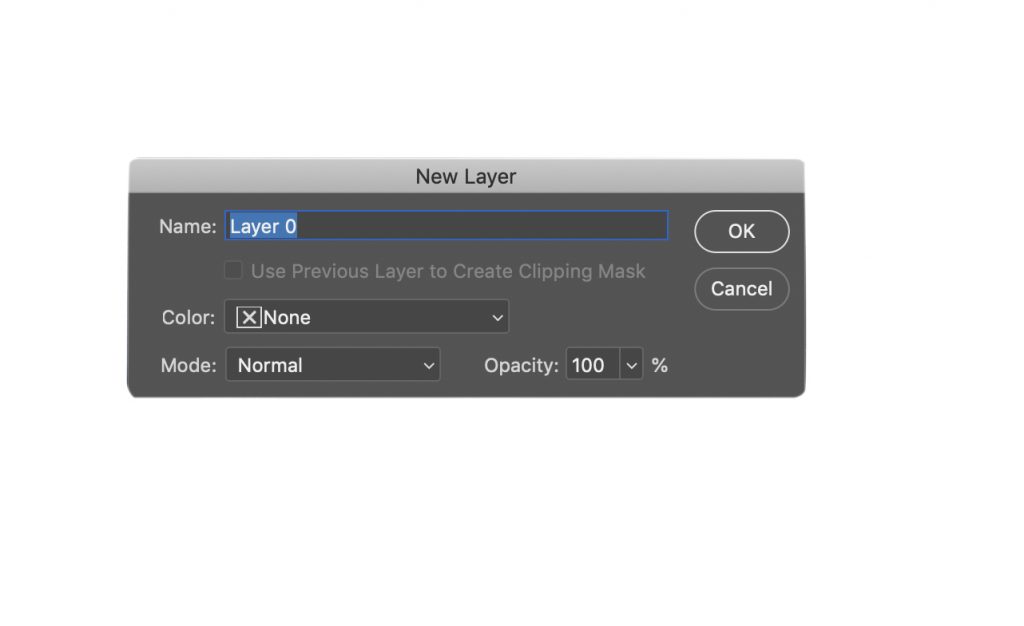
The New Layer window will appear and select OK.
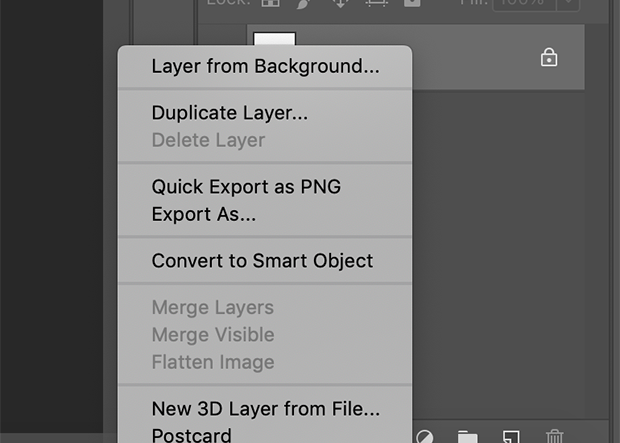
Now, right-click on Layer 0 to reveal a drop-down menu.
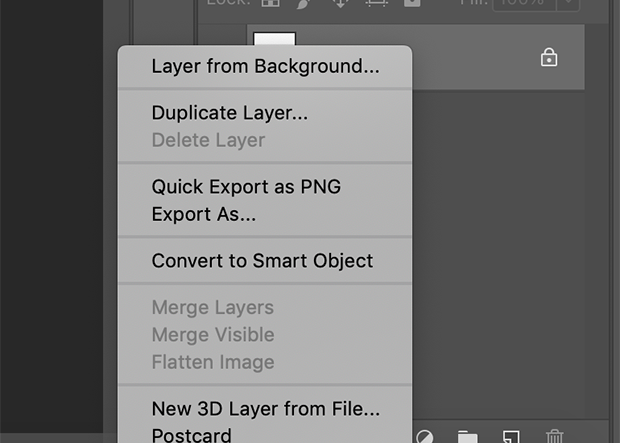
Select Duplicate Layer.

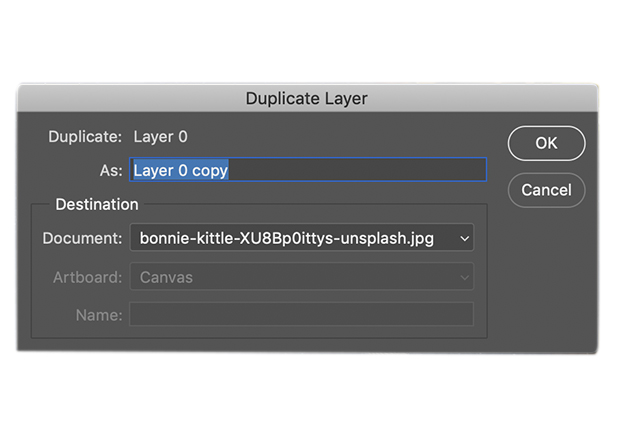
The Duplicate Layer window will appear, then select OK.
Select the Magic Wand Tool by locating the panel on the left side of the workspace.
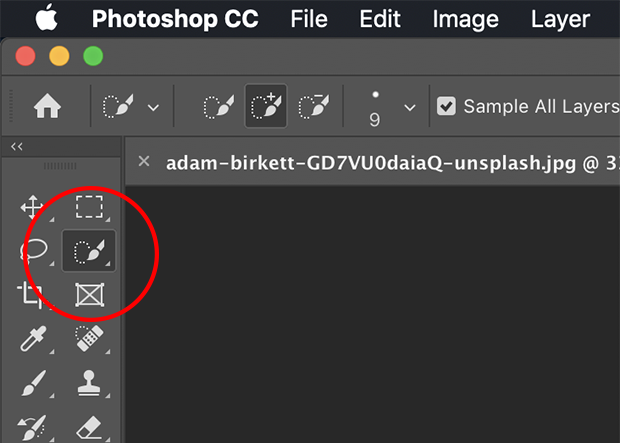
Within the Quick Selection Tool drop-down menu, which is identified by a dotted circle and a brush symbol, select and hold down the mouse to view the Magic Wand Tool.

Notice at the top of the workspace different options to customize the instrument for the selection.
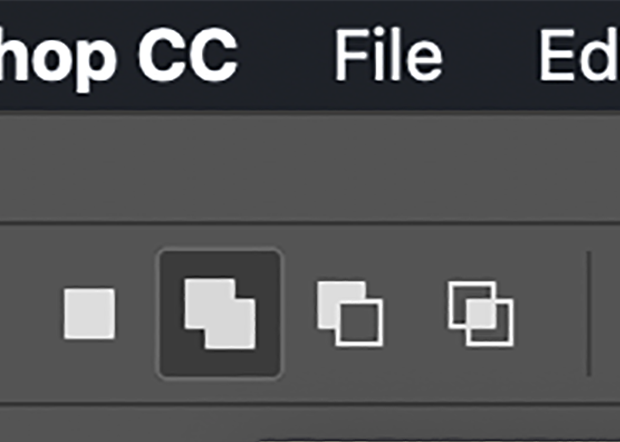
The first section, with multiple styles of squares, customizes how the the selections created will interact.
For this project, select Add To Selection. This option allows every selection made to be combined together.
Set the Sample Size to Point Sample, Tolerance to 32, and check the Anti-alias and Contiguous boxes.
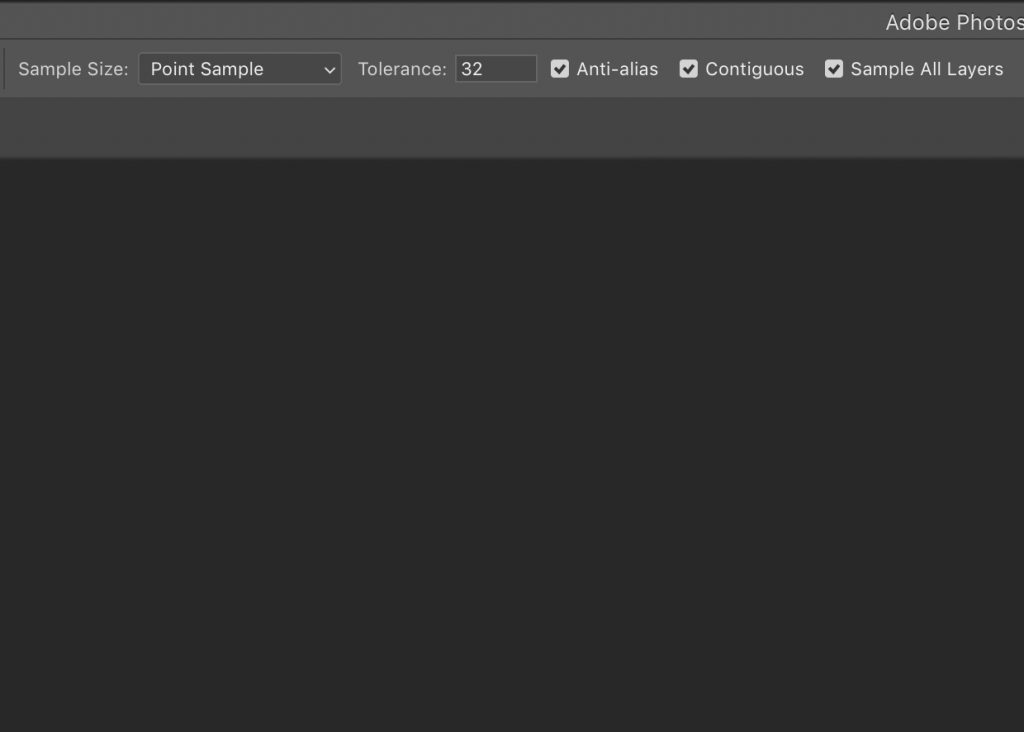
With the mouse, select the area around the object that needs to be removed from the background. Now a dotted line will appear around the area.

The Magic Wand selects similar colors. If your object contains multiple colors, you may need to click multiple times to select them all.
Currently, the Magic Wand Tool has selected the object. We want to select the background instead of the object, so we need to reverse or invert the selection.
Locate the top of the workspace and select Select. Within the drop-down menu, select Inverse.

Once you’ve selected all of the areas, locate the top of the workspace and select Select and Mask…
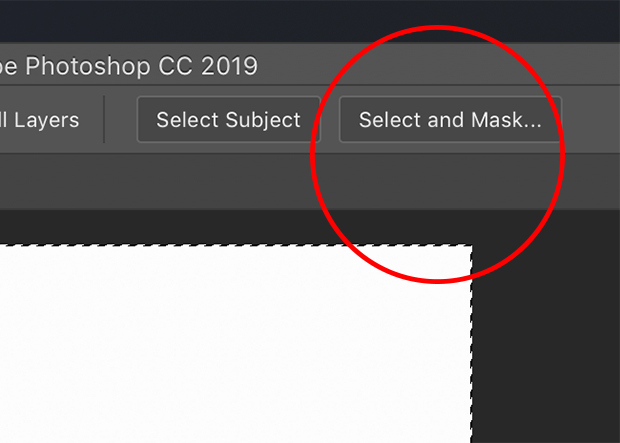
The Select and Mask… workspace allows you to view and customize the outline of the object. This avoids the issue of having pixelated edges which is a result of the negative effects of removing a background in Photoshop.
Sometimes, smoothing the outline of an object makes the object selection appear cleaner.
Set the Smooth 10, Contrast 51%, and Shift Edge -98%. Once select hit OK.

Now, simply create a layer mask to reveal the outlined object with a transparent background.

The Quick Selection Tool works best in situations when you need to remove a busy background quickly. The Magic Wand does have similar capabilities but is trickier to select objects such as an individual’s hair.
Open a photo into Photoshop.
Select the Quick Selection Tool by locating the panel on the left side of the workspace.
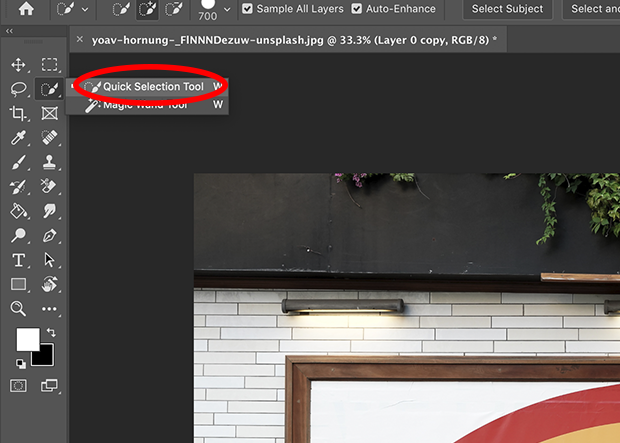
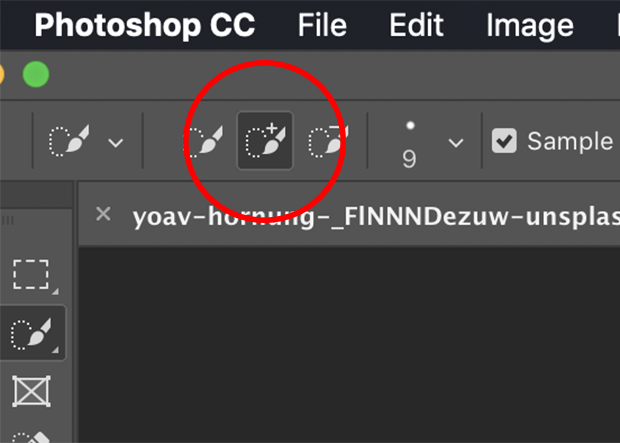
At the top of the workspace, select the brush with the + symbol. This brush represents Add to Selection which is similar to the Magic Wand Tool.
Select the Sample All Layers and Auto-Enhance boxes.
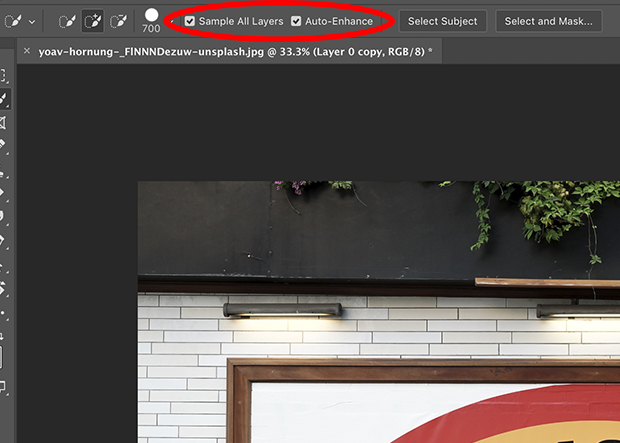
Now with the mouse, brush all areas desired.

If edges need adjusting, select Select and Mask… to make further adjustments.
If the edges look presentable, simply create a layer mask to reveal the outlined object with a transparent background.
Lastly, make the bottom layer invisible to view the finished product.

When exporting a file, the most common file type selected is JPG. But, JPG files do have some limitations.
Many may not know that it’s not possible to view a transparent file as a JPEG. Once you save a file as a JPEG, the transparent background turns into a white one. JPEG files cannot retain transparency. In order to save a file with a transparent background, you must save the file as a PNG.
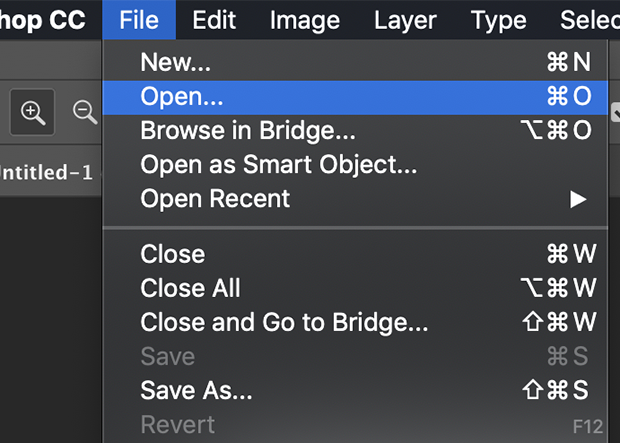
To save the file with the transparent background, select File at the top of the workspace and select Save As…

Once the Save As… window appears, select the Format drop-down window.
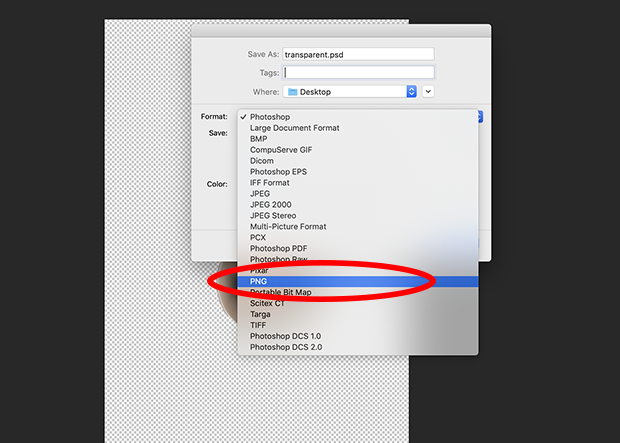
Instead of selecting JPEG as the file format, select Photoshop PNG in the drop-down window.

Now, when viewing the PNG file, the transparent background will appear.
When learning how to do a new task, practice using each and every instrument discussed to further understand removing backgrounds.
Repetition and outsourcing for more information will make a creative grow beyond their expectations. It is always important to take advice from different sources, so that in the end, the creative will be well rounded in knowledge.
When removing a background of a photo, there is some information that an individual needs to be aware of before starting. Though removing a background may seem difficult, it just requires an attention to detail.
Depending upon the tool used will also decide on how fast the task will be along with the quality. The Quick Selection Tool works well on objects that have smooth curves like a tennis ball. An object that has a lot of different angles, requires the Pen Tool to complete the task.
Photographs that have multiple areas to remove can feel intimidating, but it’s all about pacing the project. With the Pen Tool, backgrounds can be removed in sections using a mask. Then, you can save your progress until the work is finished.
The Lasso Tool is a similar tool that can be used for isolating objects. Unlike other instruments, the Lasso Tool is a freehanded instrument that entirely relies on where an individual makes selections. This process is riskier compared to the Background Eraser Tool because it involves holding down the mouse to select the object in the photograph.
The Lasso Tool can be used with a layer mask, like the Pen Tool, but is not the most advisable when taking certain steps to removing a background in Photoshop. Always think through the photo editing process before starting.
The last tip to mention is about the Background Eraser. This instrument manages the corners and selections differently then the Eraser but is not the most advisable instrument to use when photo editing. This Eraser Tool is similar to the Lasso Tool by the fact that both are more of a freehand task.
Overall, working with tools that allow a mask to be used will be the safest choice.
There are many different options for tutorials that give helpful tips but the question is where can you learn how to remove a background in Photoshop?
Once in awhile, backgrounds need to be replaced for multiple different reasons. The most common reasons to use this method is for replacing a sky in a photograph. The process between removing and adding are similar but do have different steps involved.
One of the best tutorials for removing a background in Photoshop is How To Replace An Object’s Background in Photoshop.
The second best tutorial is one of the easiest ways to remove a background in Photoshop. This tutorial provides steps to removing a background in Photoshop and teaches an alternative way of approaching the task.
Thankfully there are many different styles and ways to remove a background to a photo. By sampling different methods of removing a background, an individual will become faster at the process and find a style that fits their routine of photo editing.
We hope this tutorial on removing backgrounds from images in Photoshop has been helpful. Follow us on Twitter and Facebook for photo editing tutorials, photography tips, and more!
Envira Gallery helps photographers create beautiful photo and video galleries in just a few clicks so that they can showcase and sell their work.
