Want to give your images a dramatic flair by learning how to create a photo that’s black and white with one color as an accent?
This photo editing technique, known as selective coloring or Color Splash, makes one color stand out against a muted background by desaturating all colors except one. It’s an easy skill to master, and you can use it to give your photos a fun and playful feel or make them look more sophisticated and striking.
In this article, we’ll show you how to make a photo black and white except for one color using Adobe Photoshop or Lightroom. Ready to get started?
How to Make a Photo Black and White with One Color Accent
Feel free to jump down to the section you need depending on which photo editor you use. Don’t have Lightroom or Photoshop? Get them both with Adobe Creative Cloud for 9.99 / month.
Lightroom Tutorial: How to Make a Photo B&W Except One Color
Adobe offers two versions of Lightroom — Lightroom Classic (LrC) and Lightroom (Lr). Lightroom is a lighter, cloud-based version of Lightroom Classic. We’ll be using Lightroom Classic in this tutorial, but the process of creating a black-and-white picture with one color is pretty much the same in both versions.
First, you’ll need to import your image into Lightroom. You can do that by opening the Library tab in LrC and selecting Import at the bottom of the left column (or File » Add Photos in Lr).
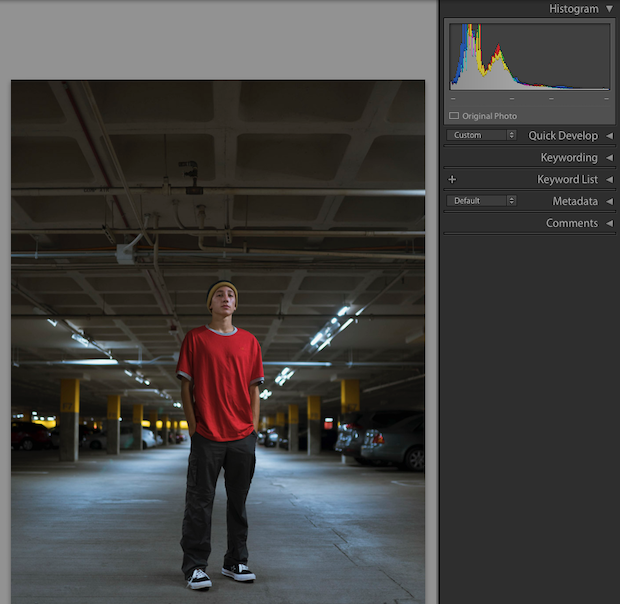
If you’d like to edit your image for sharpness, exposure, or clarity, you can do that now. Once you’re satisfied with the general look of your photo, we can move on to selective color editing.
Step 1: Create a Monochrome Effect by Decreasing Saturation
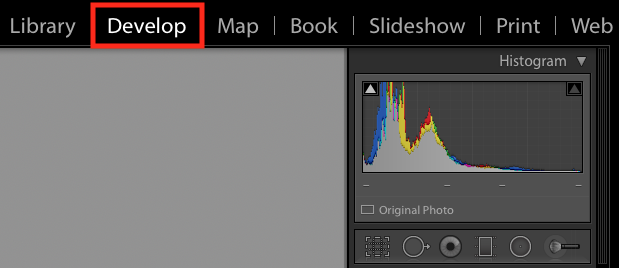
First, access Lightroom Classic’s Develop mode, located in the menu bar at the top of the application (Lr users should click the Edit tab in the right sidebar).
For the sake of this tutorial, we’ve decided to turn our image black and white except for the model’s red shirt. In order to achieve this effect, we’ll go to HSL mode.
Expand Color Mixer in the editing sidebar (may say HSL/Color in some versions of Lightroom) and select Saturation.
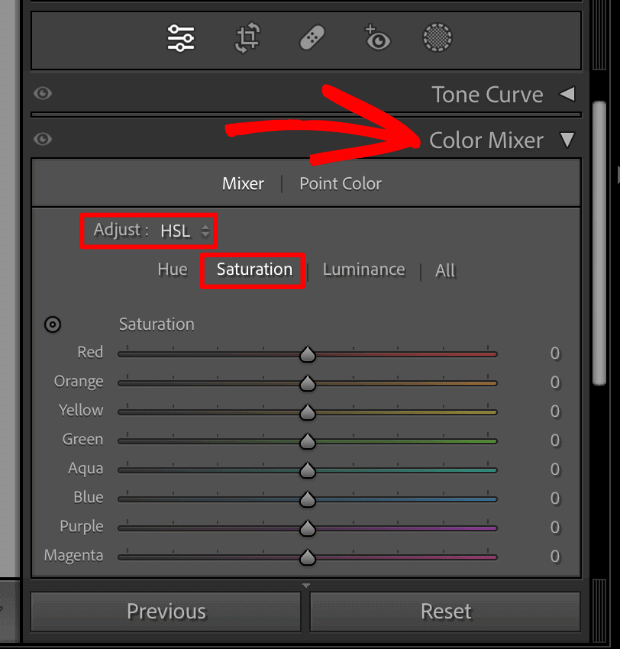
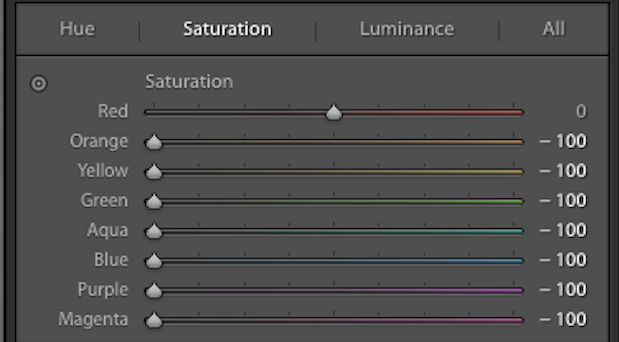
Since we want a black-and-white picture with red as the color pop, we’ll decrease the saturation of every color except red to -100. This will produce a b&w effect by turning all other colors grayscale.
Our Saturation menu now looks like this:
As you can see, our image is now almost entirely monochrome except for the subject’s shirt:

You’ll probably still see some unwanted color in other areas of your photo but don’t worry, we’ll fix that.
Step 2: Make Your Color Pop More Vibrant
Next, we’ll increase the photo’s saturation levels of red so that the color looks more vibrant. This isn’t an exact science. Just play with the saturation level of your remaining color until you’re happy with it.
For this image, we settled on a red saturation of +35.

As you can see, now the model’s red shirt clearly pops against the desaturated background.
Step 3: Remove Color from Any Lingering Areas
In our example, you’ll notice that some red color remains in the background of the photograph and in the model’s face. We can remove this unwanted color with Lightroom’s Adjustment Brush.
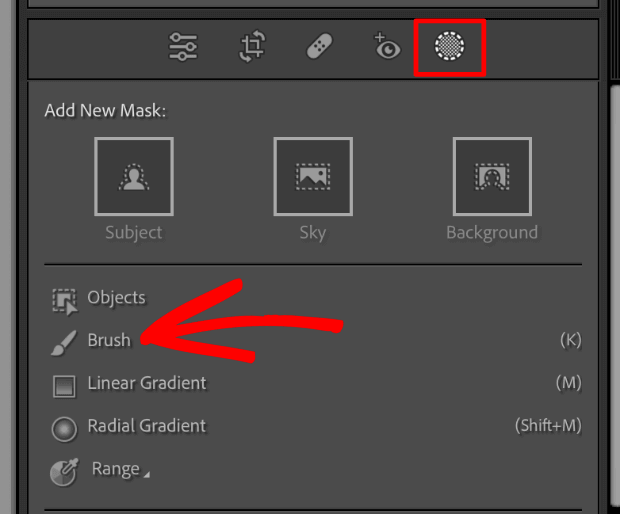
Click the Masking icon and select Brush.
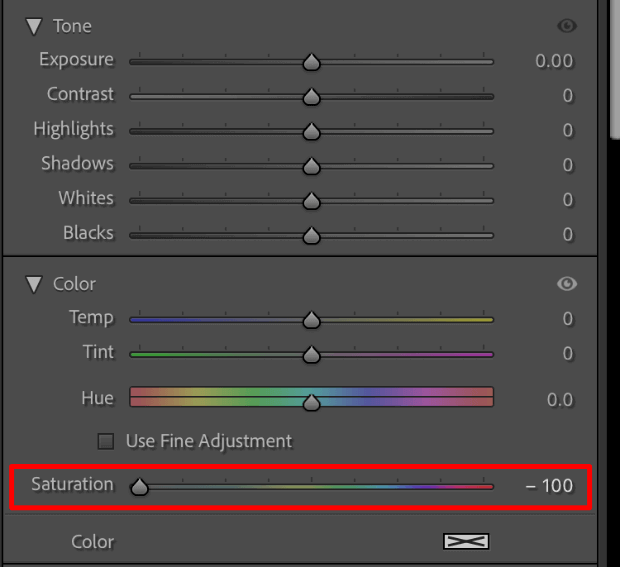
In the brush settings, under color, set the Saturation to -100.
Then, paint over portions of the image that have retained an unwanted hue, adjusting the brush size as needed.
Once we painted over those problem areas with the Adjustment Brush, our finished photo looks like this:

That’s all there is to it! Now, try it on your own photos to see what kind of striking edits you can achieve using selective coloring in Lightroom.
Envira Gallery is the best gallery plugin for WordPress and the perfect tool to streamline your photography workflow. Create beautiful image and video galleries for your website, upload photos to client-proofing galleries directly from Lightroom, add an Instagram gallery to your site, and so much more!
Check out the tutorial below to learn how to accomplish the same technique in Adobe Photoshop. Or, learn more about editing in Lightroom:
- How to Edit a Photo in Lightroom: The Basics
- How to Add Presets to Lightroom (Step-by-Step Guide)
- How to Make Your Photos Look Like Film in Lightroom
- How to Add A Watermark with Photoshop and Lightroom
Photoshop Tutorial: How to Make a Photo B&W Except One Color
In this section, we’ll show you how to create a black-and-white picture with one color pop using Adobe Photoshop.
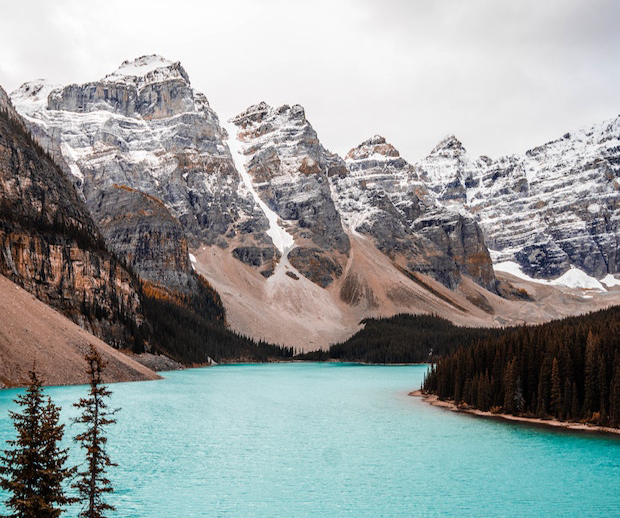
To begin, import your image into Photoshop by clicking File » Open and selecting the photo. This is the example photo we’ll use for color isolation in Photoshop.
If there are any edits you want to perform before turning the image black and white plus one color, you should do that before continuing.
Step 1: Duplicate the Photo Layer
When you’re ready, right-click on the Background layer in the Layers panel on the right-hand side of your Photoshop screen. Then, select the Duplicate Layer option.
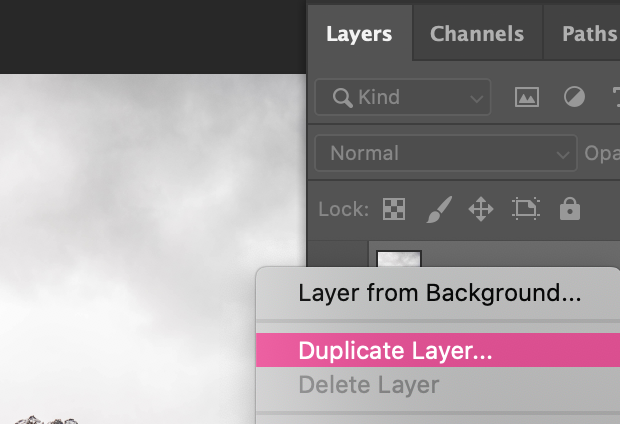
A dialog box will appear and ask you to name your new layer. Photoshop’s default name for this new background layer will likely be “Background copy”, but we suggest always renaming your layers for better organization. We’ll call ours Layer 1.
Duplicating the background layer allows us to complete our edit on two separate layers. While this may sound more complicated, you’ll see why working on two layers makes our job easier in a bit.
Step 2: Desaturate the Image
Next, we’ll make one layer black-and-white. Select the Background layer and press Shift + Cmd+ U on Mac or Ctrl + Shift + U on Windows to desaturate all the colors in your image.
Notice that Layer 1 sits above the Background layer in the Layers panel. To see the monochrome effects of your desaturation, click the Eye icon on the left of Layer 1 in the panel.
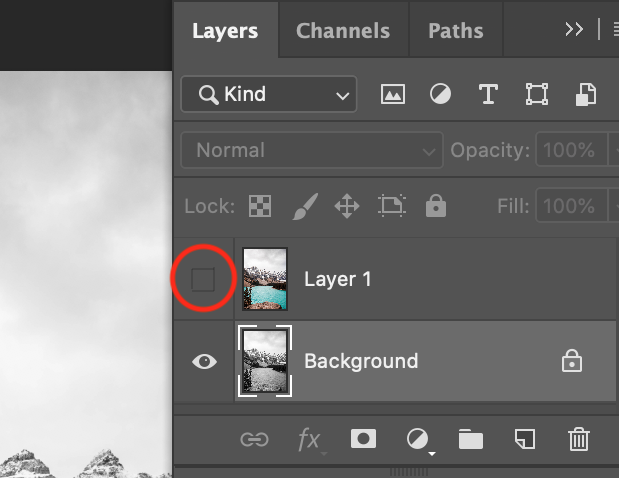
Toggling the eye icon hides and reveals that layer.
Step 3: Select Your Accent Color
Next, click the Eye icon to make Layer 1 visible again, and select it in the Layers panel.
Then, go to Select » Color Range from the top menu bar in Photoshop.
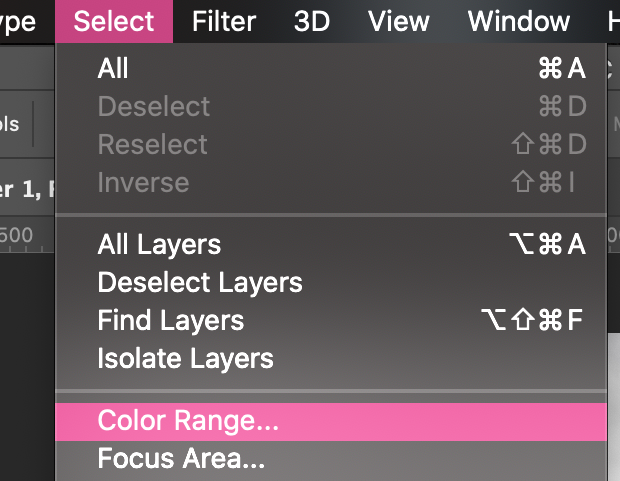
Here’s where you’ll select your accent color. For the purposes of this tutorial, we’re choosing a blue highlight color. Our end goal is to have an image that’s completely desaturated except for the blue water in the photo.
In the Color Range dialog box, choose the Eyedropper Tool with the plus sign. This tool is called Add to Sample, and it will help us select all of the blue tones in the photograph.
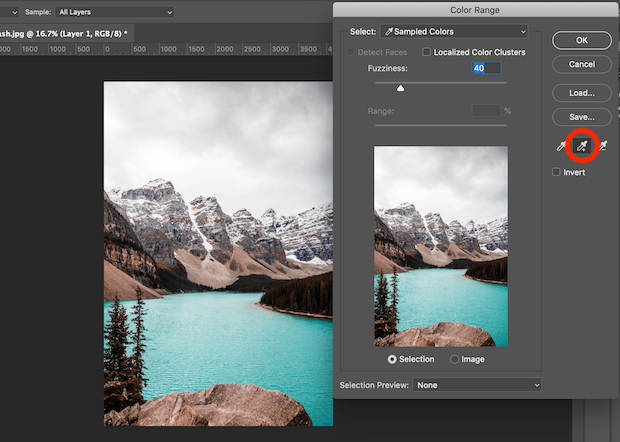
Using the Add to Sample eyedropper tool, click on the accent colors in your image. In our example, we’ll click on the blue water at multiple points in the image.
Selecting multiple points allows us to add multiple shades of blue to the sample. The more shades you capture with the Add to Sample tool, the more accurate the effect will be.
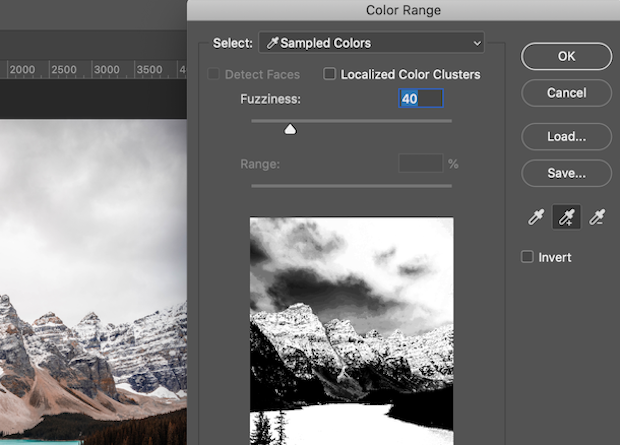
Once you’ve selected your accent color at multiple points, press the OK button to create a selection on your photo.
Step 4: Invert Your Selection
After creating the selection on your photo, press Shift + Command + U on Mac, or Ctrl + Shift + I on Windows. This will inverse the selection you just made and Photoshop will select your entire image except for the color you want to preserve.
Go ahead and press the Delete button from your keyboard to remove the selected area from Layer 1. Now your photo will be black and white except for one color!
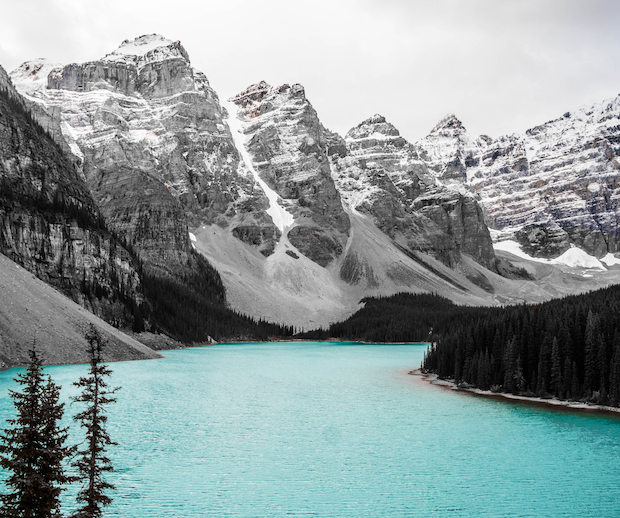
We were able to delete the portion of the top layer to reveal the bottom desaturated layer because we used two layers to create our effect. Pretty crafty, right?
You can press Ctrl + D to remove the selection from the image if your marching ants still remain on screen.
Step 5: Touch Up Your Image
If the Add to Selection tool didn’t perfectly exclude all other colors from your image, you can use the Eraser Tool to brush away unwanted hues.
With Layer 1 selected, click the Eraser from your toolbar. You can then adjust the size of the eraser as needed to remove any remaining areas with color.
Ta-da! You’ve now got a perfect black-and-white image with color in one area. Here’s the before and after of the sample photo we edited in Photoshop.
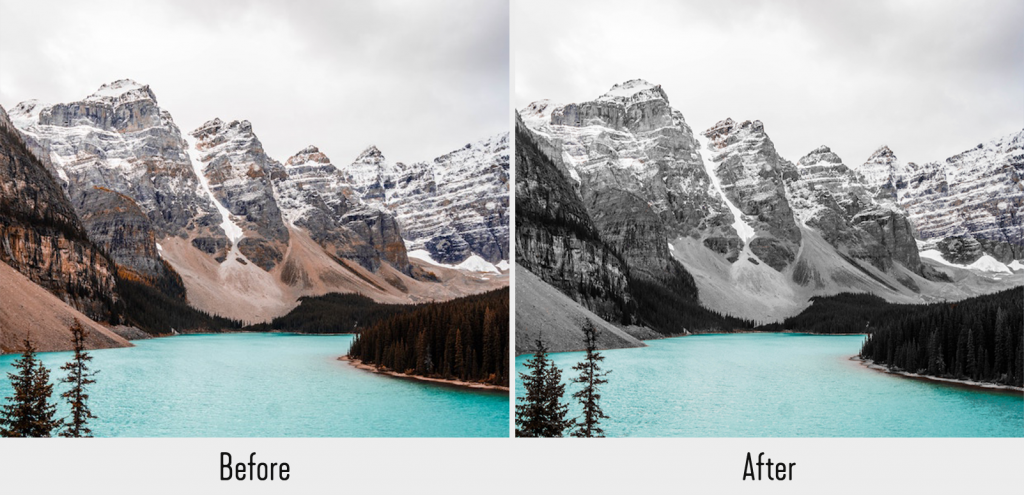
We hope this tutorial helped you to learn how to make a photo black and white except one color in Photoshop. Now, you can apply selective coloring to any of your vibrant photos.
Want to see what else you can do in Photoshop? Check out these articles:
- How to Add a Border in Photoshop
- How to Remove Skin Blemishes in Photoshop
- How to Remove a Person From a Photo in Photoshop
- How to Apply Texture to Your Images in Photoshop
Frequently Asked Questions
What is it called when a photo is black and white with one color?
Black and white with one color is an editing technique called Color Splash. It’s a popular technique that can be used to create a variety of effects, from adding a pop of color to an otherwise monochromatic image to highlighting a specific element in a photo. A lot of photographers and social media influencers use it to create a unique style for their photos.
How to make one object color and the rest black and white in Photoshop?
To create a selective color effect in Photoshop, where one object is in color and the rest of the image is black and white, you can use a beginner-friendly method that achieves a selective color effect without the use of selection tools:
- Create a Black & White adjustment layer, and fine-tune it in the Properties panel.
- Select the Brush Tool and set your Foreground color to black.
- Paint over the object you want to keep in color with a larger brush to reveal the original color of the object while keeping the rest of the image in black and white. Then, refine your edges using a smaller brush for precision.
- Optionally, you can adjust the opacity of the Black & White adjustment layer to bring back some of the original color to the image.
How do I pop one color in Lightroom?
To pop one color in Lightroom, open the Color Mixer panel and adjust the HSL saturation level for the color you want to make pop. If you want to make the photo black and white with one color, set all the levels to -100 except the color you want to retain. Then, use the Adjustment Brush, set at a saturation of -100, to paint over and remove unwanted color from any remaining areas.
Is there an app that can easily create a color splash effect on my photos?
Yes, there are many apps available that can easily create a color splash effect on your photos. Some popular options include the Lightroom Mobile App, Color Splash Effect, Color Pop Effects, and Color Touch Effects.
That’s all for this article!
We hope you enjoyed learning how to create black-and-white images with one color in both Adobe Photoshop and Lightroom.
Not using Envira Gallery? Get started today!
If you enjoyed this article, be sure to check out How to Optimize Images for Web (WordPress Best Practices).
Don’t forget to follow us on Facebook and X (Twitter) for the best photography tips, resources, and WordPress tutorials.




Your tutorials are simply the best!` I don’t understand the other tutorials clearly, but you start from the very beginning and explain each step. Thanks so much! 🙂
Glad you like it, Miriam. 🙂
YOU ARE THE BEST. Kept it simple and clear, saved my day.
What version of Photoshop do I need to do this? I am new to this but really want to be able to make images like this. Thanks for your help.
Hi Jeff,
You can use Adobe Photoshop CS6 or CC to achieve this effect on your photos. 🙂
Great post, you did really well for the learners like us. Thanks for sharing!
Thanks this was very simple and it helped alot
Hi Waseem, How do I get the layers open? Mine has the temp, tint, exposure, contrast, highlights,shadows, whites, blacks, clarity, vibrance, saturation, open? Regards,
Callie
Hey Callie, can you please elaborate more on layers open? I would love to help with this tutorial. 🙂
Wonderfully simple tutorial, got me started on the right path! It would perhaps be useful to mention adjusting the transparency of the colourful layer to vary the vibrancy of the colour, but that could be too obvious for most people.
Always wanted to know how to do that. Thanks a million !
Gah! I don’t understand how to make Layer 1 visible again!! 🙁
Hey Karina, you can see the mouse on check box of Layer 1. When you click on this check box, it will make the Layer 1 visible. 🙂
Good and concise!
Just wanted to add that adding a layer mask instead of deleting gives you a non-destructive workflow
Cheers
Great tip, Rico! Thanks for stopping by & sharing 🙂
I have followed the instructions and cannot make it work. I am using photoshop cc.
Hey Lori, can you please tell us what didn’t work for you? Any brief details will help us understand the issue, so we can guide you accordingly. 🙂
I don’t have the “color range” option! maybe i’m doing something wrong?
Hi Claire,
This appears to be a Photoshop Elements vs Photoshop CS issue. Apologies if that wasn’t clear! And let us know if you have any more questions.
Thank you! Perfect tutorial, got it on the second try!
I achieved it. Thank you so much. You kept it so simple. step by step n no confusions. Thanks again
I absolutely love color splash, been doing it since day one in Photoworks and currently I’m learning Lightroom, so the tutorial is super-helpful! Thanks!
Happy to hear it helped you Ella! 🙂
Hey!!
I really enjoyed this tutorial but when instructing how to invert selection on the mac it appears that a typo has been made. The shortcut for desaturation is repeated (cmd + shift + U) when it should be cmd + shift + I. Other than that it was super helpful thank you!!