Presets are an awesome way to get the most out of your editing sessions. Once you learn how to add presets to Lightroom, you can apply pre-made adjustments to your photos with just 1 click!
In this article, we’ll guide you through the process of adding presets to Adobe Lightroom so you can take full advantage of your editing tools and start using presets to enhance your photos in record time.
What is a Lightroom Preset?
A Lightroom preset is a digital addon that’s pre-equipped with specific settings and various adjustments for photo editing. Essentially, presets make editing and improving your images as simple and quick as possible. Rather than having to apply multiple changes to your images manually, you can use a preset to transform your photo with a single click or layer different presets on top of each other to achieve a unique design.
Why Use Presets in Lightroom?
Lightroom presets can help streamline your workflow and give you more consistent results from your editing software. Here are some of the reasons that photographers use presets:
- Save time: Presets allow you to apply a specific look or style to your photos with just a few clicks, saving you time and effort compared to manually adjusting each photo individually.
- Achieve consistency: If you’re editing a series of photos that were taken under similar conditions, presets can help you achieve a consistent look across all of them.
- Experiment with new styles: Presets can help you experiment with new editing styles and techniques without having to start from scratch each time. You can try out different looks and see how they work with your photos before fine tuning.
- Emulate film and other styles: Many presets are designed to emulate the look of film or other styles of photography, such as HDR or Polaroid. Using presets can help you achieve a specific aesthetic or mood in your photos.
How to Add Presets to Lightroom and Manage Your Collection
The first thing on the agenda when adding presets to Lightroom is finding and downloading the presets you want.
There are plenty of online sites where you can download free or premium Lightroom presets that are ready to go. In fact, many professional photographers will share presets on their website. We admit, however, that it can be time consuming to find and test a ton of presets, which is why we did it for you!
→ 120+ Best Lightroom Presets to Download Now (ALL are FREE)
Once you’ve found the presets you want, simply download the file(s). Next, you’ll have to unzip the file to access the folders within, as they usually come compressed.
Want to make your own Lightroom presets instead? See instructions below.
How to Install Lightroom Presets on Desktop
Before we get started on installing presets, it’s important to note that there are 2 versions of Lightroom: Lightroom and Lightroom Classic.
Lightroom (also known as Lightroom CC) is part of Adobe Creative Cloud, which is a cloud-based application suite that’s available on desktop, mobile, and as a browser-based version. Lightroom Classic, on the other hand, is the traditional desktop software. The process for adding presets is slightly different for each version, so it’s important to know which one you’re using.
Installing Presets in Lightroom Classic 7.3 or Later (XMP)
To import presets with the .XMP format into Lightroom Classic, you need to have version 7.3 or later. After downloading your preset:
- Unzip the file you downloaded that contains your presets.
- Open Lightroom Classic and click the Develop module. Look for the section on the left called Presets.
- Click the + icon in the top right of the presets section and select Import presets from the dropdown menu.
- Select the file or folder that contains your preset(s) in XMP format and click Import.
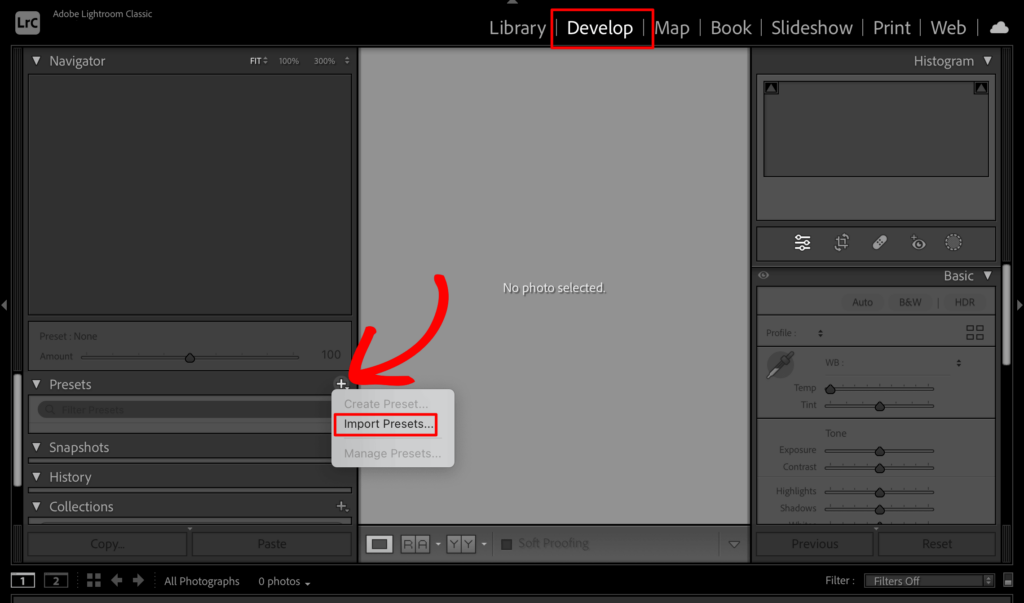
Once you have an image selected in the Develop module, you’ll see your new presets in the list of Presets on the left panel.
Installing Presets in Lightroom CC (XMP)
If you’re using Lightroom CC on a Windows PC or MacOS:
- Unzip the file you downloaded that contains your presets.
- Open Lightroom (desktop) and click File » Import Profiles and Presets from the top menu.
- Navigate to the unzipped folder or file that contains the preset(s) in XMP format and select it.
- Press Import.
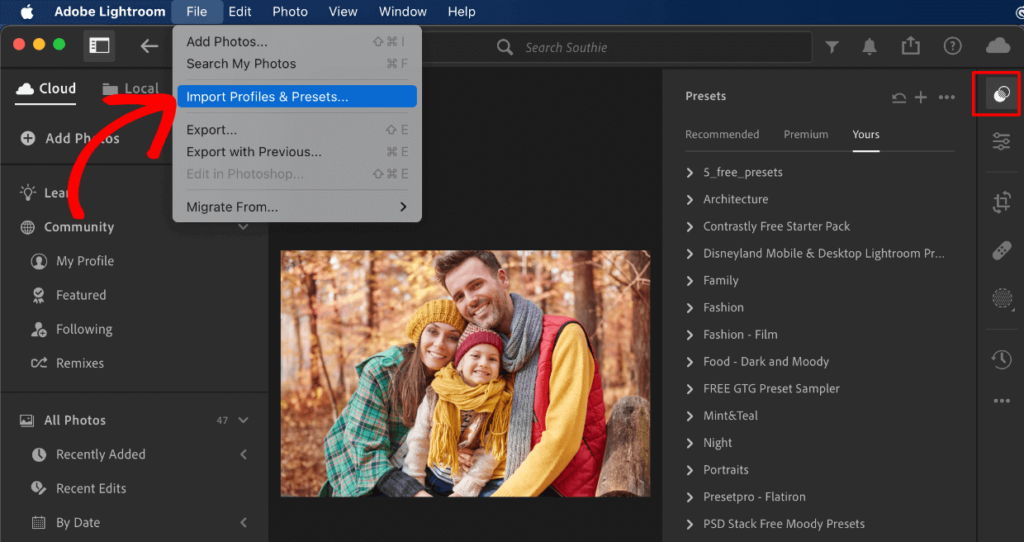
You can find and start using your new presets by clicking the Presets panel icon on the right side.
Installing Presets in Lightroom 4–6 and Lightroom Classic 7.2 or Earlier (.lrtemplate)
To import presets using the .lrtemplate file extension (rather than the newer XMP format) in Lighroom 4, 5, and 6 as well as versions of Lightroom Classic versions 7.2 or earlier:
- Unzip the file you downloaded and right click to Copy the folder that contains your .lrtemplate preset files.
- Open your Lightroom program and click Lightroom » Preferences (Mac) or Edit » Preferences (PC) from the top menu.
- In the Preferences window, click the Presets tab at the top.
- Press the button that say Show All Other Lightroom Presets (LrC) or Show Lightroom Presets Folder (Older Lr versions).
- A finder window will open, and you should double click to open the Lightroom folder. Then, open the Develop Presets folder.
- Now, Paste the presets folder that you copied earlier into the Develop Presets folder.
- Lastly, Restart your Lightroom application to start using your new presets.
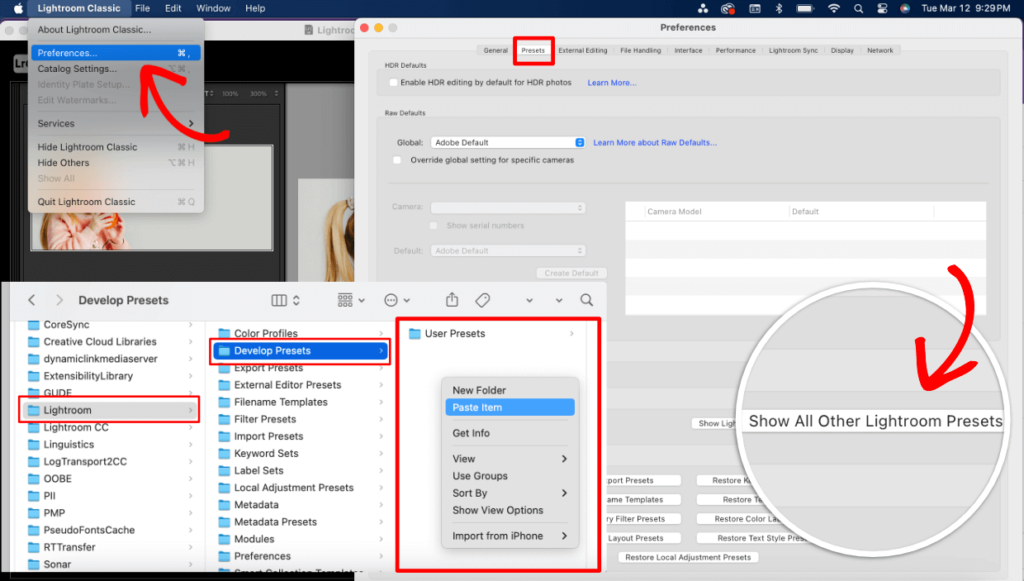
You’ll can now find your presets in the Preset panel and start applying them to your photos.
How to Install Lightroom Presets on Mobile
Lightroom also offers a mobile app where you can edit your photos on the go and even install and use presets on Android and IOS. The paid version of Lightroom Mobile is available to those who have a Creative Cloud subscription (Lightroom CC), or there is a free version available to everyone.
Method 1: If You Have a Creative Cloud Subscription (XMP)
Lightroom CC will automatically sync with Lightroom Mobile, which is by far the easiest way to add presets to your Lightroom app.
Just follow the instructions above to install your XMP presets on the Lightroom desktop application. After they’re installed, Creative Cloud will automatically import your presets to Lightroom Mobile. Remember though, you need the subscription version of Lightroom (not Lightroom Classic) for it to work.
Why are my presets not showing in Lightroom mobile?
If your presets are not showing in Lightroom mobile after adding them to Lightroom CC on a desktop:
- Make sure your Creative Cloud subscription is active and ensure your Lightroom application is the most up to date version on both desktop and mobile.
- Check that you are signed in to the same Creative Cloud account on both devices.
- Restart Lightroom mobile.
Method 2: If You Don’t Have a Creative Cloud Subscription (DNG)
The installation process for the free version of Lightroom Mobile is a bit more involved, so you’ll definitely want to take advantage of automatic syncing if you have Creative Cloud. Otherwise, follow the instructions below for adding presets to iPhone or Android using Lightroom’s free mobile app.
- Start by installing the latest version of the Lightroom app on your device.
- Download a ZIP file that contains presets for mobile and unzip the file.
- Save the folder that contains DNG formatted presets to your phone (if you downloaded the presets on your phone) or to cloud storage that can be accessed on your phone, like Dropbox.
- Now, open the Lightroom app on your phone and continue with the instructions for your device.
How to Import Presets in Lightroom Mobile
| (IOS / iPhone) | (Android) |
|---|---|
| – From the Lightroom app, open the collection where you want to import presets (or create a new folder specifically for presets). – Press the 3 dots in the top right and select Add Photos from the menu. – Select either Device or Files depending on where you saved the presets. Find and select the presets you want to import. – Press Open to add them. (If you get an error message, just press the checkmark to continue anyway). – Once imported, tap to open the first DNG image. Then, press the 3 dots in the top right and select Create preset. – Fill out the Preset name. You can click the dropdown to create a new Preset group for your files. Adjust the settings and press the checkmark at the top. – Repeat the same steps for the rest of your DNG files, adding them to the new group you made. | – Select and open an image from your Library in the Lightroom app. – At the bottom of the screen, select the Presets tab from the toolbar. – Tap the 3 dots to select Import Presets from the menu. – Navigate to where you saved the folder of presets to select and import it. – Your presets will be added and saved under a new group. |
You can now find and apply your presets from the Presets tab when editing a photo.
How to Make Your Own Lightroom Presets
Another way to achieve a consistent look across all your photos is by learning how to make presets yourself.
All you need to do to create a Lightroom preset is make changes to an image. For instance, you might start by adjusting the tone curve, reducing saturation, or changing the contrast slightly. Then, the steps are pretty much identical whether you’re using Lightroom CC or Lightroom Classic on your desktop.
- After editing a photo, navigate to the Presets Panel. (In LrC it’s on the left-side, under the Develop module. In Lr, click the top icon from the right toolbar to open it.)
- Click the + icon or + and then Create Preset in LrC.
- Give your preset a name, assign it to a group if you’d like, and select the settings you want to include.
- Click Save.
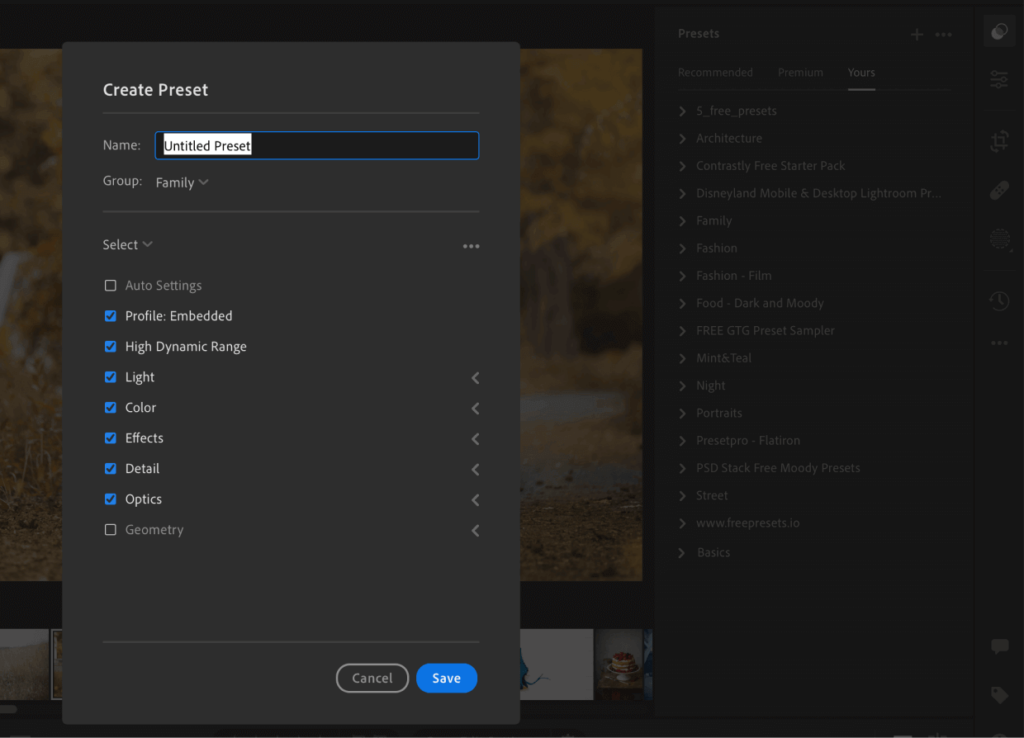
You’ll now see your custom preset in the Presets panel, and you can apply it to your other images. To share your preset, right click on it from your list of presets and press Export. You can also right click on a group to export a bundle of presets.
How to Manage Your Lightroom Presets
If you have a lot of Lightroom presets, it can be difficult to find the one you need when you need it. So, now that you know how to add presets to Lightroom, lets talk about organizing presets to help you edit photos faster and more efficiently.
Back Up Your Presets
Lightroom does save your presets, but we still recommend creating a backup before you start adjusting them or moving presets around. To do this, find where your Lightroom preset folder is stored on your computer (instructions below) and copy all the files inside. Then, paste them into a new folder called “preset backup” in a new location such as Dropbox or a thumb drive.
Organize Your Presets
First, find your list of presets in the preset panel for your version of Lightroom. Expand any groups by clicking the small triangle. Next, right click on any individual preset. From there, you can press Add to Favorites to automatically create a new group with your most used presets. Or, press Move to place the preset in a different or new group.
If you want the preset panel to only show certain groups, you can right click a group a press Manage Presets. Then just unselect the groups you want to hide. We really like this feature since it makes it easy to keep your panel clean when working on a particularl project. For example, if you’re editing portraits, you can hide the extra clutter and only show your presets for portrait photography.
Where Are Lightroom Presets Stored?
Your Lightroom presets are stored in the Develop Presets folder, which can be found in the following locations:
Mac: Users/[username]/Library/Application Support/Adobe/Lightroom/Develop Presets
Windows: \Users[username]\AppData\Roaming\Adobe\Lightroom\Develop Presets
To find your presets folder on a Mac computer, open your Finder window and click Go in the top menu while holding your Option key. This will allow you to see and select your Library folder. From there, you’ll want to find your Develop Presets folder, which contains all your presets. The typical path is Application Support » Adobe » Lightroom » Develop Presets.
On a Windows computer, go into your start menu and click on the control panel. Next, click on Appearance and Personalization and open your folder options. In the Advanced tab, you can select Show Hidden Files and Folders. Then, look for your Develop Presets folder. The typical path is AppData » Roaming » Adobe » Lightroom » Develop Presets.
Bonus: Sync Lightroom Collections with Your Website
If you’re looking to streamline your workflow and upload photos directly from Lightroom to your website, you can use Envira Gallery to sync Lightroom with WordPress!
Envira Gallery is the best WordPress gallery plugin, allowing you to beautifully display your images, videos, and portfolios on your website. It’s easy to use and comes with crucial features for photographers such as client proofing, lightbox display, featured content galleries, social sharing buttons, watermarking, built-in image optimization, albums and tags for organization, image-protection, eCommerce integration, and more!
And for Lightroom users, Envira Gallery is even more powerful! The Lightroom Addon lets you upload images, create or edit galleries, and publish photos for proofing directly from Lightroom.
Get Started with Envira Gallery for Lightroom today!
Envira Gallery saves you a ton of time and effort and ensures your Lightroom collections are always in sync with your WordPress galleries.
Well, that’s it for this article!
Adobe Lightroom presets are a great addition to any photographer’s toolkit, as they make it easier to edit large batches of photos with speed and simplicity. Whether you’re just getting started or a photography pro, presets can enhance your images in a variety of fantastic ways. And now you know how to add presets to Lightroom and find them on any device!
We hope you enjoyed learning how to install presets in Lightroom and manage your collection. We think you’ll also want to check out The Top 5 Free Alternatives to Photoshop (Tested & Reviewed).
Not using Envira Gallery? Get started today!
Don’t forget to follow us on Facebook and X (Twitter) for the best photography tips, resources, and WordPress tutorials.


