Would you like your lightbox nav arrows to be outside your image? With Envira, you can set your lightbox nav arrows based on the lightbox theme you choose. This tutorial will help you set your lightbox nav arrows outside your gallery images.
Configuration
Step 1 – Create or Edit an Envira Gallery
First, you’ll need to create a new gallery or edit an existing gallery. If you need help creating your first gallery, please review our documentation here.
Step 2 – Install and Active Gallery Theme Addon
You’ll need to install and activate the Gallery Theme addon in order to choose the Gallery Lightbox Theme from the dropdown. For help setting up the addon, you can follow our guide here.
Step 3 – Choose Your Lightbox Theme
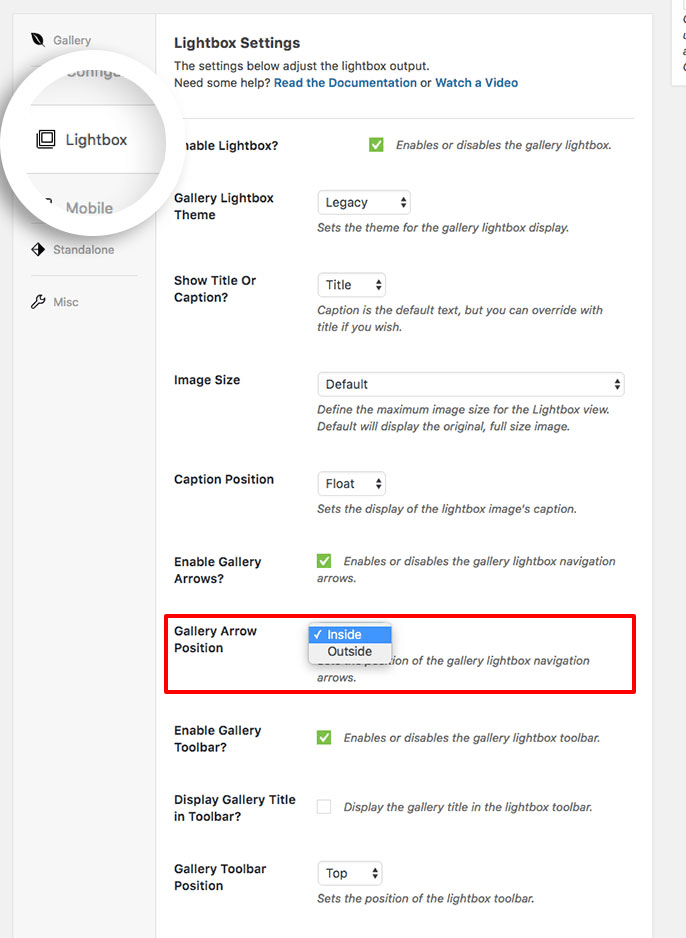
Next, navigate to the Lightbox tab to select your Lightbox theme.
The ability to have the lightbox arrows outside the gallery image will depend on the lightbox theme you select.
The following lightbox themes will give you the option to choose your Gallery Arrow Position:
- Captioned
- Polaroid
- Showcase
- Sleek
- Subtle
- Legacy

Step 4 – Select your Gallery Arrow Position
On the Lightbox tab, select the Gallery Arrow Position field to show the arrows on the inside or outside.

Step 5 – Publish or Update Your Gallery
Finally, your last step is to click Publish or Update on your gallery to save the changes.
And that’s it! You’ve now successfully changed the position of your Lightbox nav arrows.
If you’d like to learn more about Envira’s Lightbox, check out our article on Envira Gallery Lightbox Options.
FAQs
Why don’t I see the option for Gallery Arrow Position?
A: This is likely because you’ve selected either the Base (Dark) or Base (Light) lightbox theme.
These lightbox themes will not allow you the ability to set the Gallery Arrow Position.
Are the same options available for my Envira albums?
A: Absolutely! The Envira Albums works exactly the same as the gallery with the exact same settings for this option.


