Fashion photography is the crossing point between portraiture and product photography. Fashion photography is also about the strong representation of clothing or accessories that the photo is meant to sell. Settings and composition are still as important as ever!
Focusing more on a model, pose, clothing, style, or individual aspect of a photo is key. Once you’ve taken a photo, where do you take it? How do you start photo editing for Instagram, your portfolio, or your website?
An editorial point of view or theme allows a photograph to focus on telling a story, or selling an emotion. Selling a lifestyle, fulfillment, or enjoyment is often the purpose of a fashion photographer’s images. As such, using exotic locations and having pristine images is a requirement at the high end of the field.
This article will cover several different parts of how a novice can break into editing their own fashion photography, as well as offering a variety of tips for editing fashion photography. These photo editing tips are sure to help you out!
- Tips & Elements of Editing Fashion Photography
- What You Need to Know About Retouching
- Software Choices
- Recommended Tutorials
This brings us to the editing of fashion photography. Editing fashion is often time-consuming. Using efficient techniques to both manage files and edit photos will allow you to do more, and thus improve rapidly.
For a great history of fashion photography, read HighSnobiety’s article.
Tips & Elements of Editing Fashion Photography
The first step is to choose the right tools for the job. Finding the right software for your photography is important, and you can find several such tools in our editing software tutorial.
In this tutorial, I will be showcasing Adobe Lightroom Classic, and Adobe Photoshop. However, the majority of these steps can be accomplished with many of the editing programs shown above. The amount you choose to edit is up to you. However, it is important to follow your own personal style.
Adobe Photoshop and Lightroom can be had from $9.99 (USD) a month, through Adobe, or check out some Lightroom replacement softwares.
Basic File Formats
Shooting your photos in a RAW file format, rather than JPEG, will allow more flexiblity in editing.
RAW is a lossless file format, meaning that your image will not be compressed after you take the photo. This means that you have more information to work with, and be able to execute more extensive edits. Also, you will have more room to work with if you under or over exposed an image originally.
Basic Editing Guide
Are you still trying to find your voice through your photos? If so, I recommend editing the same image in a multitude of ways and finding a style you can personally develop and tailor until it suits you.
Minimalistic editing allows for a much more cleaner, editorial or journalistic feeling, while heavy edits can feel more like the fashion advertising that is so popular today.
For the majority of fashion work, you should be shooting with lighting. Natural lighting can work, but even continuous artificial lighting will upscale your images.
Shooting with any light sources you have, and adapting them with modifiers, reflectors, diffusers, and any other manipulations will leave you with a better final product. If you are new to lighting, I highly suggest Lighting 101 by Strobist, which will bring you from a total novice to an advanced lighter in a great tutorial, at your own pace.
Color balance/White balance becomes important here and are the introductory steps to editing your photographs. In Lightroom, we have access to these tools in the Lightroom>develop module.
Here, we can either select a point to white balance from, by using the eyedropper tool, or we can manually slide the white balance temperature and tint sliders.
White Balancing Your Image
Here is the sample image that I will start editing with:

When white balancing for this photo, I want the background to either be white or slightly cool. It is currently too cyan and magenta. To combat this I added a combination of green and orange in the white balance will allow me to adjust for this. To do this, I simply drag the Temp and Tint sliders.
Another method of doing this is by clicking the eyedropper tool. Then, dragging the tool on the image I can choose a point to white balance. In this case, I used the eyedropper and made slight adjustments for correct color.

Your image doesn’t necessarily need to have perfect whites. The image may be better suited to a warmer or cooler temperature. Aa slight tint in either the green or magenta direction can also work.
You have the option of changing white balance using the As Shot or Auto modes. Don’t use these modes as a final destination, but rather as a place to edit from.
This is where I am at after white balancing. Minor changes can do a whole lot to your image.
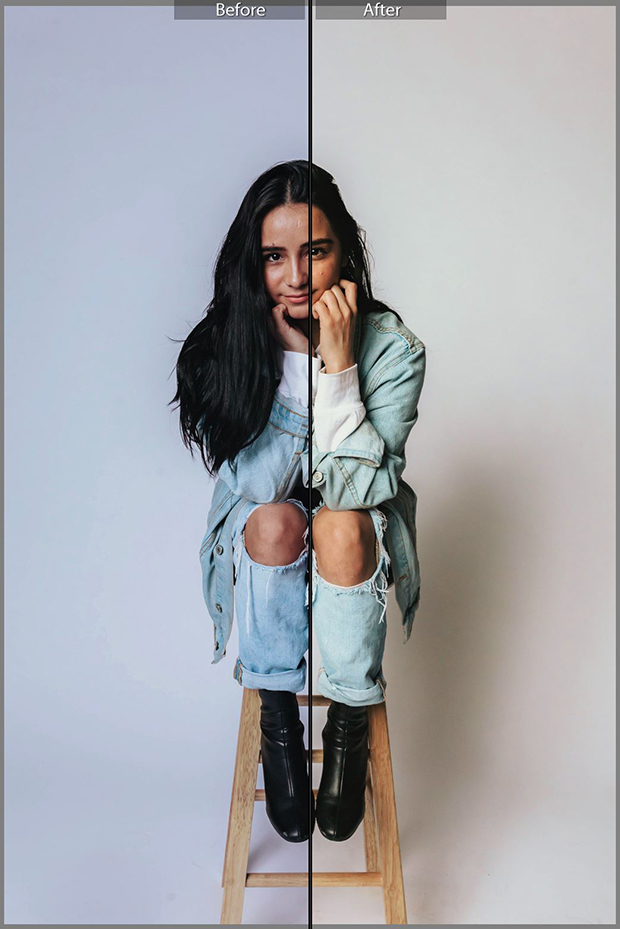
Global Adjustments
Now that I have made these changes to color balance, it is time to start working on global adjustments
The Basic tab in the Lightroom develop module is a great place to start. You can also use the Camera RAW filter in Photoshop. Any and all Camera RAW editing programs will have the majority of these functions.

Slight adjustments are favorable to larger adjustments in most scenarios. Adding a tad of saturation or clarity can enhance a photo, but pushing any of these sliders to the max is usually the clear sign of an amateur.
(This is of course not always the case, and recovering shadows or highlights is often required).
A great way to learn to edit is to change the exposure slider between steps, and keep an eye glued to the Histogram. The histogram maps out the different amounts of colors and their place in your exposure in an easy to read two dimensional histogram.
Every time you move one of the Highlights, Shadows, Whites, or Blacks sliders, change the Exposure slider to compensate for this movement. This will allow you to keep a neutral exposure while making the changes you desire to appear in the images.
Using other sliders, such as the HSL(Hue/Saturation/Luminance)/Color sliders allows for local color adjustments. Pay specific attention to the oranges, yellows, and reds, as you can often make someone have a fantastic or ethereal skin tone by creating the correct adjustments here.
Skin tones are vital to a great portrait, as the subject’s skin can help deliver a message, a theme, or an idea to the viewer.
Further Smaller Edits
A great part about Lightroom is the presets. You can use presets as a great starting point to edit from, adding in a color that might suit your own style. Presets can give you ideas to implement into your work, and creating your own presets from past edits is a great way to recreate some elements of those photos.
If you really like the way you have edited an image and want to easily apply these edits to another photo, click the plus sign in the Presets tab in the Lightroom Develop module, while the photo with the edits is selected. Then, name and save your preset for future use. Simply click it, or any other preset you have downloaded, while you have another image selected to apply these changes.
Furthermore, a great way to make your images pop on Instagram is by adding +40 – +80 by using the Sharpness slider. Because Instagram naturally lowers your image’s resolution, the increase in sharpness will make sure the image appears less muddled by the loss in quality than it otherwise would seem.
After adding these changes, I arrived at the following image(s):
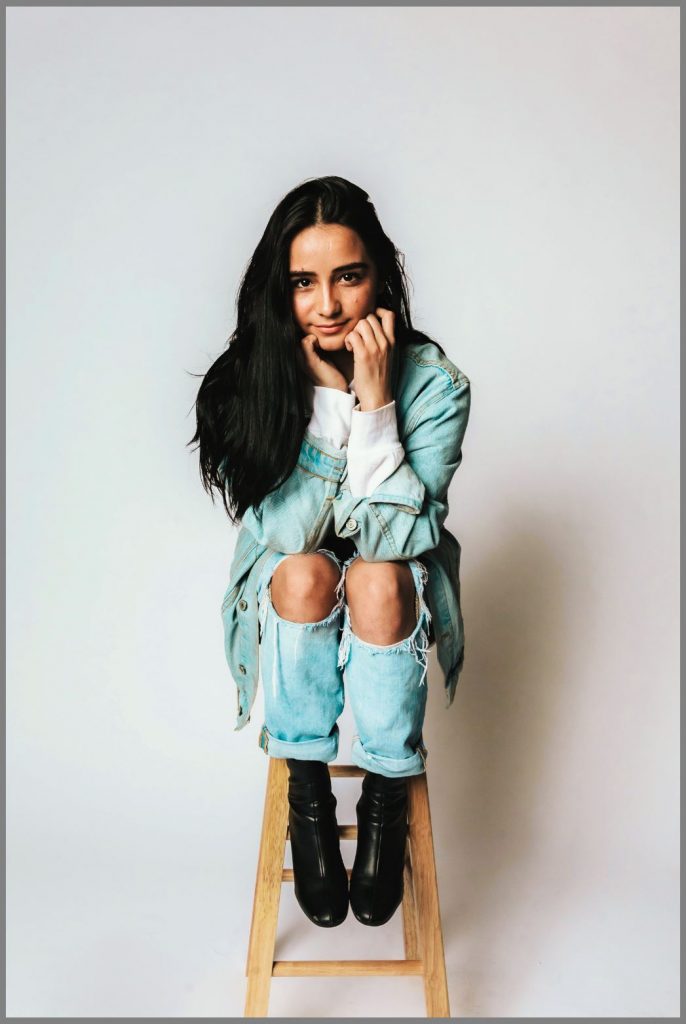
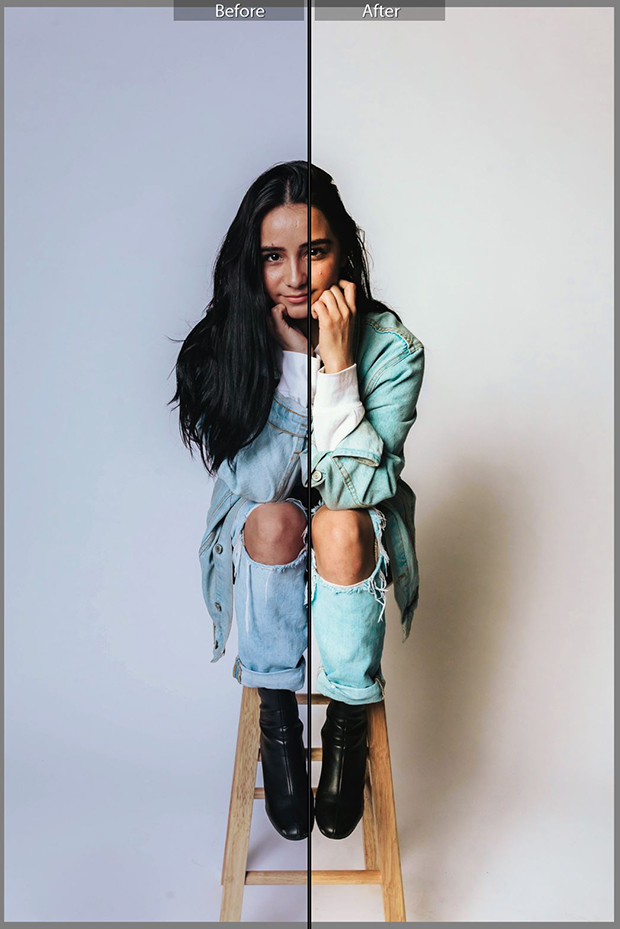
By shifting the blues and oranges slightly through the Saturation and Luminance sliders in the HSL/Color tab, I was able to change the skin and clothing to reach the aqua orange aesthetic that is incredibly popular currently. A great resource to choose colors that will compliment an image is Adobe Color, which is a completely free website.
What You Need to Know About Retouching for Fashion Photography
After playing around with sliders, it is time to move into a more extensive portion of editing. Cleaning up both the model and the product to look their best is key. Removing blemishes and smoothing skin, removing wrinkles (in both person and product), and making sure everything is portrayed in the best possible light is crucial.
Retouching is a very sensitive area. France recently banned photoshopping images of people, and many companies are now riding the train of photoshopping or air brushing, especially unrealistically, is a bad thing.
While it is up to the photographer or photo-editor to choose how the image looks, it is also important that you are not going against the wishes of the company you are working for.
For personal use, or when taking photos of friends, feel free to remove pimples, blemishes, and temporary problems on skin, but stay away from reshaping someone’s body, removing lines, wrinkles, moles, or any other visual imperfections in a person.
My personal parameter is that I will remove all temporary problems with skin and nothing else, unless I have specified that to both the model and client previously.
In this tutorial, however, I will be removing both scars, scratches, and moles present on the model, just to make sure that you understand the process.
Arriving in Photoshop
As a novice fashion editor, it is important that you start with the basics. Attention to detail is crucial. I find that establishing a workflow checklist is a great way to know what parts of an image to work on, and breaking up the workflow in this way can make you as efficient as possible.
Here are my layers from Photoshop, followed by an explanation of my layer workflow.
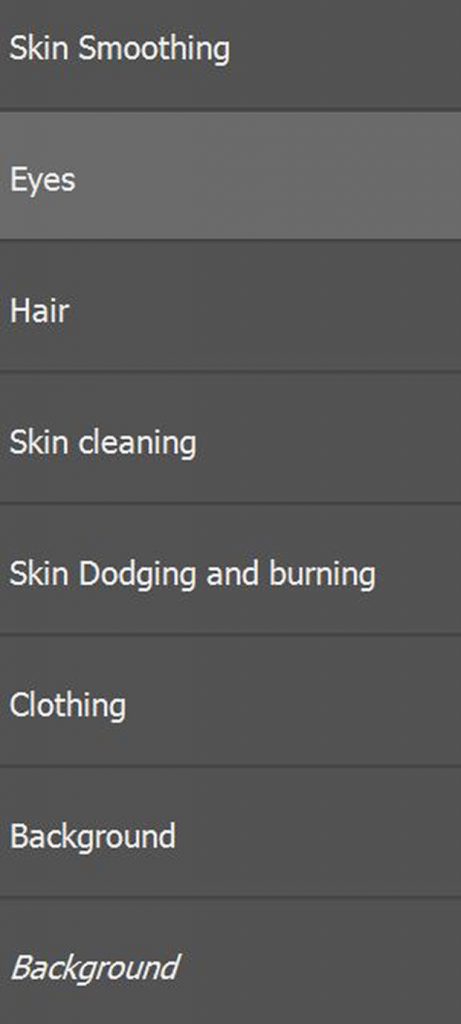
The first thing I do when opening a file in Photoshop is create a duplication of the background, so that I can always see where I started from. To hide and unhide layers in Photoshop, simply click the eye shaped visibility tool present on all layers.
To get all the tools you need, as well as your histogram and adjustment options, go to Window >> Workspace >> Photography.
Layers and Layer Masks
To create a layer mask, which allows you to create a local adjustment in its own layer, simply select the layer you wish to make a mask and press the layer mask tool underneath your layers panel. It is a white rectangle with a gray square.
All this can be achieved with enough patience and practice, and I recommend making sure that you are using the right tools for the job. In Photoshop, creating layers and masking out parts of the image to edit is the right way to tackle the job.
In the next section I will be tackling different software and how you can achieve this effect without subscribing to the wallet beater which is Adobe.
The reason for my editing workflow is simple. I want to build up the image from the least important parts to the most important. Background and Clothing are a simple patch up job, using the spot healing brush (use by either pressing J or selecting it on the tools panel).
In this image, I cleaned up some of the clothing and some of the dirt on the background before moving into the dodging and burning process.
Dodging and Burning for Fashion Photography
Due to the extensive process which is both learning to using the dodge and burn tools, I have linked a tutorial on how to best attack this process by Dani Diamond at the bottom of this blog post.
The basic idea is you are contouring the face with light to make it most attractive. You can also dodge and burn out areas to make them appear less or more bright, colorful, and contrasting.
Clicking O in Photoshop allows you to access your Dodge and Burn brush. Right-click whichever of the two you are currently using to switch between them. Use the menu at the top of the window to select between Shadows, Midtones, and Highlights, which will allow you to choose what you will be dodging or burning. The majority of your work will be in the midtones.
In the same part of the window, change the Exposure to change how much the dodge and burn brush will affect the painted area. Using this underneath your skin smoothing masks will allow you to hide some of the mistakes you made dodging and burning. Make sure that you have Preserve Tones turned on when necessary.
Basic Skin Smoothing Technique
This is an easy technique you can apply in conjunction with a layer mask to create smoother skin. Make sure that you are only applying it lightly, porcelain skin is NOT the goal.
- Create a duplicate layer of your topmost layer in Photoshop. First, select the topmost layer. Then duplicate the layer (ctrl+J/command+J, or right click >> duplicate).
- Invert the layer (ctrl+I/command+I).
- Apply a High Pass Filter to the image. (Filter >> Other >> High Pass).
- Change the layer mode to Soft Light. (Select the layer type “Normal” above your layers panel and scroll to Soft Light.
- Make the layer a Layer Mask as shown above.
- Invert the layer mask. (Make sure the layer mask is highlighted and either check the Invert box or Invert as shown above).
- Press D then X to reset your brush colors and then switch to white.
- Select your brush tool by pressing B.
- Paint on the areas you want to smooth with your brush. Press X to switch between white and black, which will act as additions and subtractions (or drawing and erasing) of the layer.
Using these steps correctly, you can achieve a similar look to the one I reached in this image:
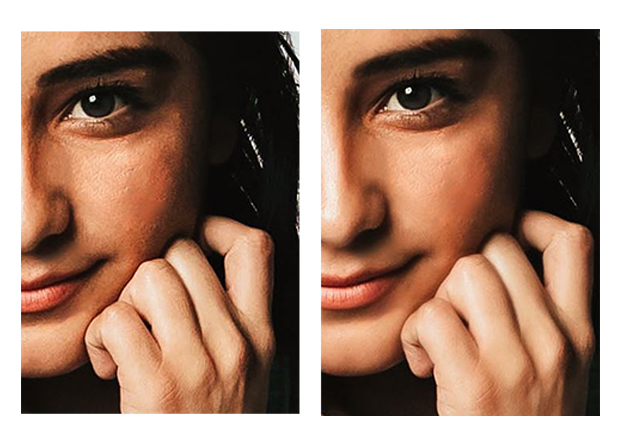
After applying all these edits and adjustments, I ended upon the following image. Outside the skin, the most time consuming parts were cleaning the clothing and the hair up. If you can afford a stylist and make-up artist for your shoot they will make your editing much less complex and your results stellar, but they are not a must!
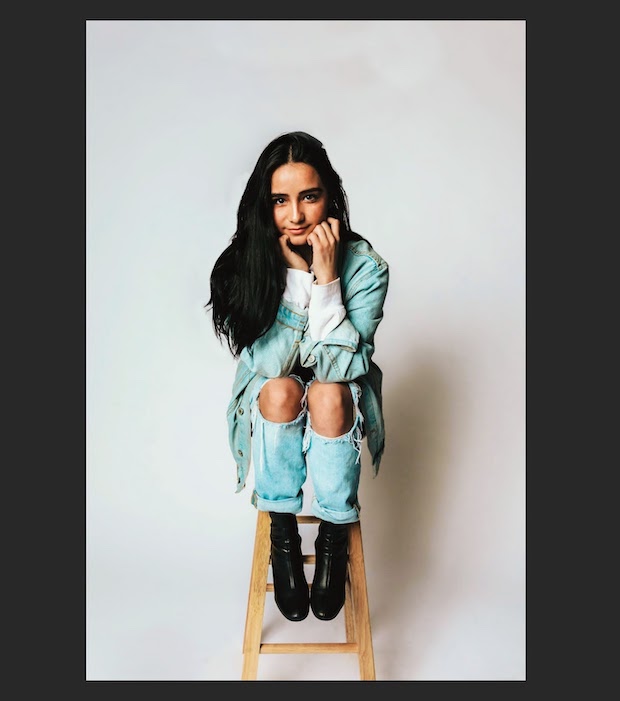
Improvement comes only with practice, so feel free to download the original image and give this a go yourself!
The Best Software for Editing Fashion Photography
Choosing the right software to learn with is a difficult task. Adobe’s Creative Cloud is the industry standard, and has been for a long time. However, due to many advances in competing technologies, there are many different choices which can yield equal results.
You should choose which software to edit using depending on several different things. Budget, level, and options. If you need a cheap tool, those exist and do great things.
Free photo editing software exists too! Level means the quality of the software. Being able to edit an image and retain original quality is incredibly important.
The options provided by a tool are also incredibly important. Things like spot removal are what make Photoshop so dominant, and while there are other options, none do it to quite the same level.
What do you need to edit fashion photography?
What should you be looking for in a piece of software:
- Light Global Adjustments a la Camera RAW
- White Balance
- Affecting only some areas of exposure
- Things that play with Blacks, Shadows, Whites, and Highlights.
- Dodging and Burning
- Spot Healing Brush or a Clone Stamp style tool
- A way to apply select color changes
- Something that your computer can run
A program that handles the RAW file type created by your camera is also important. You can leverage RAW to make the most use of your camera’s sensor, and you should not unnecessarily limit yourself.
One last key element is file management. While not strictly photography software, using Lightroom, Photomechanic, Adobe Bridge, or any other file handling system will allow you to sort through images and fine those best suited to editing more quickly.
You don’t want to be scrolling through an SD card full of images and picking the best shot without any side by side comparison. If you are ever compositing together two different shots of the same model, you want to be able to look at them side by side and apply the same global edits before playing with the image in your editing software.
Some pieces of software allow you to shoot tethered, meaning the image goes directly from camera to computer while you take photos. If this is something you want to use, look for it.
If this is something you want to use, look for it. As a fashion photographer, the benefits of thethering are massive. A lot of the time a fashion photographer will spend a lot of the time in the same location with the same lighting, and the ability to really understand these shots through your app of choice will make your images much stronger.
Smaller Details
On the topic of compositing: for those without the large budgets to use exotic locations in their shoots, or for those who lack great vistas nearby, using replacement skies or even backgrounds out of windows is a great way to add effects that you can showcase in a portfolio. Choosing a program that allows layers and masks allows you to do this. Layers and masks also allow you to accomplishing all the tasks I explained above.
Choosing your editing tools is similar to choosing a camera. While you may have a lot of anticipation for the choice, it is important to remember that the software you choose will not be the end all be all of your photography and your career as a photographer. Different programs allow you to specialize in different areas of photo manipulation.
A tool is simply meant to allow you to do your work, and all editing software today is more than capable of affording you the chance to make final and polished works of art. Photo editing is no longer something meant just for the best of the best!
Making Your Choice
There are several other pieces of software that I have used and heavily recommend. An app like any of the ones mentioned below will be a great piece of photo editing software. Photo manipulation with any of this photo editing software will be a breeze.
- Capture One Pro
- It is a one time payment Lightroom replacement, and many professional photographers use it. It retains many of the same features as Lightroom does, and is just as versatile, too.
- Photopea.com
- Photoshop, but built into your web browser. Absolutely free and powerful. If you haven’t ever taken your photo to a powerful image editor, stick here.
- Affinity Photo
- Allows use on Apple’s iPad and iPad Pro
- Constantly updated and a one time payment (although large edition upgrades are often expensive, although it is constantly on sale.)
Professional photographers use different programs, and while the majority settle with Adobe’s Suite, many of these professional photographers minimally edit or use other programs.
Film photography has had a large resurgence, and although very few who only edit in the dark room remain, there are people that still do everything the analog way and achieve spectacular results.
There should be nothing in the way of you and the image you want to create, and there is an option in software for you out there.
Fashion Photography Tutorials
What are some of the best tutorials for how to edit fashion photography? Photo editing is hard, and using some of these best tutorials for how to edit fashion photography will help a lot!
The best part of the internet age is information. Knowledge is no longer withheld, and now has a platform to be distributed to all people. Photographers can learn everything through the internet, from the basics of posing a model and the nuances of light while taking a shot, to the depths of editing and achieving that perfect look.
There are several tutorials I recommend, and although some take more time and require a lot of practice, they will make you an astounding photographer.
I mentioned several tutorials above. Two great places to start are tutorials on Photoshop replacements and Lightroom replacements, some of which are actually websites instead of softwares.
Learn Lighting
As mentioned above, Strobist’s Lighting 101 is the perfect place to start learning how to shoot with lights. Flashes and continuous lighting of any kind allow for much more creativity. Shooting in a studio-like space allows for you to shoot at any time, provided you can get your models there too.
Studio lighting tutorials are a resource that will teach you your first way to light someone in a studio. Using a living room and a blank backdrop for a studio works, so don’t be afraid to get some used lights and try this one at home. This tutorial teaches a very dramatic lighting setup that is great for a more edgy look, especially in Black and White.
Editing and Evolving your Art
FStoppers, the famous photography website, has tutorials that are great anchor points for your photography and editing. Posing models is a great place to start learning, because even with just a phone and a model you can start putting together the pieces of fashion photography.
Masterclass is a fantastic resource for photography, as Annie Liebovitz has a great portraiture class she taught. It is long and full of stories but also teaches how a famous professional photographer thinks when working on a photo. She goes into depth about images she took that have gone viral across the ages.
If you enjoyed this editing tutorial, consider following us on social media like Twitter and Facebook for more similar tutorials.






Oh, I like you before/after photo. I can see there difference and I like it.
Needed some quick guides for a first time fashion shoot and this article is so helpful. Thanks for the great information!