Do you want to blur the edges in your image? Sometimes you may want to edit a portrait so that the edges blend to white or a transparent background. In this article, we will show you how to blur edges in Photoshop.
Do you want to blur the edges in your image? You may decide to blur the edges of a photo so that you can blend it into a solid or transparent background, or into another photo. In this article, we’ll show you how to blur edges in Photoshop so you can achieve perfectly blended photo edits.
Of course, you’ll need to download the latest version of Photoshop so that you can follow along with this tutorial. If you don’t have it yet, you can get Photoshop from Adobe’s site here.
Without further ado, let’s learn how to blur edges in Photoshop!
Blur Edges Using Photoshop Feather Selection
First, open your image Photoshop by dragging the image file to the Photoshop app icon. You can also choose to open Photoshop first, then select Open from the main screen that appears.
I’ll be using this portrait photo to demonstrate this editing technique:

Once you’ve loaded your image into the Photoshop workspace, select the Elliptical Marquee Tool from the left-hand Photoshop toolbar. We’ll use this selection tool to select the portion of our image we want to maintain intact throughout the edit.
In other words, whatever you select with the Elliptical Marquee Tool won’t get blurred in later steps.
I’m working with a portrait for this tutorial, so I’ll select the model’s face and head with the Elliptical Marquee Tool so that it doesn’t blur.
Keep in mind that you can use whichever selection tool works best for your image. Photoshop’s selection tools include the Lasso Tool, Rectangular Marquee, Quick Mask, Magic Wand and more.
When you’re done, you’ll see your selection cordoned off by “marching ants.” My selection looks like this:

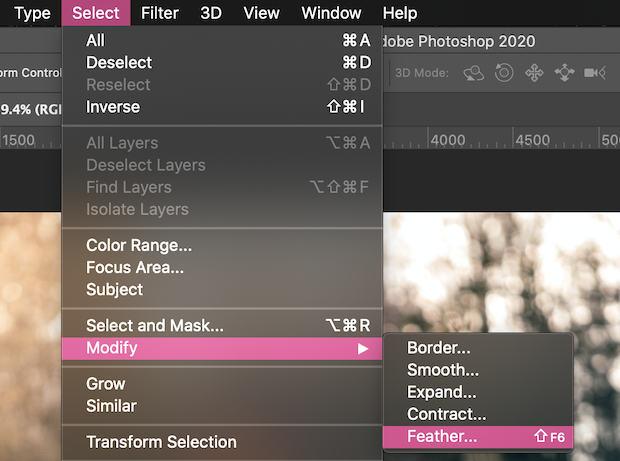
When you’re happy with your selection, you can more onto the next step. Now, navigate to Select » Modify » Feather from the upper menu bar.

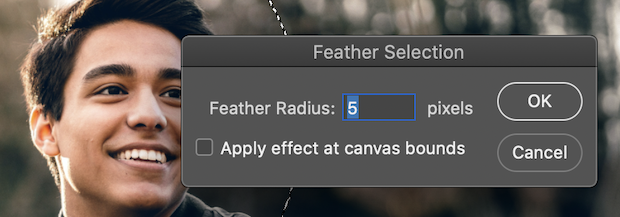
When you click Feather, a dialog box will expand that allows you to input a feather radius. The feather radius determines how quickly the feather fades your image. For example, a feather radius of 5 creates a much starker feather than a feather radius of 30 pixels.

Set your feather radius depending on your own tastes and how you’d like your final results to look. I’ve chosen to use a feather radius of 20 pixels for this edit. Click OK when you’ve set the feather radius.
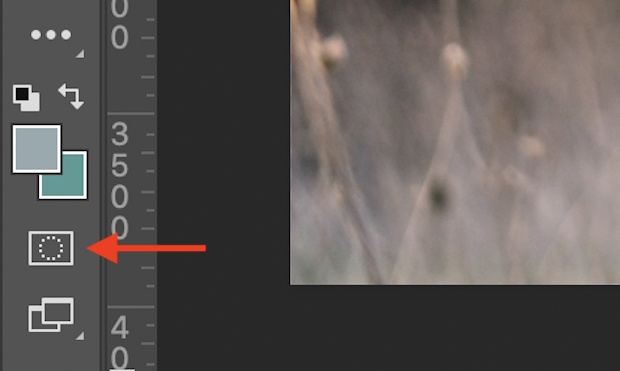
Next, select Quick Mask Mode from the left-hand toolbar. Photoshop denotes this mode with a rectangle with a circle taken from the center, as shown below:

Entering Quick Mask Mode overlays your photo in red. You should now be able to see where you applied your feather effect.

Click again on the Quick Mask Mode button to return to the normal viewing mode.
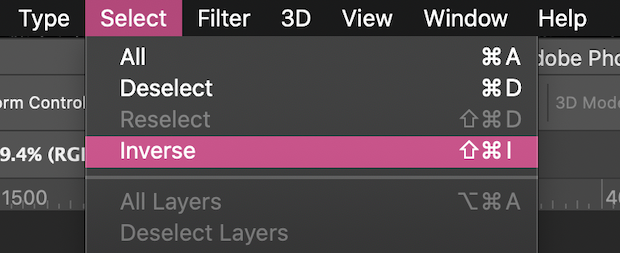
Next, go to Select » Inverse to inverse the selection in the image.

When you look at the image now, you’ll see that the outside of the photo is bordered by marching ants. That’s how you’ll know you’ve successfully inverted the selection.
Now it’s time to create a new background for your image so that the feathered edge is obvious. Go to Layer » New » Layer to add a new layer and fill this layer with a color of your choice using the Paint Bucket.
I’ve chosen to fill my background with white. Of course, you can place your selection on any background you want, including patterned backgrounds and even other photos.
Once you’re happy with the new background you’ve created for your feathered image, press Ctrl + D to remove the selection.
That’s it! Here’s our final edit:

We hope this article has helped you to learn how to blur edges in Photoshop. You may also want to check out our guide on Photoshop actions to blur background.
If you like this article, then follow us on Facebook and Twitter for more free photo editing tutorials.


very nice lesson!!
We’re glad you’ve found it useful!
Your statement ‘It will fill the image with the white color, leaving the selection around the face of the model in the image. ‘ is totally unclear. Does ‘It’ mean ‘creating the new layer’? If so, how can creating a new layer will fill the image of another layer with the white color? What do you mean by ‘ leaving the selection around the face of the model’?
Your description works until this step. The rest is not valid.
Please clarify your statement.
Thanks
Loved it.. Thanks!
Nothing happened? I hit control d… nothing.