Which photo editing software is best – Luminar or Photoshop? People often ask that question, but the question should be, which editing software is best for you?
This article is going to look at both photo editors. We will examine the advantages and disadvantages of each editing program. That way, you can make an informed decision.
We’ll be looking at:
- Main differences between Luminar and Photoshop
- Ease of use of each program
- Pros and cons of Luminar for photographers
- Pros and cons of Photoshop for photographers
- How to choose between Luminar and Photoshop
- Which photo editing software is the least expensive?
Luminar vs. Photoshop – What are the Main Differences?
Every image editor has its fiercely loyal fans and also its detractors. We’re going to look beyond that at what each editing program does (and does not) do. We’ll discuss how to make the choice between them if you’re in the market for new editing software.
Firstly, what are the main differences between Luminar and Photoshop?
Adobe’s Photoshop has been the benchmark photo editing software for photographers for many years. But, it’s becoming difficult for Adobe to justify the extra expense of Photoshop since there are now other less expensive, yet high-quality image editors on to the market.
Skylum’s Luminar is one of those challengers to the photo editing throne, but what exactly sets it apart from Photoshop? Here are some of the main differences:
Image Library and Organization
Luminar is an image editor and an image organizer. It offers a way to store and organize all your images. You can import entire folders of images into the software. In this, it’s very similar to Adobe’s Lightroom, with a nod to Capture One software too.
Photoshop is an image editor, pure and simple. It doesn’t offer a library or a way to store images, although it integrates with Lightroom. Lightroom does store images. So, you can move images straight from Lightroom to Photoshop for editing.
RAW File Handling
Luminar allows you to open RAW files directly in the program, while Photoshop opens RAW files in Adobe Camera Raw. You must adjust them there before saving them as TIFF or JPEG files to open in Photoshop. This makes it a much longer process to open a RAW file than in Luminar. Both image editors offer batch processing for your files.
Adding Text
Luminar doesn’t yet have the option of adding text to images, which makes it no good for adding graphics. On the other hand, Photoshop allows the addition of text to images.
Pricing Plans
Luminar is available for a one-off price and doesn’t have any plans to introduce monthly subscriptions. You also get free software updates regularly.
Photoshop is available for a monthly subscription fee – either as a standalone program, or part of a bundle from Adobe.
Ease of Use for Beginners
An important question is how easy are Luminar and Photoshop to use – especially for those new to them?
Luminar’s interface is very user-friendly, and there are plenty of tutorials for learning new skills on the main page. Information on what each feature does is available by hovering your mouse over the question mark next to each feature. Even Luminar beginners should be able to find their way around and start editing their photos quickly.
Photoshop can be confusing to beginners, and the learning curve steep without watching lots of video tutorials. The program has so many features and editing tools. It can be difficult to remember what each one does, or even where to find them.
Presets, Filters and LUT Mapping
Luminar has many filters and LUTs that you can apply with just one click. Photoshop does have filters, but they are hard to find unless you know where they are. They are also different from the filters in Luminar. Adobe’s Lightroom editing software uses presets and LUTs, so it is more similar to Luminar in that respect.
Why You Need Good Photo Editing Software
In this day and age, you need good photo editing software to make your images stand out and look professional. This is especially true if you are trying to make a living from photography or image retouching. Having software with good noise reduction capabilities, retouching tools, and batch processing can make all the difference in fine-tuning images. You could say that we are photo mechanics!
Speed and reliability of your photo-editing software should be taken into consideration, especially if you need to batch process many images for your photography business. There’s nothing worse than spending ages on a photo edit, only to find your software has crashed or frozen. Then, you’ve lost all that precious work!
While you can use free and inexpensive software for a while, you need a dedicated photo editing program like Photoshop or Luminar to get the best results. They have all the tools to set up a smooth and fast editing workflow.
Pros and Cons of Luminar for Photographers
We’re going to dive deeper into the good – and not so good – things about Luminar, before moving on to Photoshop. These pros and cons are, of course, my opinion, and based on my own use of both Luminar and Photoshop.
Luminar Pros:
1. RAW File Processing
The ability to open RAW files in just one step really leaves Photoshop standing. It cuts down on time. In Photoshop, you have to open RAW files in Adobe Camera Raw, adjust, then export them. You can only work on them in Photoshop as TIFF files.
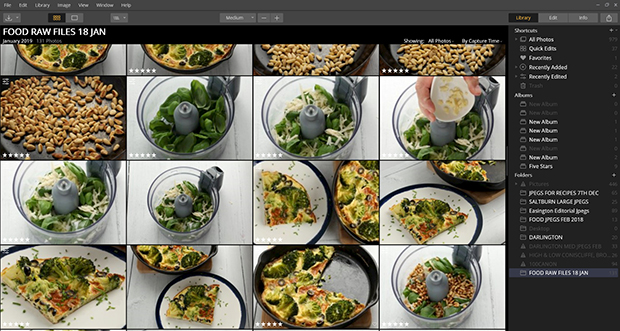
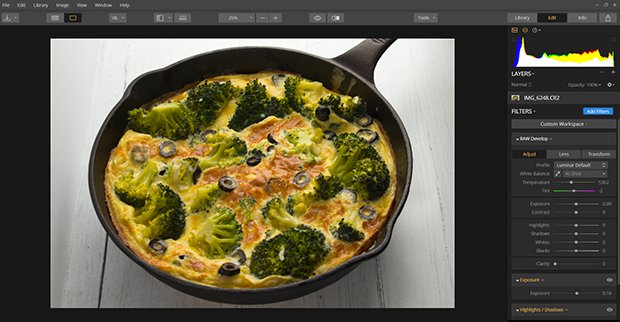
In Luminar, you can add whole folders of RAW files to the Library, see what they look like. Then click Edit to move the chosen image into Luminar’s editing window:
The RAW Develop module in Luminar offers all of the expected features. This includes Exposure, Contrast, Shadows, Highlights, White Balance, etc.:
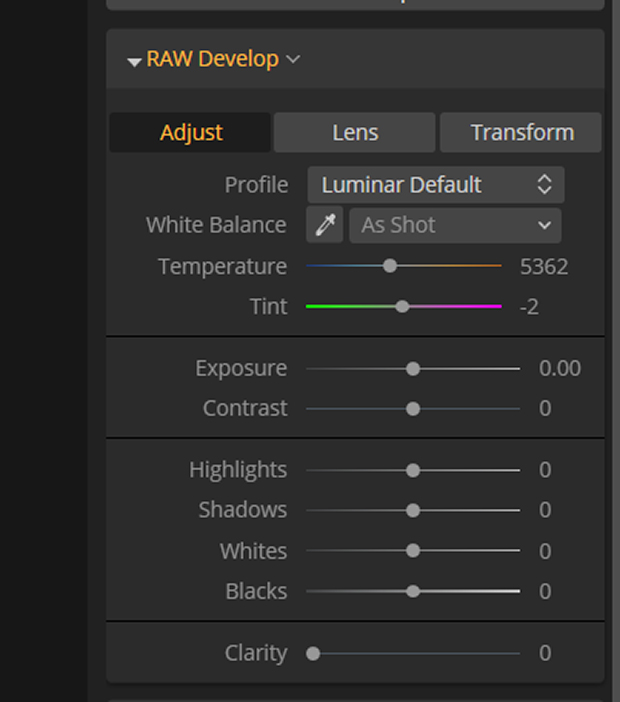
Using the RAW Develop module allows you to effectively fix any exposure problems that you may have had in-camera.
Clicking on the Lens tab of the RAW Develop module brings up a list of automatic lens corrections. Simply click the box:
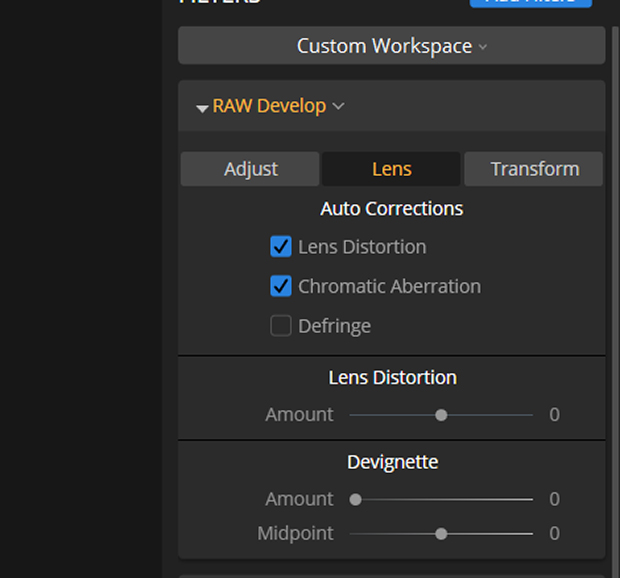
While the Transform tab allows you to warp and straighten your image whichever way you see fit:
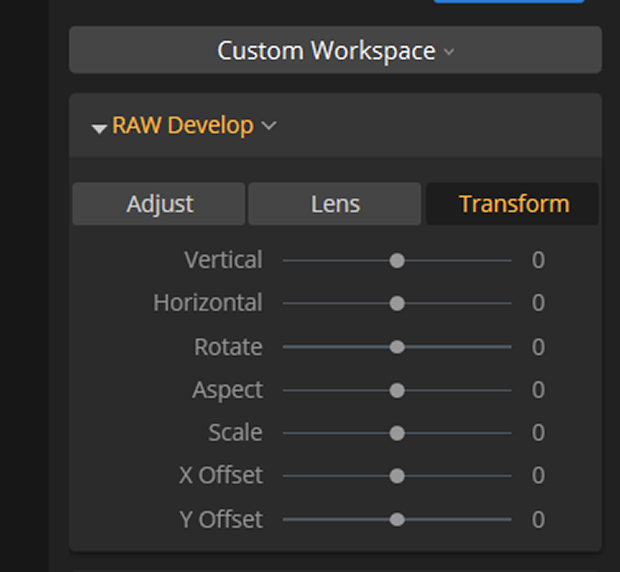
2. Dedicated Workspaces
Luminar’s Workspaces make finding tools you may need very simple. They have broken down the Workspaces into eight different categories, as shown in the screenshot below:
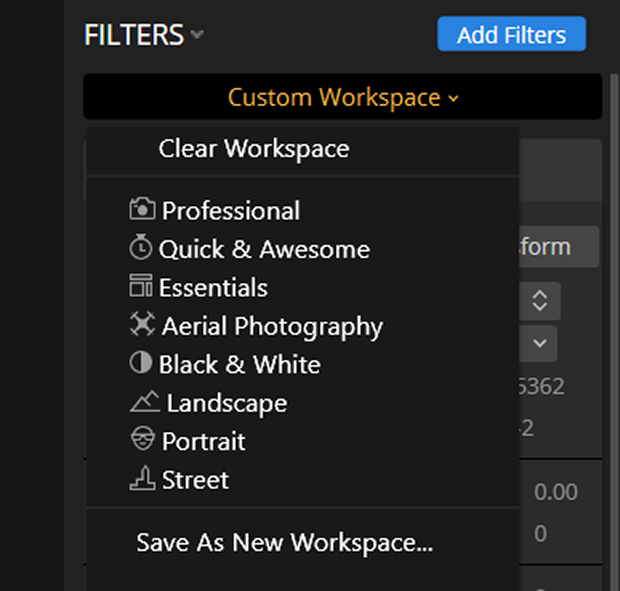
Arranging the workspaces like this makes it easy to find what you want. Each workspace contains editing tools that you are likely to need for each specific category. For example, the Professional Workspace contains filters such as Advanced Contrast, HSL Adjustments, Dodge & Burn and Channel Mixer among others.
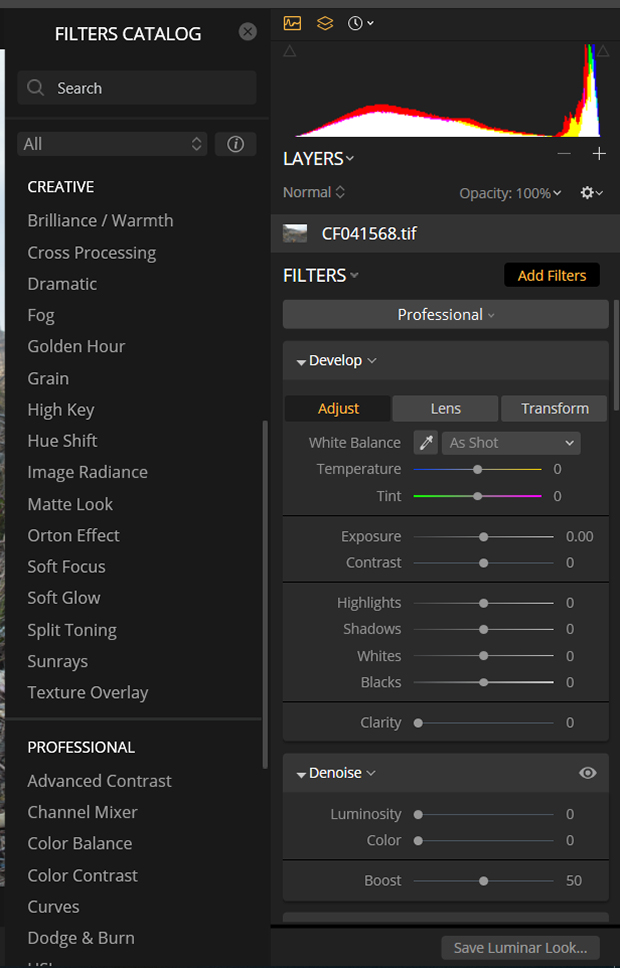
The Quick & Awesome Workspace is intended for those new to Luminar or photo editing. For those who just want to edit an image quickly and easily, this workspace is ideal. The filters in this workspace include Accent AI 2.0, AI Sky Enhancer, Saturation/Vibrance, and Clarity.
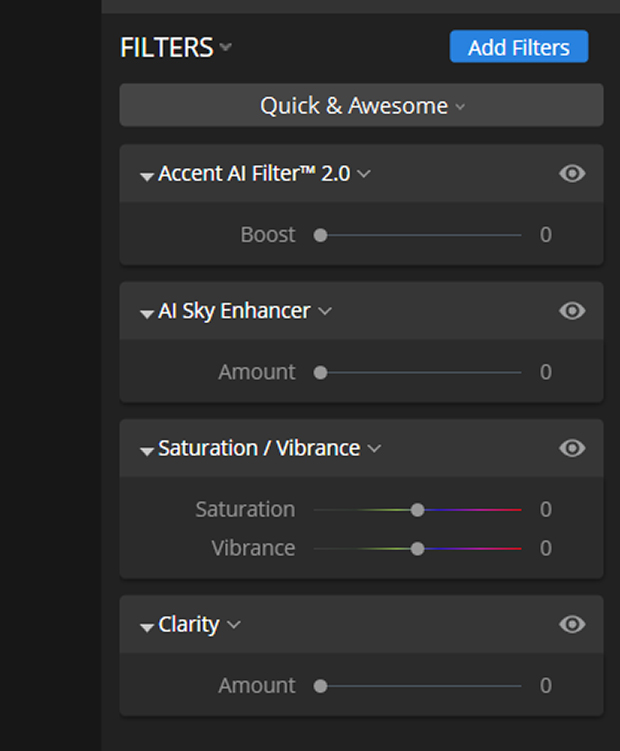
As with all the Workspaces, you can add any of the other Filters to it. You can also create your own custom workspace.
3. Information on Each Editing Tool
Luminar is intended to be easy for beginners and professionals to use. All their Filters have information about what they do. This information appears in a separate window when you click on the information symbol at the top of the Filters Catalog menu. Simply hover over the Filter name:

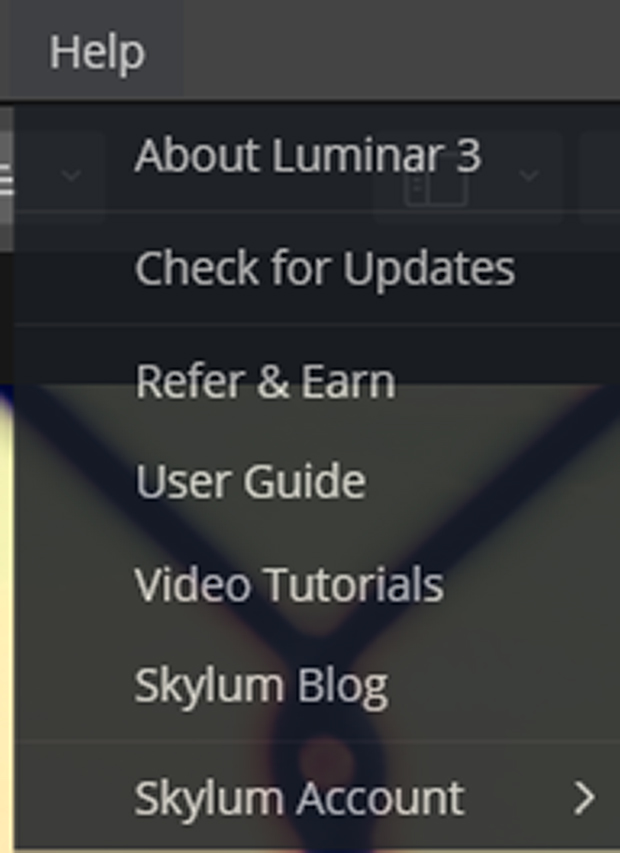
You can also find plenty of help and guidance from a user manual to video tutorials if you click Help along the top menu bar:
4. Professional Editing Tools
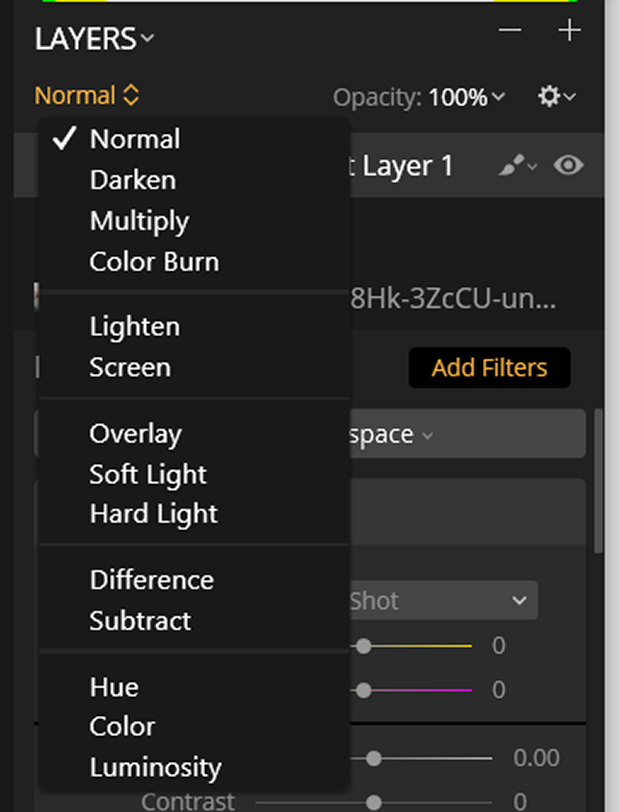
Luminar is easy to use, but don’t let that fool you. It still has all the professional photographer’s editing tools that Photoshop does, including Layers, Layer Blend Modes, Clone Stamp, Crop, Transform, Denoise, Dodge & Burn, Advanced Contrast, Brush Tool, Luminosity, Gradient, and Radial Masks and Curves:
5. Powerful AI-Driven Filters
Skylum has invested a lot into their AI Filters in Luminar – namely Accent AI Filter 2.0, and AI Sky Enhancer.
These two filters use artificial intelligence to make adjustments tailored to the individual images. They aren’t a one-size-fits-all filter. Accent AI can take an image and work out how much exposure adjustment, contrast, saturation, etc. it needs to look good. The AI Sky Enhancer uses advanced masking technology to find the sky in an image. It only applies adjustments to the sky.
Luminar also has a good range of other Filters that go from Utility to Creative. One of the most innovative is the Sunrays Filter, which allows you to add realistic-looking sun and sunrays to your image. You can adjust the strength, color, and direction of light, and the length, number, and randomness of the sun rays themselves.
6. Good Noise Reduction Capabilities
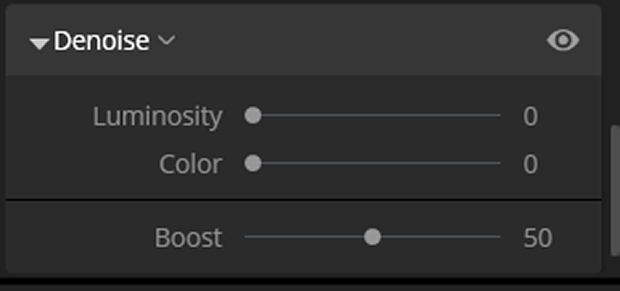
Luminar has a dedicated Denoise Filter, which is simple to use, yet effective. Adjust the Luminosity slider to reduce noise, and the Color slider to reduce chromatic noise:
7. Luminar Looks
Luminar calls their presets ‘Looks’, and there are many different built-in Luminar Looks to choose from. You can buy more from the Luminar Marketplace. Some of the paid-for Looks are signature collections created by professional photographers like Max Rive, Trey Ratcliff, and Ilya Nodia.
The free, built-in Looks are divided into categories like Aerial, Portrait, Street, Landscape, etc.
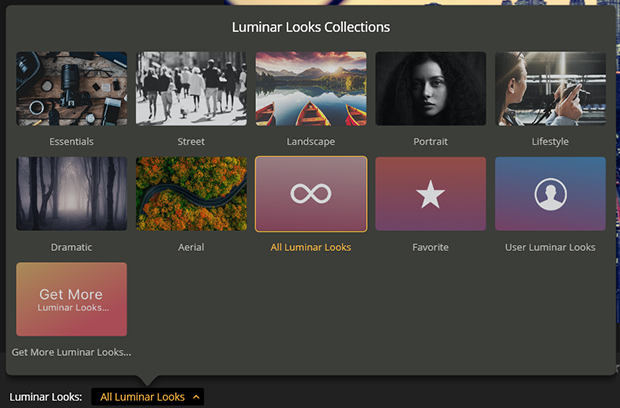
The good thing about Luminar Looks is that you can adjust the strength of them with the slider, as well as create duplicate layers and select different Looks to create a new, dramatic Look from the layer stack. You can even change the Layer Blending Mode to make even more changes.
You can also create your very own Looks presets from the filters and layers. You can save these and find them in the User Luminar Looks tab to apply to other images.
8. Luminar Library
Luminar is not just an image editor, it’s a photo organization tool as well. Much like Lightroom, Luminar offers photographers a method of organizing their images inside the software itself.
It allows you to find specific images, rate and tag them, and upload whole folders of photos. The software then automatically sort the shots by date, month, and year.

The Library also offers edit synchronization and batch editing so that you can edit one image of a group, and apply the same edits to other photos in a few mouse clicks.
9. Batch Processing
Batch processing is being able to apply an edit to one photo, and then apply the same edit to any other photos that you choose. This speeds your workflow up considerably, and is really necessary in today’s world of “right now!”.
Luminar offers speedy and smooth batch processing, allowing you to add Luminar Looks or your own custom user looks to the files you want to batch process.
Cons of Luminar:
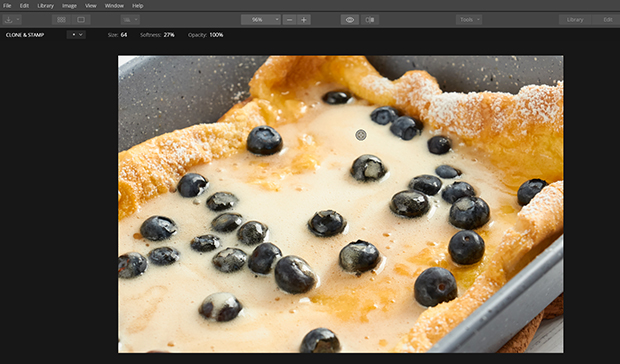
1. Clone and Stamp Tool
Although Luminar’s Clone and Stamp Tool is handy for quick edits and does the job, I personally find it more difficult to use than Photoshop’s clone tool – perhaps because it’s just what I’m used to.
2. Can Occasionally Crash
Although Skylum has worked out a lot of the bug issues with Luminar, it can still play up on occasion.
It sometimes freezes up, and sometimes just shuts down while you’re using it, but as I said, it’s a lot better than it used to be for reliability.
3. Lacks Some Pro Editing Tools
Luminar does have the most-used photo editing tools, such as Crop, Clone and Stamp, Erase, and Free Transform, but it is lacking some tools that you often need in photo editing. A pen tool for making detailed selections, and a healing and spot healing brush, patch tool, text tool or a lasso tool are missing.
4. Some Tools Open in New Windows
Maybe this is not a con for other people, but I find it irritating the Crop Tool in Luminar opens in a new window. Then, you have to click ‘Done’ when you’re finished cropping to take you back to the main editing window.
This may not seem like a big problem, but if you have a lot of images to crop, you don’t want to be messing around opening and closing windows in your image editor!
As a result, I don’t crop in Luminar now. I crop in Photoshop because I can use the Crop Tool in the same window without hassle.
The Clone and Stamp Tool, Free Transform, and Erase tool in Luminar also open in different windows. Again, you have to click ‘Done’ for your changes to take effect.
In Which Situations is Luminar the Best Photo Editing Software
As you may have noticed above, there aren’t that many cons with Luminar compared to the pros.
I use both Photoshop and Luminar in my editing workflow, and I rely on each of them for specific parts of my editing. Luminar is, in my opinion, best at processing RAW files and having them ready to edit directly in the software.
The Library feature is great and does speed up your workflow.
Luminar is also best for making adjustments, adding filters and presets to your images – adding the finishing touches, if you like.
If you are a beginner photographer, Luminar has a far less steep learning curve than Photoshop. This means that you’ll going to end up with some nicely edited photos far quicker and with less frustration.
Professional photographers may be a bit wary of Luminar. They might think it’s a bit gimmicky and geared only towards hobbyists, but that isn’t the case. Skylum has put a lot of thought into making Luminar accessible to all. It does even have some great pro-spec features.
Pros and Cons of Photoshop for Photographers
Now we’ll look at the good – and not so good – parts of Photoshop. As mentioned before, these are my opinions, formed through my own use of Photoshop and Luminar.
Photoshop Pros
1. Extremely Powerful
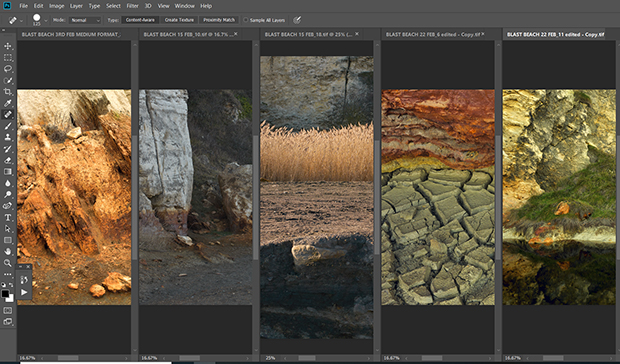
Photoshop is a vastly powerful image editor, and it allows you to have multiple large TIFF images open at the same time to work on – something many other photo editors would struggle to do without lagging or crashing:
2. Huge Array of Professional Editing Tools
Whatever editing tool you are after, you will find it in Photoshop. The Clone Tool, Healing Brush, Spot Healing Brush, and Patch Tool make quick work for professional retouching, and you also have the choice of using Content-Aware, Proximity Match or Create Texture to really nail a flawless retouch:

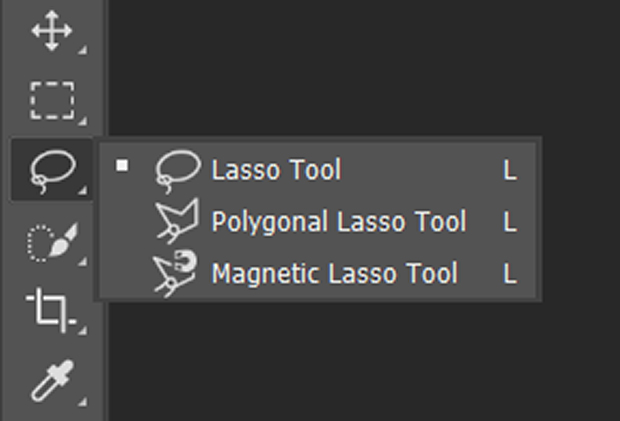
If you want to create detailed cutouts and selections, the Pen Tool is perfect, and you have a multitude of selection tools to choose from:
3. Edit More Than Just Photos
If you need to do some graphic design work or add text to images, Photoshop has everything you need to get started. You can even edit videos or create 3D images with it.
4. Print from Photoshop
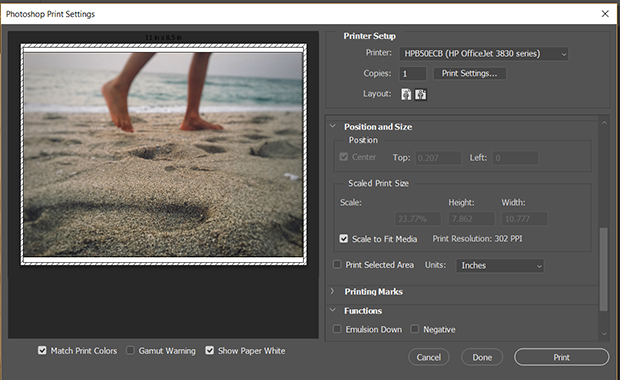
Photoshop allows you to print images directly from the software itself, which means you can use Photoshop to manage the print colors, so your print comes out exactly as it looks in Photoshop.
5. Add Plugins
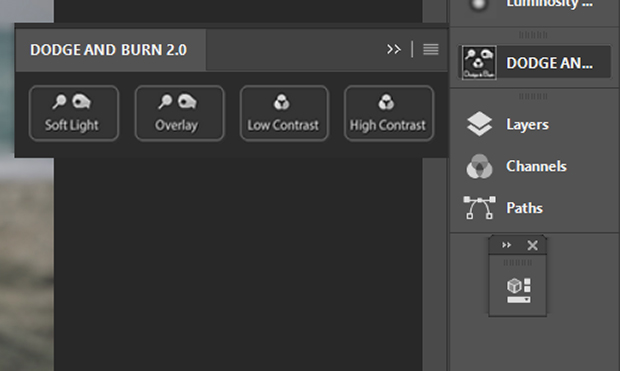
One of the great things about Photoshop is that it allows you to add editing program plugins so you can use your favorite photo editing software directly from within Photoshop.
For instance, you can add retouch panels, which contain all the tools you need for editing fashion and beauty photos, luminosity masking, and specialist dodge & burn panels:
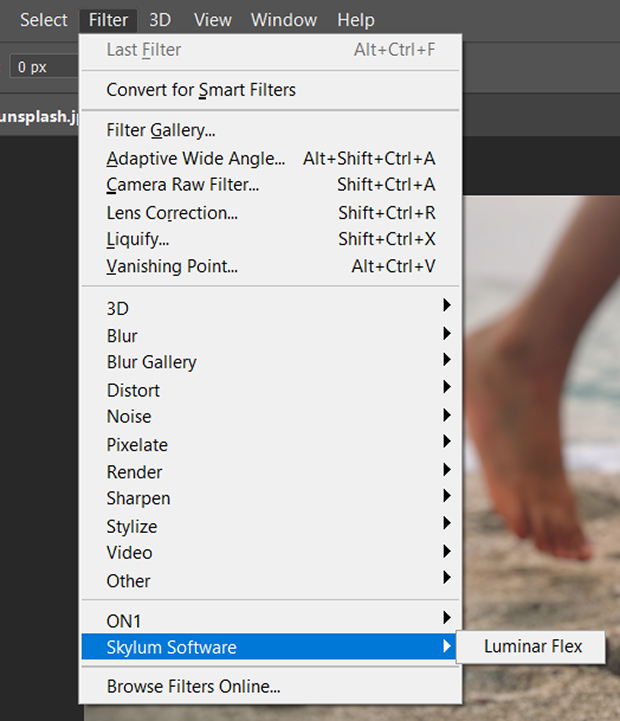
There are many, many plugins out there for Photoshop, and Skylum have even produced Luminar Flex, which is a Luminar plugin designed to be used from within Photoshop:
6. Smart Objects
Smart Objects are a revolutionary way of working on an image without losing quality no matter how many edits you do. They preserve the image source contents with all of the original characteristics. So, Smart Objects allow you to do nondestructive editing to the layer.
7. Create Panoramas
Photoshop enables you to create panoramic images by intelligently stitching together a series of images seamlessly. You can also add specialist plugins for panoramic images directly to photoshop.
8. Add Borders to Images
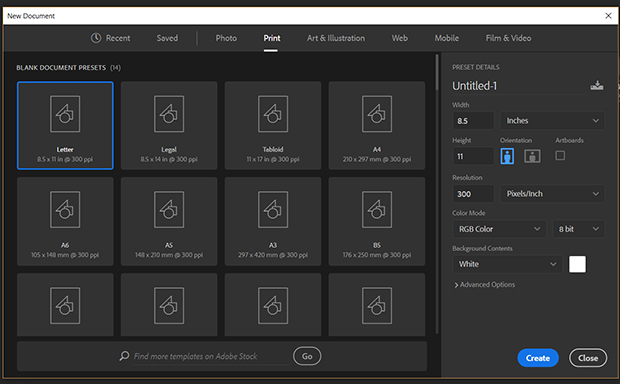
If you are preparing photos to print, Photoshop allows you to create new, specific sized backgrounds to copy and paste your images on so you can have the borders you want.
You can also create triptychs and photo collages.
9. Batch Processing
Photoshop has the capability to handle batch processing of large files and a great number of images pretty quickly and reliably.
10. Create Contact Sheets
Photoshop allows you to create contact sheets of all the images you choose and gives you the option to print them out. If you want to show clients your contact sheets, or need to make quick decisions on shoots where there are hundreds of photos, the ability to create and print contact sheets comes in very handy.
Cons of Photoshop
1. Difficult for Beginners to Use
Although Adobe has started putting Luminar-style information boxes on each tool when you mouse over it, Photoshop can be off-putting for those who have never used it before.
The sheer amount of tools and options that make Photoshop such a good photo editing program. They can also become overwhelming for those who don’t know where to find what they need. Beginners often seek alternatives to Photoshop.
Photoshop Elements is Adobe’s pared-down version of Photoshop for those who don’t want all the tools included in the full version.
2. Can’t Open RAW Files Directly in Photoshop
This can be really annoying for photographers who just want to get on and edit their images as fast as possible. You either have to open your RAW files in Adobe Camera RAW or use Adobe Lightroom to open and adjust your RAW files. Photoshop cannot deal with RAW files until they’ve been saved as TIFFs.
3. Only Available with a Monthly Subscription
Gone are the days when you could buy Photoshop for a one-off price – although it was pretty expensive.
Nowadays you have to sign up to pay Adobe a monthly subscription to get Photoshop, which just doesn’t suit everyone. You can still buy Photoshop Elements for a one-off price, but it doesn’t have all the features of Photoshop.
4. You Need a Good Graphics Card and Lots of Memory
Because Photoshop is so powerful, it takes up a great deal of space and a lot of graphics capability on your computer – you need a good graphics card to ensure Photoshop runs fast and smooth on your computer.
If you have the space and the graphics to handle it, Photoshop is extremely reliable and rarely crashes or freezes.
In Which Situations is Photoshop the Best Editing Software?
As mentioned before, I use both Photoshop and Luminar as part of my professional photo editing workflow.
Photoshop is great for the middle of your workflow when you have dealt with the RAW files. Then you can use Photoshop for further retouching and cleaning with the clone stamp and healing brush etc.
Photoshop really can’t be beaten at this stage for in-depth retouching and manipulation of photos.
Photoshop is also best if you want to print images directly from it. You can print an image from Luminar, but it doesn’t allow you to color manage it.
How to Choose Between Luminar and Photoshop
So, how do you know whether Luminar or Photoshop is the best editing software for you?
It comes down to several factors:
- Which one is the quickest and easiest to use?
- Which is least expensive?
- What do you want to use the software for?
Which One is Quickest and Easiest to Use?
Luminar is the fastest image editor to get up and running on. You can open it up as a complete beginner and still manage to edit an image and export it.
Which is Least Expensive?
You can buy Luminar for a one-off payment, which works out considerably cheaper than Adobe’s monthly subscription fees for Photoshop. Luminar lets you have a free trial, and once you’ve bought Luminar, you continue to get free updates and bug fixes.
Luminar can be bought for around $70. The software can be bundled with Aurora HDR software for varying prices.
Adobe currently charges around $20 a month for individual app subscriptions, but check out their Photography Plan. This bundle allows you to get Photoshop CC, Lightroom Classic CC, and Lightroom CC for only $9.99 a month. If you are a student, Adobe offers a 65% discount.
What Do You Want to Use the Software For?
This is one of the most important factors in deciding which one to get. If you are a professional photographer who needs to do a lot of image retouching and skin work, Photoshop is hands-down the best for you.
Beginner photographers and those professionals who don’t do a lot of detailed retouching will probably be better off with Luminar. It offers a selection of impressive batch processing capabilities, as well as RAW develop, for time-crunched pros.
I use both image editors for my professional work, and each has a place in my workflow. I use Luminar for RAW files and Photoshop for retouch. I then move back to Luminar for finishing touches such as LUT mapping or filters.
If you’re still not sure, here’s a quick rundown on how each of them fares on some editing essentials:
Photo Organizing
Luminar’s Library lets you organize, tag, and sort your images, while Photoshop is an image editor, pure and simple. If you want to organize your images with Adobe, then Lightroom is their photo library tool.
Photo editing
For basic editing, each one will do a good job. That being said, Luminar offers more in the way of filters and Looks.
Presets
Luminar wins this one hands down. Luminar Looks offer lots of creative and utility presets, and there’s LUT mapping too.
Photoshop does have a few filters, but they’re mostly artistic ones. If you want Adobe presets, you need to use Lightroom presets before putting your image in Photoshop.
Editing Tools
Luminar has the basics, but Photoshop is the more experienced user’s choice because there’s a high-quality tool for every situation.
Batch Processing
Both are equally good at this, although Luminar lets you batch process RAW files too.
Conclusion
It’s not always an easy choice, but hopefully this article has made choosing your editing software a bit easier. For me, it’s always going to be a ‘horses-for-courses’ choice. Each program has its own strengths and weaknesses, which is why I use both image-editors.
Ultimately, it comes down to your own personal preferences, workflow, editing skill level, and budget. Remember to ask yourself what you intend to use the edited photos for.
Whichever software you choose, there are thousands of good-quality tutorials out there on getting the best from them. Don’t be afraid to dive in and get creative.
If you liked this article, you can follow us on Facebook and Twitter for some great free photography resources.


