





Create Beautiful Responsive Photo & Video Galleries For Your Site in Minutes
Documentation, Reference Materials and Tutorials for Envira Gallery
The Frontend Submissions addon turns a gallery into a two way gallery. Instead of only showing your photos, it puts an upload form on your site so visitors can add their own.
Visitors do not need a WordPress account and they never see your dashboard. They pick their photos, upload them, and you decide whether each photo goes live. It is a good fit for event photos, photo contests, community galleries, and client galleries where other people are doing the shooting.
Note: Frontend Submissions is a Pro feature. On a Basic or Plus license the Submissions tab shows an upgrade screen instead of the settings, and the form does not render on the front end.
Submissions are switched on one gallery at a time, so you can collect photos in one gallery while your other galleries stay closed.
From your WordPress dashboard, click Envira Gallery in the left hand menu, open the gallery you want to collect photos in, then click the Submissions tab.
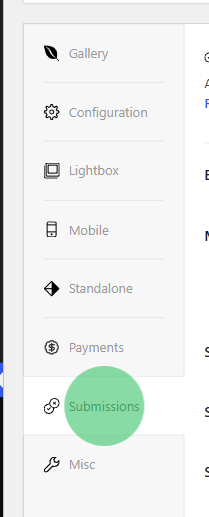
Check Enable Submissions. The rest of the settings on the tab appear as soon as you do.

Here is the full tab with everything switched on:
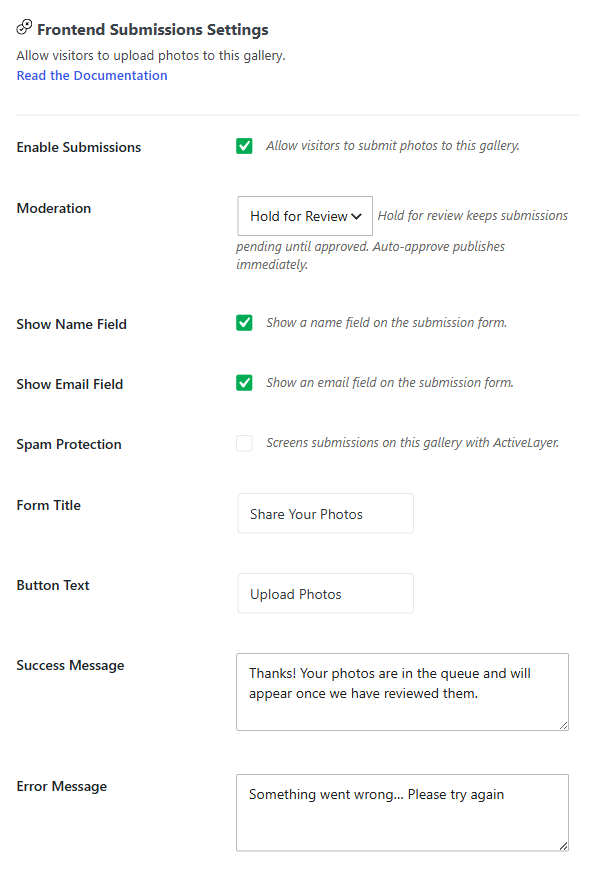
The settings do the following:
| Setting | What it does |
|---|---|
| Enable Submissions | Switches the upload form on for this gallery. Nothing else on the tab applies until this is checked. |
| Moderation | Hold for Review keeps each photo hidden until you approve it. Auto-Approve publishes photos the moment they are uploaded. |
| Show Name Field | Adds a First Name field to the form. The name is saved with the photo and shown to you when you review it. |
| Show Email Field | Adds an Email field to the form. The address is saved with the photo and is only ever visible in your dashboard. |
| Spam Protection | Applies your site wide spam screening to this gallery’s form. See Step 3. |
| Form Title | The heading above the form. Leave it empty to show no heading. |
| Button Text | The label on the upload button, for example “Upload Photos”. |
| Success Message | What the visitor sees after a successful upload. |
| Error Message | What the visitor sees if the upload fails. |
Click Update to save the gallery when you are done.
Note: The name and email a visitor types are stored with the photo for your reference only. They are never included in the gallery output your visitors see, even after the photo is approved.
Moderation is the setting that decides what happens the second a photo lands on your site.
You can change this at any time. Switching to Auto-Approve does not approve the photos already waiting in the queue, so anything already pending still needs your review.
An upload form that anyone can use will attract bots sooner or later, so the addon ships with protection built in and lets you add another layer on top.
Always on, with nothing to configure:
On top of that you can add a CAPTCHA or the ActiveLayer spam service. You pick one method for the whole site, then switch it on for the galleries that need it.
Go to Envira Gallery > Settings and click the Frontend Submissions tab.

Pick one of the three options under Spam Protection.
CAPTCHA works with a CAPTCHA plugin you already run. Envira supports hCaptcha for Forms and More, Simple Cloudflare Turnstile, and Advanced Google reCAPTCHA. Install and configure one of them the normal way and Envira picks it up on its own, with nothing to enter here. If none is installed, this tab tells you so.
ActiveLayer screens submissions through the ActiveLayer service instead, with no puzzle for your visitor to solve. Choose it, paste the API key from your activelayer.com account, and save.
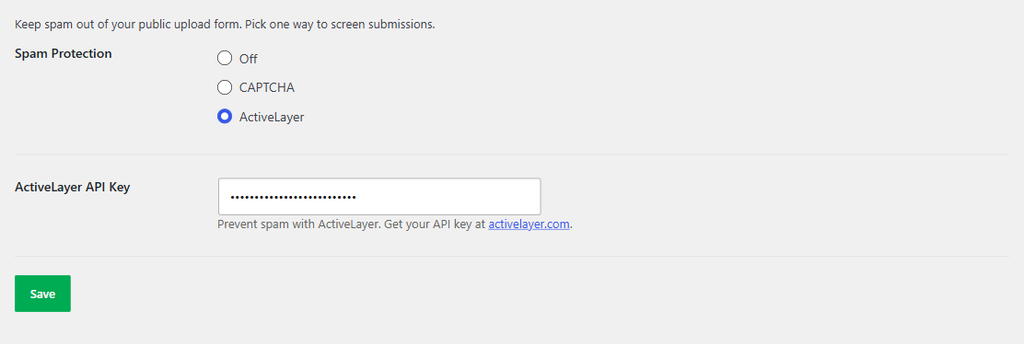
Click Save, then go back to the gallery’s Submissions tab and check Spam Protection there. The description next to the checkbox confirms which method that gallery will use.
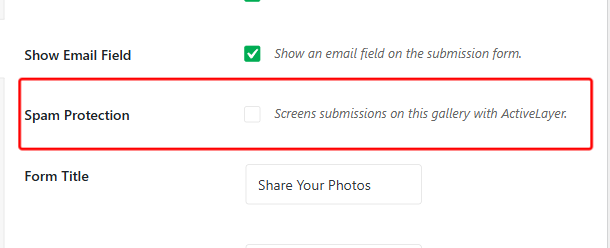
Note: The per gallery Spam Protection checkbox stays greyed out until a usable method is set on the settings page. If you picked CAPTCHA but no supported CAPTCHA plugin is active, or you picked ActiveLayer but left the API key empty, there is nothing for the gallery to switch on yet.
If you run more than one supported CAPTCHA plugin, Envira picks one for you and shows a notice offering to let you choose. A Prefer a specific one? dropdown appears on the settings tab in that case.
Enabling submissions does not put the form anywhere on its own. You add it to a page in one of two ways.
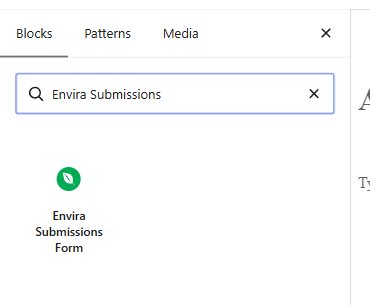
In the block editor, click the block inserter, search for Envira Submissions Form, and add it.
With the block selected, open the block settings panel on the right and pick your gallery under Submissions Settings.
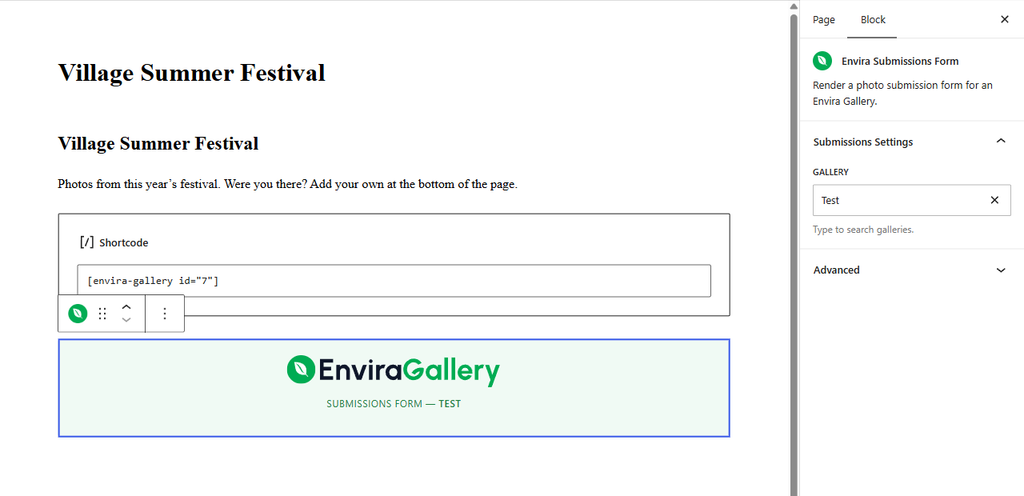
The Gallery dropdown only lists galleries that have submissions enabled. If yours is missing, go back and finish Step 1.
If you are not using the block editor, or you want the form inside a widget, a template, or a page builder, use the shortcode instead. Open the gallery and look in the Envira Code box in the sidebar. The submissions shortcode is at the bottom, and the clipboard icon copies it for you.
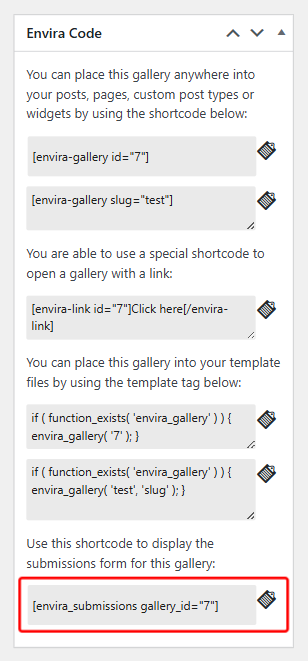
It looks like this, with your own gallery ID:
[envira_submissions gallery_id=”7″]
The form and the gallery are separate, so you can put them on the same page or on different pages. A common setup is the gallery at the top of a page with the upload form underneath it.
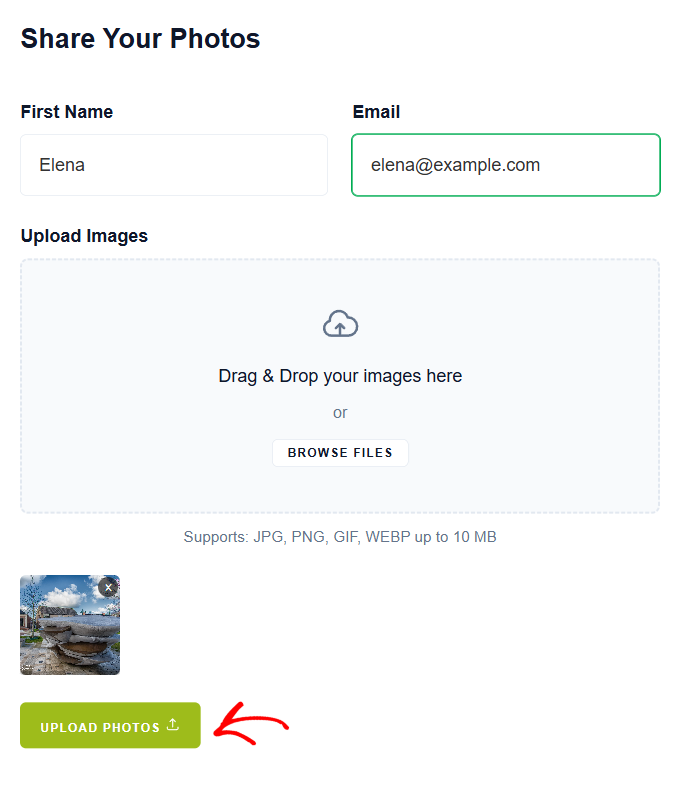
This is the form on the front end, with both optional fields switched on:
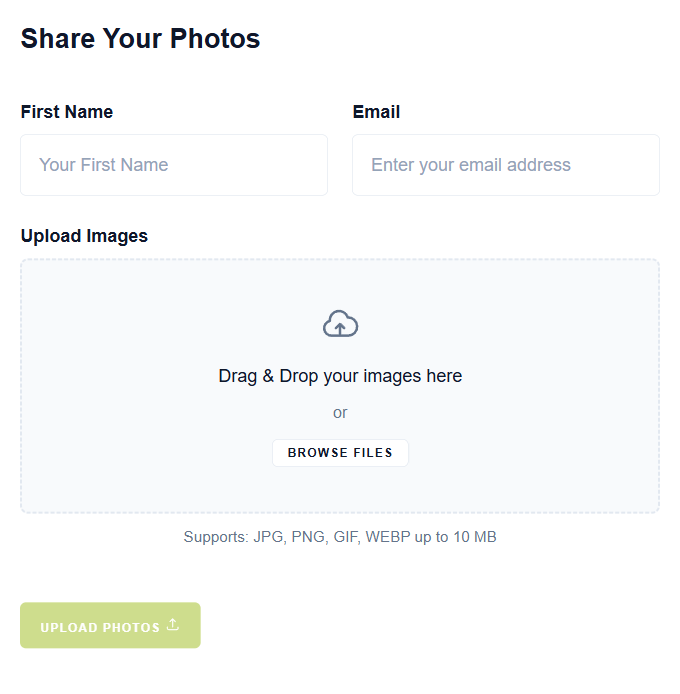
Visitors can drag photos onto the upload area or click Browse Files to pick them. Each photo appears as a thumbnail below the drop area, with an x to remove it, and the upload button stays disabled until at least one photo is chosen.
After the upload finishes, your Success Message appears under the upload button, and the thumbnails and text fields clear so the form is ready for another submission.
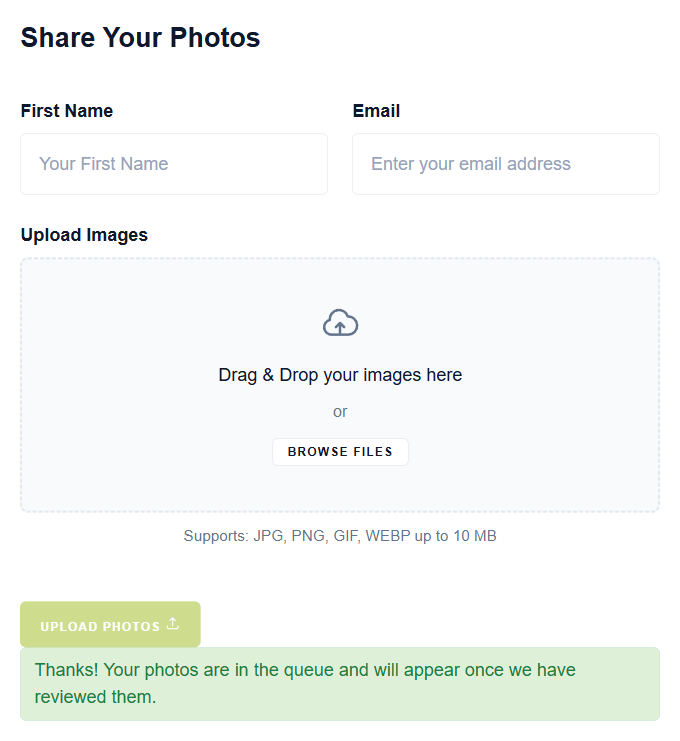
If the gallery is set to Hold for Review, the photo is now waiting in your dashboard and is not visible in the gallery to anyone yet.
Open the gallery and stay on the Gallery tab. Photos waiting for review appear in a User Submitted Photos panel above your published images.
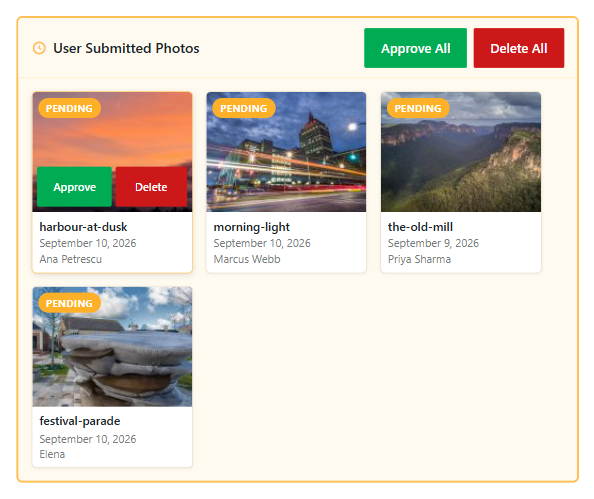
Each photo shows its file name, the date it arrived, and the submitter’s name if they gave one. Hover over a photo to reveal its buttons:
The buttons at the top of the panel, Approve All and Delete All, do the same thing to every pending photo at once. The two delete actions ask you to confirm first, because they cannot be undone.
Approved photos drop into the image grid below the panel right away. When the last pending photo has been handled the panel is replaced by a short confirmation, and it comes back the next time someone uploads.
Note: Deleting a submission permanently removes the image file from your media library. There is no undo, so use it for spam and photos you do not want rather than as a way to tidy up.
You do not have to open a gallery to know whether photos are waiting.
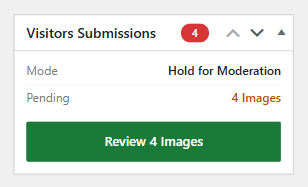
The Visitors Submissions box in the gallery sidebar shows the moderation mode, the number of pending photos, and a button that jumps straight to the review panel. The number in the box title is a quick badge you can read at a glance.
The galleries list gets a Submissions column too, so you can scan every gallery at once.

The column shows one of three things:
Every submission sends one email to your site’s admin address, the one under Settings > General in WordPress. The email names the gallery, says how many photos arrived, and links to the gallery editor so you can review them.
A visitor who uploads five photos at once triggers a single email, not five.
If the mail never arrives, the cause is almost always WordPress email delivery in general rather than this addon. An SMTP plugin such as WP Mail SMTP usually fixes it.
These limits apply to every submission form:
| Limit | Value |
|---|---|
| File types | JPG, PNG, GIF, and WEBP |
| Maximum file size | 10 MB, or your server’s upload limit if that is lower |
| Photos per submission | 10 |
| Submissions per hour | 10 files per hour from one IP address |
The form shows the real numbers for your server under the upload area, so a visitor sees the limit that actually applies. Files that are too large or the wrong type are rejected in the browser before anything is uploaded, and the visitor gets a message naming the file.
The form does not appear on my page. Check that Enable Submissions is checked on the gallery and that the gallery was saved afterwards. Then check that the shortcode or block points at that same gallery ID. If you are on a Basic or Plus license, the form does not render at all, and logged in administrators see a short note saying a Pro license is required.
Uploaded photos are not showing in the gallery. That is Hold for Review doing its job. Open the gallery, look at the User Submitted Photos panel on the Gallery tab, and approve the photos you want to keep. Switch Moderation to Auto-Approve if you would rather skip the review step in future.
A visitor sees “Too many submissions. Please try again later.” They have hit the rate limit of 10 files per hour from one IP address. It clears on its own after an hour. If your visitors legitimately upload more than that, raise it with the envira_submissions_rate_limit filter.
The Spam Protection checkbox in the gallery is greyed out. No usable method is set for the site yet. Go to Envira Gallery > Settings > Frontend Submissions and either pick CAPTCHA with a supported CAPTCHA plugin active, or pick ActiveLayer and enter your API key.
A visitor sees “File is too large” or “Invalid file type”. The file is over the limit shown under the upload area, or it is not a JPG, PNG, GIF, or WEBP. These checks happen in the browser, so the upload never starts. Ask for a smaller or converted copy.
Approved photos still are not visible on the page. Approving a photo clears that gallery’s cache automatically. If you also run a page caching plugin or a CDN, clear that cache too so the page itself is rebuilt.
Still stuck? Get in touch with our support team and we will take a look.

Envira Gallery: Create, Showcase, and Sell Your Work – Trusted by 150k+ Sites.
Enter the URL of your WordPress website to install

Unlock even more powerful features designed to make your galleries even more beaituful.
Video Galleries
eCommerce
Social media Sharing
Adobe Lightroom
And much more!

What are you waiting for?


Copyright © [#this year :%Y] Envira Gallery, LLC. Envira Gallery is a trademark of Envira Gallery, LLC.