Envira Gallery Blog
Digital Photography Tips, Tutorials and Resources
Digital Photography Tips, Tutorials and Resources
Last updated on May 28, 2024 by [email protected] Reader Disclosure
Creating double exposures in image editing software can give you some really dramatic effects, but which photo editing software gives you the best results and is easier to use? In this article, we’ll look at double exposures in Skylum Luminar versus Adobe Photoshop, and the strengths and weaknesses of both editing programs for this task.
We’re going to take an in-depth look at double exposures, so if you have ever wanted to make one, you’ll find out all you need to know here. Other things you’ll learn are:
In film cameras, double exposures happen when you take two photos without winding the film between them. This creates one negative that has two images, one on top of the other, and you can see both.
Double exposures were often the result of mistakes, but film photographers realized that the resulting images could be pretty cool. This led some of them to deliberately choose their subjects and double expose them.
Here’s an example of a double exposure:
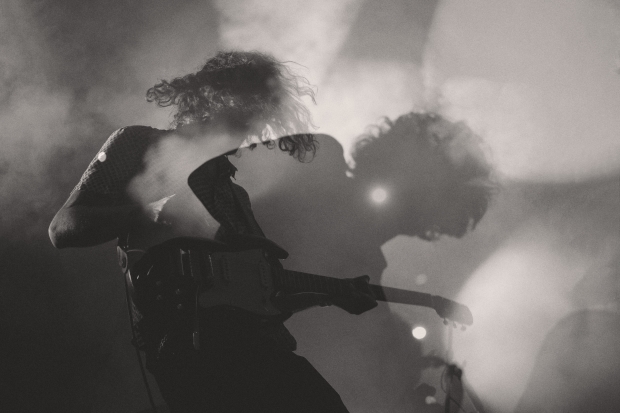
As you can see, the two photos of the guitarist are superimposed on one another, making for a really dramatic and creative effect.
You don’t need a film camera to make double exposures nowadays. All you need is photo editing software, two digital photos, and a little bit of know-how.
If the images you want to use for this are your own, you have two choices — use two you already have in your collection, or go out and and use your photography skills to capture some great images.
Otherwise, you can find some good free stock images to practice on from places like Unsplash and Pexels.
One of the best things about making double or multiple exposures is that you can express your creativity, or find a theme that you like.
There are several options for subject choices in double exposures.
If you want to tell more of a story about a person, then you can combine a portrait of them in your photo editor with one that lets the viewer discover a bit more about them.
For instance, when taking wedding portraits, you can combine the bride and groom with the place they got married, their floral arrangements, decorations, etc.
If you want to tell a story about where your subject comes from (or would love to visit), then combine an image of them with their town or country. You can also use textures in your photo editing to tell a story.
Landscapes offer endless possibilities for double or multiple exposures. You can combine a busy cityscape with a lonely forest, or combine dramatic skies with huge buildings.
Because black and white images are generally high-contrast, with easily defined shapes, they work excellently as subjects for double exposures.
Want to get super-creative? When you have mastered the ropes of double and multiple exposures, you can combine those skills with other editing techniques to make images of people or things levitating.
To create double exposures, you need photo-editing software that has layers and brushes. Both Luminar and Photoshop have these editing tools, so you can create your blended images in either editor without any problems.
The main difference is how you create your effects in each editor. With Luminar, the process is a little simpler and quicker, using layers and brushes. In Photoshop, you need to use Layer Clipping Masks and Blending Modes.
Double exposures in Skylum Luminar versus Adobe Photoshop comes down to your experience with photo editing.
It might take you a bit longer if you are unfamiliar with these tools. You do, however, have more control over fine-tuning the results.
If you’re a beginner, Luminar might be better to start with due to its user interface, which is quick to learn. Once you have the hang of creating double exposure photos, you can move on and use the editing tools that Photoshop has to offer.
The biggest advantage of using Luminar for editing double exposures is its very beginner-friendly interface. You can quickly create an image blend without having to learn how to use clipping masks or more advanced editing tools available in Photoshop.
Another advantage that Luminar has is that it can open and process raw files. If you want to open raw files in Photoshop, you first have to open them in Adobe Camera RAW editing software. Then you make your adjustments, and export as TIFF files to Photoshop.
With Luminar, you can edit from the raw file right through to the final JPEG without having to spend time in separate photo editing software.
We’re going to walk you through the steps you need to take to create a double exposure image in Luminar.
First, you need to choose two images that work well together. Many double exposures mix landscape with portraits, or two portraits together.
Landscape images work very well, so why not take your own? Check out these landscape photography tips if that’s something you’re interested in.
For this tutorial, we’ll combine two landscape and portrait images.
Choose which image you want to use as your base. I’ve chosen to work with this photo:

On the right-hand side of the screen, just below the histogram, you’ll find the Layers panel. Click on the ‘+’ symbol, and a drop-down menu will appear. Choose Add New Image Layer:

Add your second image. Your base image will disappear, but don’t panic. It’s there underneath your second image.
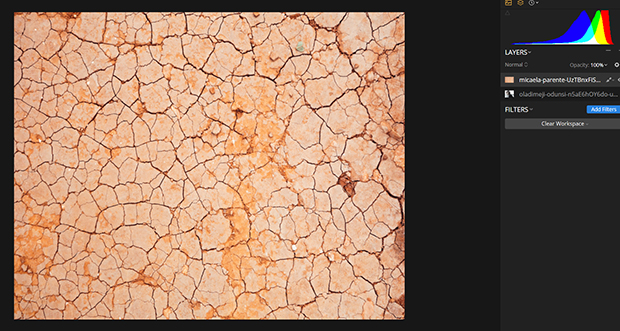
Next, drop the opacity of the top layer. You’ll find the Opacity slider in the Layers panel:
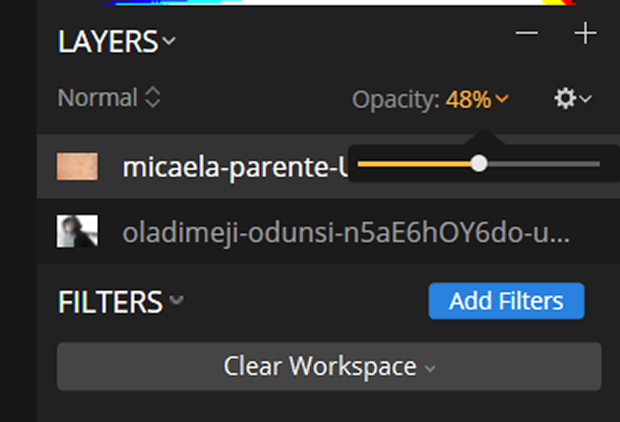
Take the slider down towards halfway, and you’ll see your base image starting to show through:
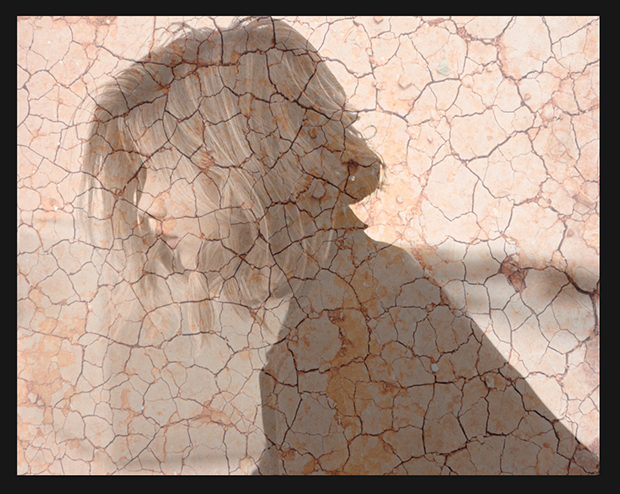
You can leave the whole image as it is, or use the Brush tool on the New Image Layer to paint in the places where you want the second layer to show through on top.
You’ll find the brush tool icon on the layer panel. Click on it, and it brings up a drop-down menu:
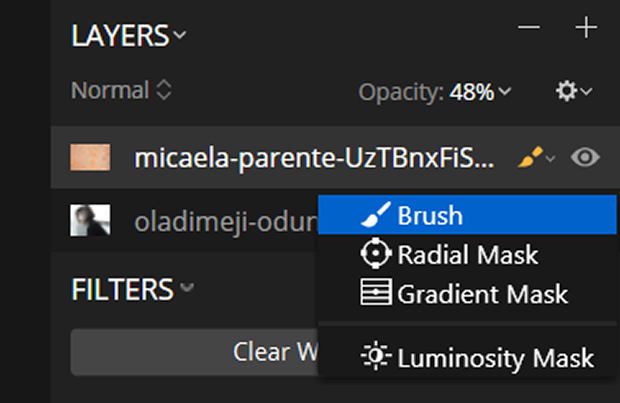
The brush control menu will appear along the top bar of the screen, and has controls for brush size, brush softness, opacity, and the eraser tool:

You can also go into the Mask options, where you will find Feather and Density, along with other masking choices:
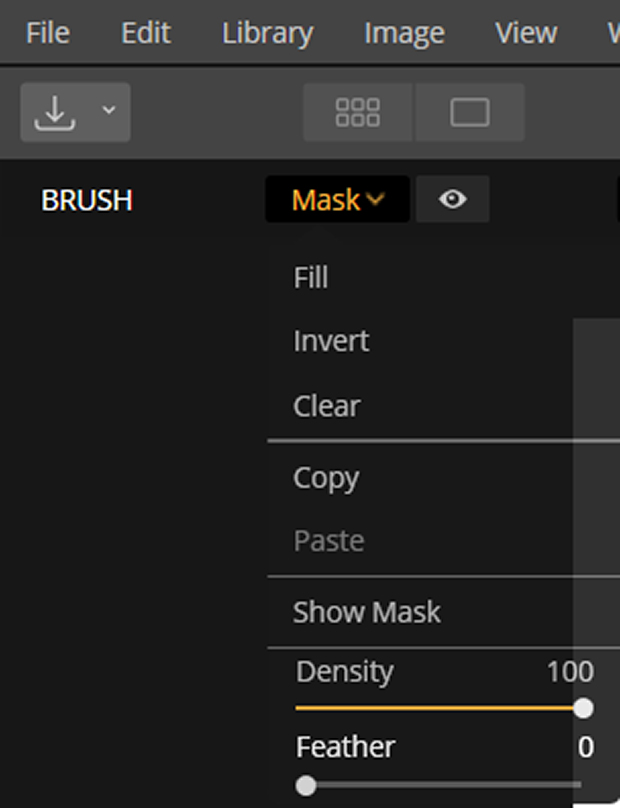
If you’re a beginner, you won’t need to mess around with the Mask editing tool, but it’s handy for those with a bit of experience in creating masks.
When you click on the Brush icon, your top image will disappear, and you’ll be left with the base image.
Use the Brush to carefully paint the top image back in where you want it to appear on the base image:
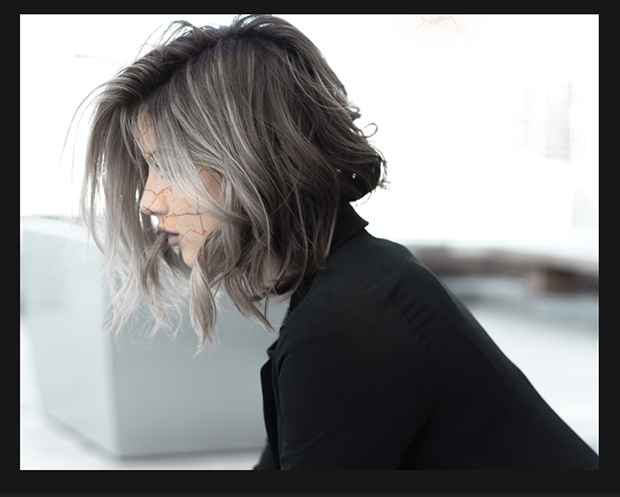
If you want to quickly make your brush larger or smaller, use the [ symbol on your keyboard to reduce the size, and the ] symbol to increase size.
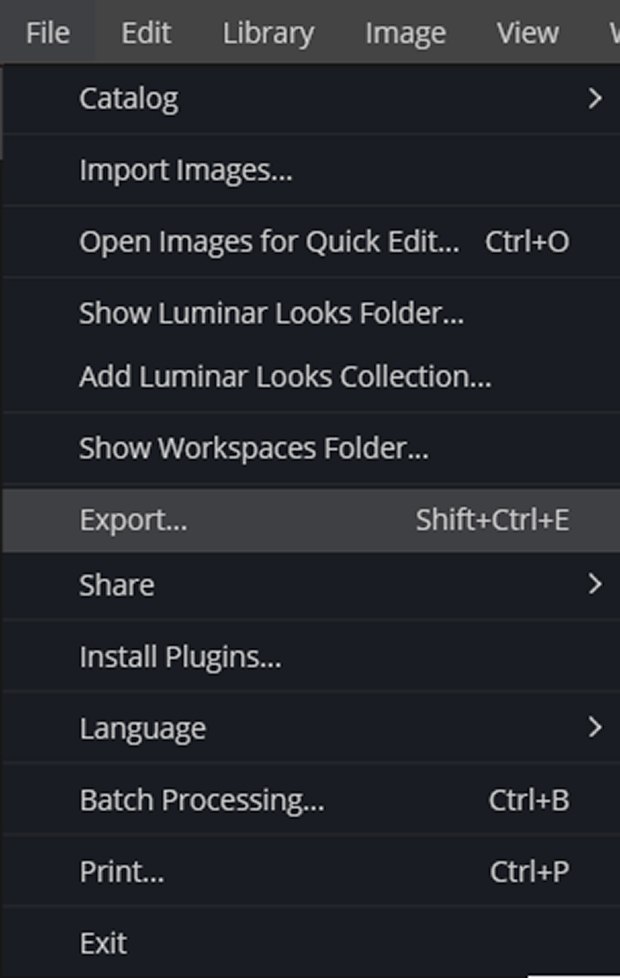
If you’re happy with what you’ve done, save your image by going to File, and choosing Export from the drop-down:
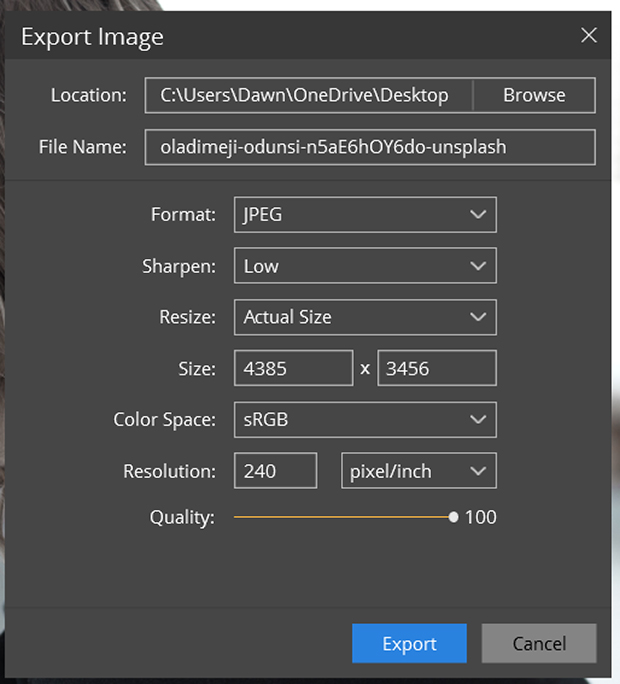
A new window will open with all the options to save your photo:
You can also add more images as Add New Image layers, and follow the same steps as above to create a multiple exposure image:
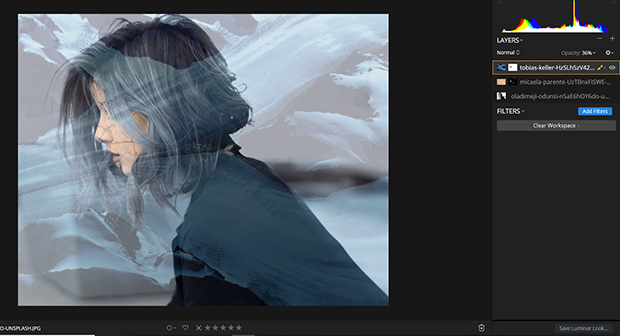
That’s it! Luminar has made it really simple and quick to create double exposures.
There are a few limitations to using Luminar for double exposures, and it’s mostly to do with the brush tools and layers.
When you click on the paintbrush icon, it always starts at 50% opacity and 100% softness. I find this annoying, because I hardly ever use the brush at those settings. I
f I forget and start painting, I have to switch to the eraser tool to remove what I’ve just done. The eraser tool is also set to 50% opacity. I don’t understand the point of that myself!
Luminar has only one brush tip option, unlike Photoshop, which has several. However, this makes it easier for beginners to learn the basics of the brush tool without being confused by a range of different options.
Although adding and removing layers in Luminar is easy (+ icon to add, – icon to remove), there doesn’t seem to be an option to flatten the layers yourself like there is in Photoshop.
Flattening the layers combines all your layers into one image, and makes sure your changes are retained. Luminar doesn’t offer this option and must flatten the layers itself when you export your image.
This isn’t a massive drawback, but it would be nice if they added an option to flatten layers manually.
If you want to delve deeper into making double exposures in Luminar, your options are limited. There are no advanced editing tools like clipping masks or quick selection options, for instance. You can only get so far with just layers and blending modes.
The big advantage of using an image editor like Photoshop to create double exposures is that you cannot beat its powerful editing tools and reliability.
If you have intermediate or advanced skills at photo editing, you will already be familiar with layer masks and brushes. Therefore, you probably won’t find too much to trouble you here.
You can find plenty of Photoshop Actions to download for creating double exposures. These make the job quick and easy, but it is fairly simple to learn the steps to do it yourself.
There are a couple of ways to make double exposures in Photoshop. One of them is time-consuming and involves layer clipping masks and blending modes. We’ll look at both ways of blending images, although there are several different ways to do it. This is especially true in Photoshop!
As a side note, if you only have Photoshop Elements, you can still create double exposures with it. Photoshop Elements is a stripped-down, bare essentials version of Photoshop.
But, that does make it good to learn on before moving to the full version. It’s also cheaper, though you can purchase Photoshop through Adobe’s Creative Cloud Plan for only $9.99/month.
As with making a double exposure with Luminar, you’ll need two images – a base and a top layer. We’ll try two landscapes for this one – a rural landscape and a cityscape.
If you’re taking the images yourself, choose your base and top subjects carefully. Make sure you’ve got the right camera settings to get the shot you want. Check your shutter speed, ISO, f/number, and focal length.
Open both photos in Photoshop, and go to Window – Arrange -2 up (vertical or horizontal, it doesn’t matter).
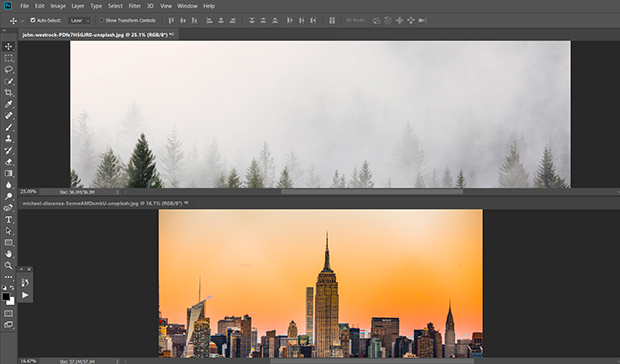
Once they are both open, drag the image you want to be the top layer onto the bottom one. Go to Window >> Arrange >> Consolidate All to Tabs. You’ll be left with one image:
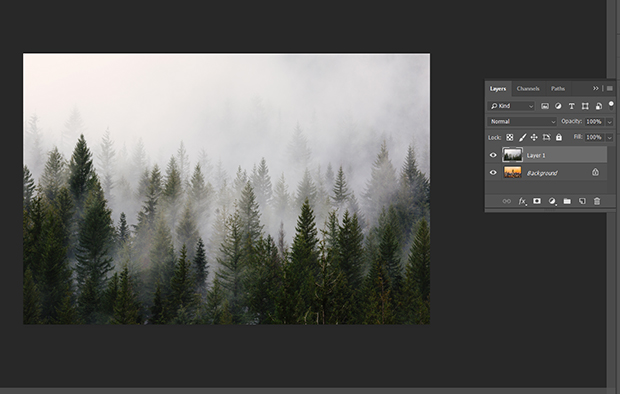
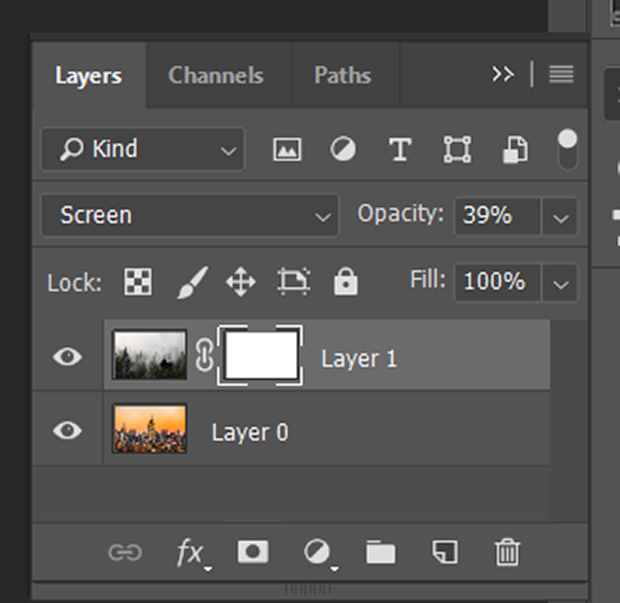
As you can see in the screenshot above, there are two layers in the Layers panel.
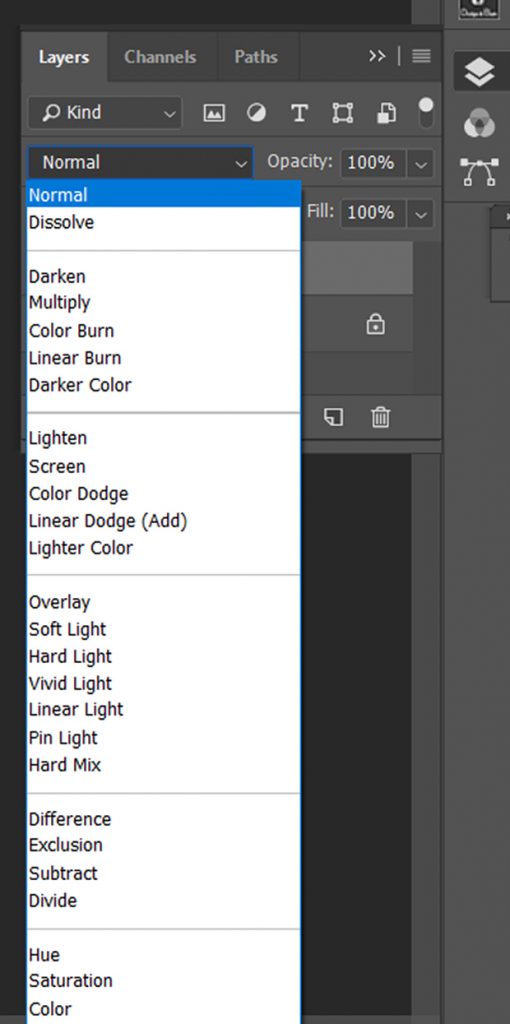
Next, go to Layers and find the Blend Mode drop-down menu. This is located next to Opacity on the Layers Panel, and it will say Normal. Click the drop-down, and a list of options will appear:
Change the Blend Mode to Screen:
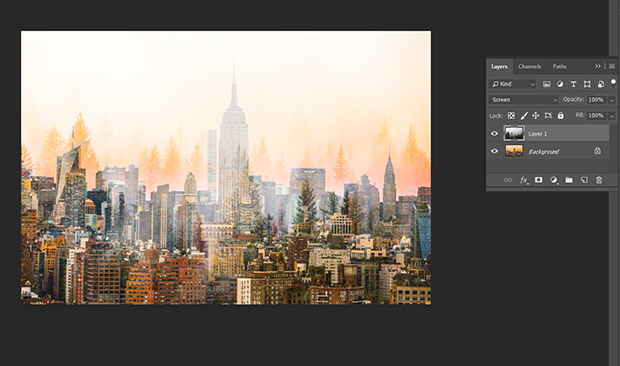
Both images have blended into one another, now it’s time to drop the Opacity slider until you begin to get the double exposure image that you want:
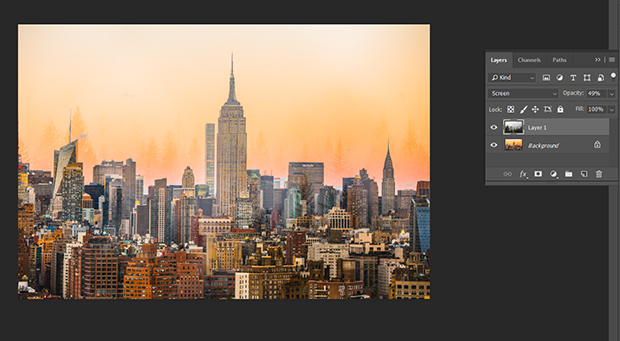
If you want to brush out parts of the top layer, add a Layer Mask. You can do this by clicking on the rectangular box with a circle in the middle at the bottom of the Layers panel:
Make sure your brush settings are how you want them. You’ll find them along the top menu bar of the screen. Set your brush color to black. Then paint out the parts of the top layer that you don’t want to see in the finished image.
If you’re happy with your image, you’ll need to flatten it before exporting. Go to the Layers panel again, and in the top-right hand corner, you’ll see a menu button. Click on it, and you will get a drop-down menu of options. Choose Flatten to merge your layers into one image.
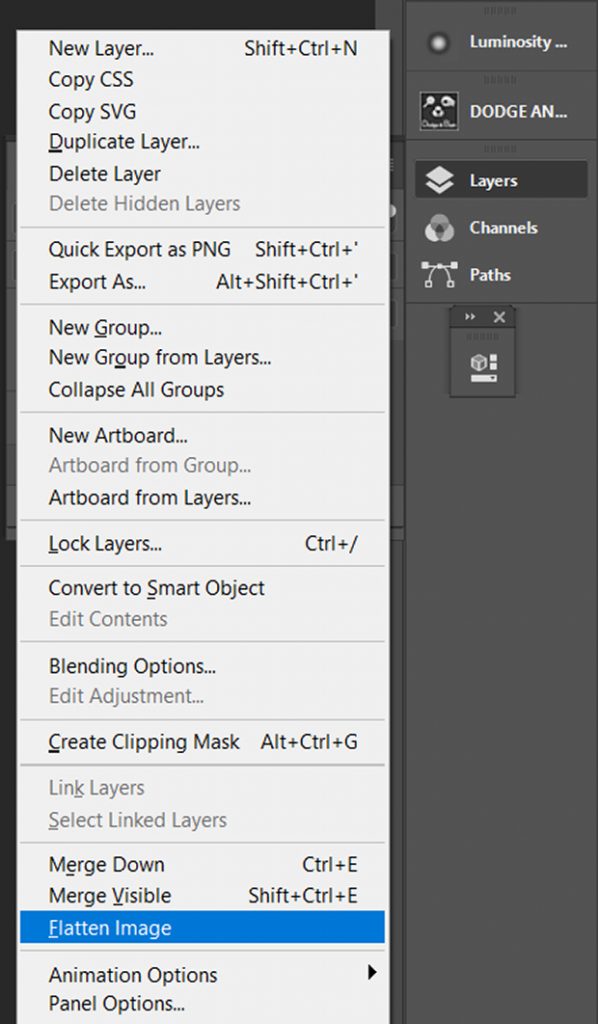
If you want to do more work on your image, don’t flatten it yet. Do that as your last task.
That’s it, done!
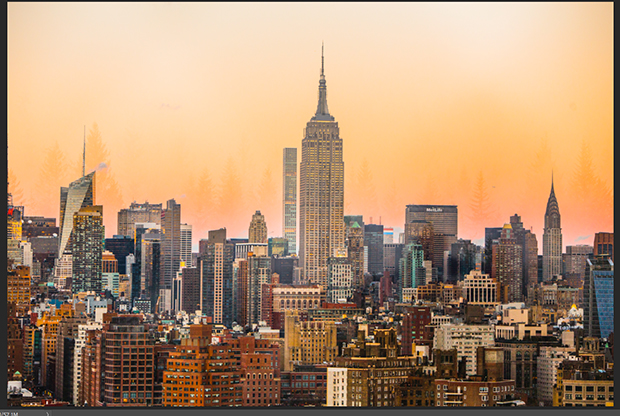
That is the quick and simple way to create double exposures in Photoshop, but what about more advanced edits?
The good news is that you can create just about anything with Photoshop as an photo editor – you just need to know how.
We’re going to go through a step-by-step tutorial on how to create a double exposure using Photoshop’s Quick Selection Tool, Paint Bucket Tool, and Layer Clipping Masks.
The base photo can be anything you like, but it needs to have a main subject and be well-exposed. It makes it far easier if you pick one with a neutral background, such as a portrait shot on a monocolored background. This means you will have to do less editing work later.
The layer photo can feature any subject, but a detailed and intricate photo is best.
I’m going to try to give the lady in the portrait below some flowery hair using this method:
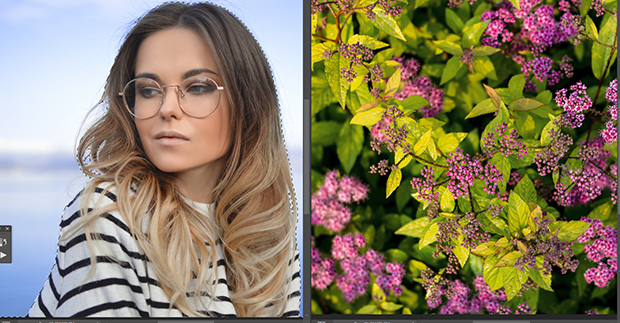
Open both your images in Photoshop. Change anything you need to, such as giving the images a bit of extra color and contrast. This will help optimize the images and make them easier to blend.
I added a little contrast and brightness to the portrait here, using the Brightness/Contrast Adjustment Layer. You can use Curves or Levels too.
On your base image, use the Magic Wand or Quick Selection Tool to select the whole background area:
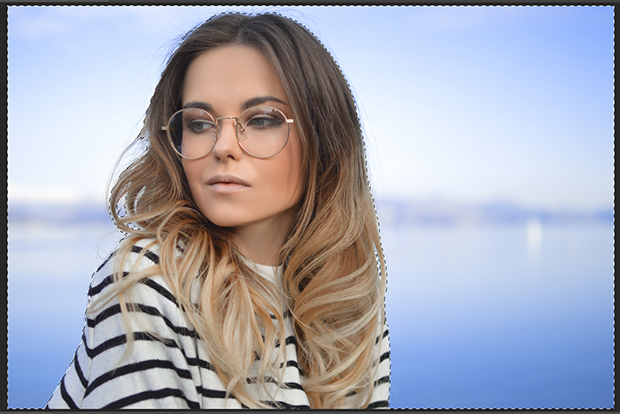
Once that’s done, go to Select >> Inverse. That will invert your selection so that your main subject is selected instead of the background.
Go back to the Select menu, and choose Select and Mask from the drop-down. This will open a new window where you can fine-tune your selection.
Tick the Smart Radius box and increase the Radius in the Edge Detection to over 1.5 px. If your subject’s hair is frizzy, then you’ll need to take the radius even higher in order to capture the minor hair strand details.
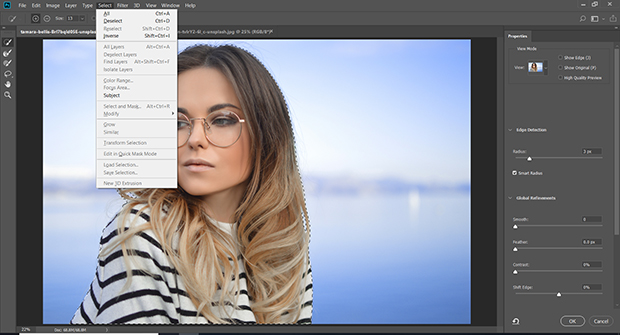
Still in the Select and Mask window, go to the Output section. Select the New Layer with Layer Mask in the Output To options:
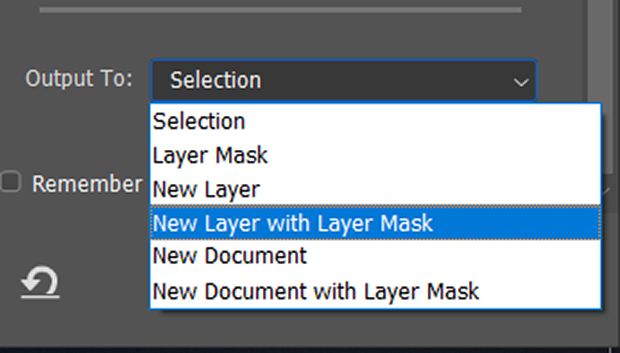
Click OK, and your image will be copied with the background hidden. This option doesn’t make permanent changes to your image file.
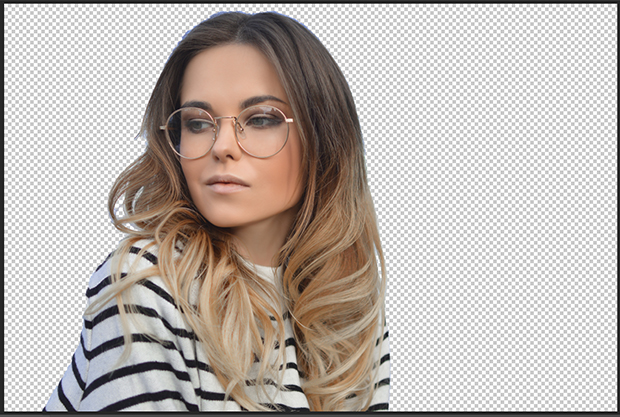
Go to the top of the Layers Panel, and click on the menu button on the right-hand side. Choose Add New Layer from the drop-down:
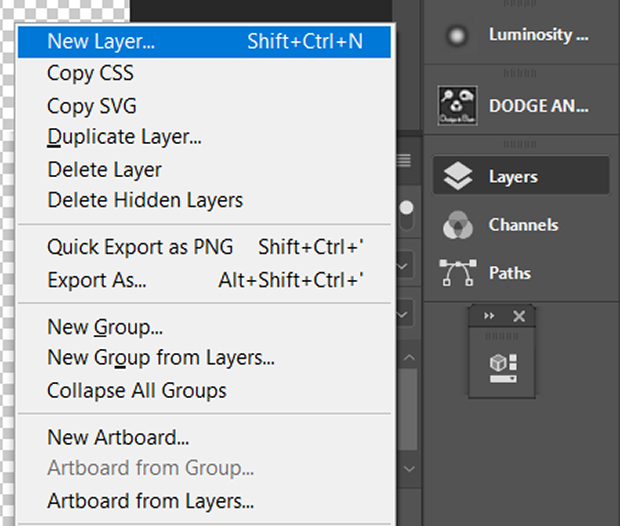
Click and drag the Background Copy layer above this new layer.
Choose the Paint Bucket Tool from the menu on the left-hand side of the screen. It may be hard to find if the Gradient Tool icon is the one on top. Right-click on it and you’ll see additional options to choose from:
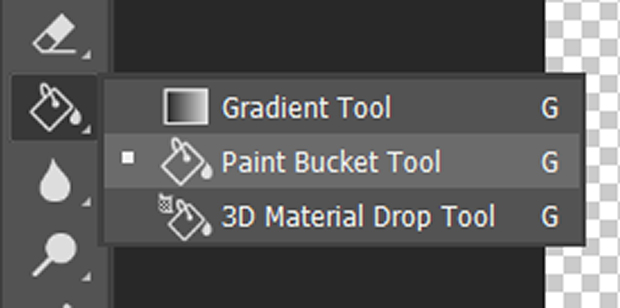
Choose a neutral color like grey or white, and use the Paint Bucket tool to fill the background with this new color. Make sure you that you have clicked on the new layer in the layers panel before you fill with paint.
Use the Color Picker tool to find a good background color.
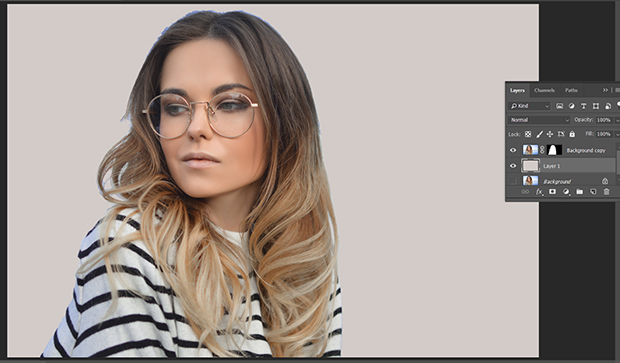
As you can see, my hair masking wasn’t quite accurate enough! Of course, you can use the Eraser tool to remove the unwanted areas, but it can be difficult to make the photo look natural when you do this.
With both windows open (2-up in the Window >> Arrange menu), use the Move tool to drag and drop your layer image on top of the base image. You’ll find the Move tool here:
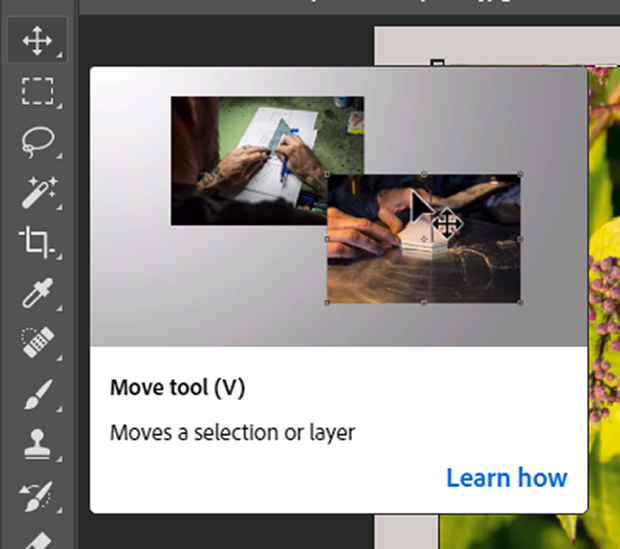
You’ll have one window with the base and top images on. Make sure before you use the Move tool that you have clicked onto the Background Copy photo layer in the Layers Panel, or your layer image won’t appear on top.
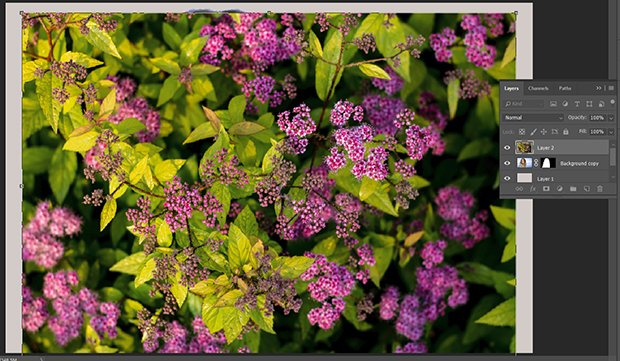
Select the second image by going to Select >> All. With it still selected, hold down the Ctrl key, and click the Layer Clipping Mask button of the background layer. The clipping mask is the black and white silhouette next to the original photo:

You will then see a selection outline of your base subject on the new layer:
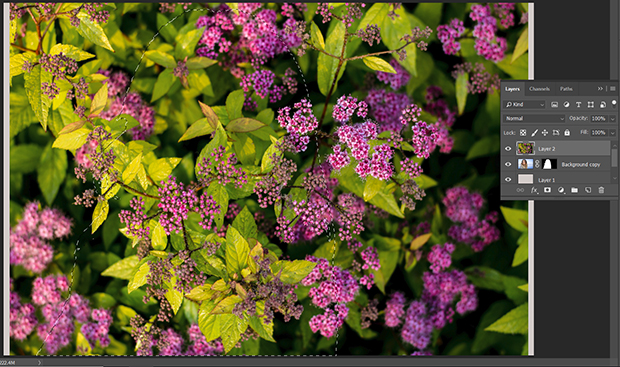
Unlink the mask and move or rotate your top photo around until the bit that you want is within the selection silhouette.
Make a copy of the portrait or original subject layer by clicking Ctrl + J. Drag it on top of the second layer, and change the layer blending mode to Lighten:
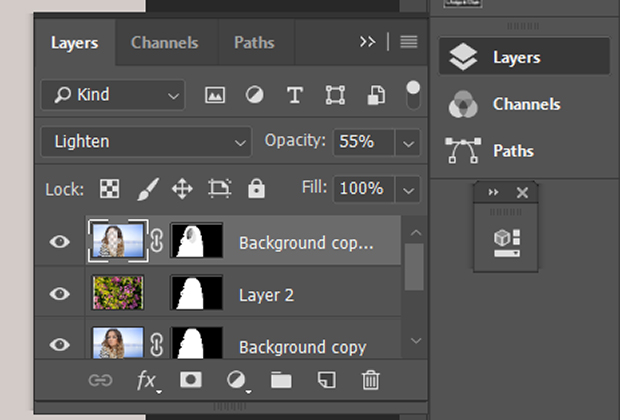
Why not experiment with different blending modes and opacity levels until you get the desired effect?
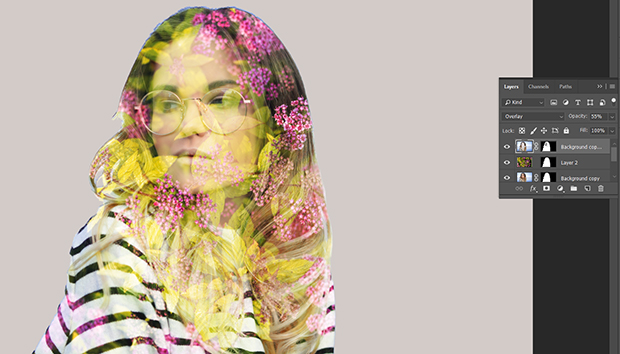
Use the Eraser tool to softly remove the subject layer on the bits of your image that you don’t want it to show on.
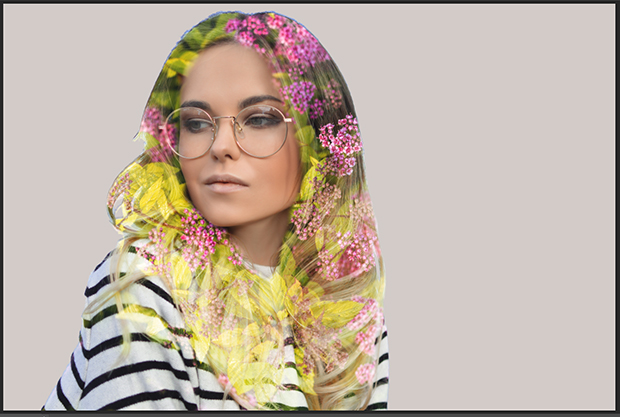
That’s it, you’re done!
There are a few limitations when using Photoshop to make double exposures, but it’s mostly down to ease of use.
With Luminar, loading your second image is as easy as adding a new image layer, but with Photoshop it’s a little different. You have to open both images and use the Move tool to drag one image on top of the other.
That’s fine if you know your way around Photoshop, but it’s more of a hassle than adding a new image layer in Luminar.
The usual niggle about Photoshop is that a beginner would probably find it hard to create a double exposure. Without constantly referring to a tutorial, knowing where the Move tool and Layers panel are may be difficult.
Again, although I like being able to flatten my layers manually, a beginner may not realize that they need to flatten before saving their image as a JPEG.
So, how do you choose which is the best image editing software for creating double exposures?
Luminar and Photoshop each have their own strengths and weaknesses when it comes to making double or multiple exposure images.
Photoshop is great for handling more complex double exposure projects. Although, as the first step-by-step shows, it can be used to create very simple ones too.
The tutorials in this article are really just a tiny part of what Photoshop can do with double or multiple exposures. Once you master these techniques, you can create whatever looks you wish. Photoshop allows you to create something really unique.
Photoshop also allows you to create a tool to automate double exposures by using Photoshop Actions. Even video double exposures can be created by using the Photoshop video timeline for making animations as well as cinemagraphs.
Luminar just can’t beat Photoshop for creating complex masks and selections (not yet, anyway). If you want to create flawless, professional-quality image blending photos then you should use Photoshop.
Luminar is best for those learning to do double or multiple exposures. It offers a very simple way of doing so and is ideal for someone who wants to improve their image blending skills before moving on to tackle more complex projects in Photoshop.
One of the advantages Luminar editing software is that it can process your raw files. To use Photoshop, your must open your raw files in Adobe Camera Raw first.
Luminar offers a quick and easy way to stack and create multiple exposures without needing to create complicated selections and masks, and the Blending Mode and Layer setup are pretty similar to Photoshop, except that it doesn’t give you the option of creating masks.
That all depends on exactly what you are looking to achieve!
For a novice photo editor, a simple and clear user interface is going to be important, as is easy-to-find (and use!) editing tools.
Your photo-editing software needs to have layer capability. It should also have Blending Modes in order to create quality double or multiple exposures.
Those are the most basic requirements for blending images, and Luminar and Photoshop both have them.
To create neater, more advanced double exposures, you also need good selection, masking, and edge-refining tools. This is especially true if you are masking hair or other complicated edges.
Photoshop has all of these image editing tools. And, it also offers plugin purchasing options that offer extra select and mask capabilities, like the AKVIS SmartMask or Topaz Labs ReMask.
Luminar is available for a one-time fee of around $70, but you can often get discounts on it. You can also try a fully-functioning free trial version, so you can decide if you like it before you buy it.
You get free software updates included in the one-off price, too.
Photoshop is now only available with a monthly subscription from Adobe. Prices for this subscription range widely, and sometimes it’s cheaper to buy Photoshop as part of a package that includes other photo-editing software.
The Adobe Photography Plan, that enables you to have Photoshop, Lightroom CC, Lightroom Classic, Adobe Spark, and Adobe Portfolio only costs $9.99 per month.
That’s not too bad for a bundle containing some of the best photo editing software!
You also get free 20GB of storage with that plan. But, 20GB goes nowhere when you’re working with RAW and TIFF files! With that in mind, Adobe offers an upgrade on the storage to 1TB for $19.99 per month.
For those who don’t want to pay monthly, you can buy Photoshop Elements for a one-off price of $60.
Adobe also offers free trials of all its Creative Cloud plans.
When you are considering which image editing software to buy, you need to ask yourself which you would be more comfortable using.
A complete beginner to double exposures would perhaps be better served by Luminar before moving on to Photoshop.
For those who want to craft more complex and professional-looking double exposures, Photoshop is the best choice. This is simply because of the extra options you have with selecting, masking, and refining your edges, as well as the ability to create Actions for making future image blends.
If up-front cost is a factor, Photoshop’s $9.99 a month is probably easier to find in your budget than Luminar’s $60-70. But, when you add up the monthly cost over a year, Adobe costs nearly $120.
However, for that price, you also get two versions of Lightroom, Spark, and Portfolio builder. With Luminar, you only get one program for your $60-70.
As both brands offer a free trial on their editing software, it could be worth it to download both image editors. Then, you could play around with them each to see which suits you best.
We hope this article has helped decide double exposures in Skylum Luminar versus Adobe Photoshop.
If you would like to discover more photography and photo editing tips and tutorials, follow us on our Facebook and Twitter, and sign up for our emails.
Envira Gallery helps photographers create beautiful photo and video galleries in just a few clicks so that they can showcase and sell their work.
