As a photographer, even when you’re lucky enough to get an incredible shot, there’s always the chance that you could make your image just a little better with the right effect.
In Lightroom, there are presets, in Photoshop, you can browse through filters. With On1 Photo RAW, effects are designed by combining multiple different layers and filters together to create a new style of image. You can build your own effects or take advantage of the pre-set options like Vintage or HDR.
So, how do you use the Effects in ON1 Photo RAW?
Here, we’re going to talk you through:
- Accessing the Effects Module
- Creating preset Effects
- Implementing Effects
- Changing the Details
Opening the ON1 Effects Module
The Effects Module for ON1 Photo Raw is a recently-added feature of the impressive photo editing tool. The app is available either independently or as a plugin for your Lightroom or Photoshop programs. To use effects in ON1 Photo RAW, you’ll need to decide how you prefer to access the system. Usually, the individual app is the easiest option.
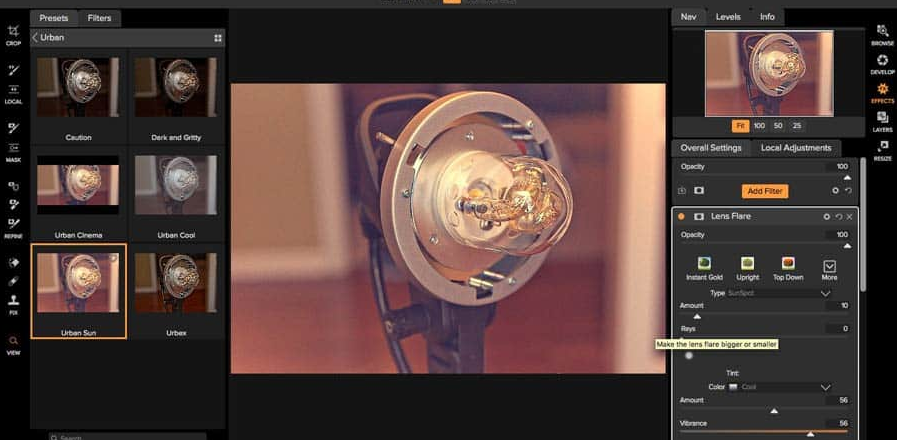
To open the Effects Module go into the settings tab and click on the Effects option. Here you can look through your available Presets and filters, or create your own stackable design. Thanks to the non-destructive workflow offered by RAW, you can get experimental with your images, and change as many sliders as you like to seek out the best look.
If you choose a pre-made filter, you’ll find them conveniently organized into themes like “HDR,” “Landscapes,” “Sports” and even “Weddings.”
Creating Your Own Preset Effects
If you’re not fully happy with the selection of presets and filters that you get as standard with Photo RAW, then you might prefer to make your own instead. All you need to do is open your picture and use the custom sliders on the right-hand side of the program to apply tonal filters like contrasts, curves, and more. You can tweak the settings as much as you like until you find a design that appeals to you. Once you’ve finished creating your own Effects in ON1 Photo RAW, you’ll be able to save them so that they appear whenever you open your “Effects” module and go into the Presets tab.
Ultimately, what you’re really getting is a selection of filters that have been stacked together to create a certain look – but it’s a very effective way to transform your images fast. Remember, when applying your presets to future images you can also check the thumbnails available to see what your pictures will look like when you add the effect.
Implementing Effects and Filters
ON1 Photo Raw is a popular editing tool for a number of reasons. Not only is it excellent at keeping your images organized, but it’s also very good at providing high-vibrancy, dynamic and colorful photos. Implementing an effect into your image is as simple as clicking on your desired preset or filter. When you do, you’ll still have access to all your sliders and the “Develop” module on the right-hand side where you can add or remove parts of your image.
For instance, you might decide that you want to flatten the image by reducing the whites and increasing the blacks in your photos. Alternatively, if you’re going to boost the color tone in your shot, you might apply the vintage filter and desaturate the image slightly.
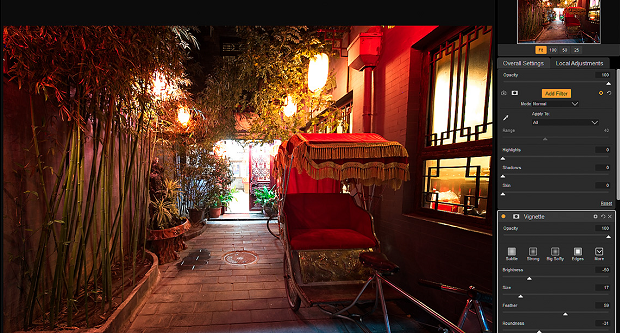
Whether you’re working with Develop or Effects filters, it helps to use masking to your advantage. Using local adjustments, you’ll be able to mask out the person and the ground, while adjusting other elements of your image. This is a great way to give more depth to your photos.
Changing the Details
A great thing about the Effects in ON1 Photo Raw is that they’re flexible enough to suit any style. You can adapt and transform your art to suit the needs of your client or change your portfolio. Like Lightroom and Photoshop, the numerous sliders available alongside each effect ensures that you can make each image your own, regardless of whether you use the same filter for every session or not.
With ON1 Photo Raw, you can also get down into the most minute details of each picture, keeping the skin tones of your subjects smooth while adding grittiness to the surrounding environment or re-touching the color. However, it helps to learn a little more about masking so you can make the most of the feature.
How do you feel about the Effects module in ON1 Photo RAW? Let us know in the comments below, and remember to follow us on Facebook and Twitter for more tips!


