Would you like to add some texture and depth to your images? This article will tell you everything you need to know about layers and textures in Skylum Luminar versus Adobe Photoshop. It will also give in-depth tutorials on how to use these programs to create stunning image effects.
Layers and textures can help you put the finishing touches on your photos, and can be a valuable part of your photo editing workflow. You’ll discover how to use photo editing software to create these effects, as well as:
- What layers and textures are
- The main differences between using layers and textures in Skylum Luminar versus Adobe Photoshop
- How to decide which image editing software is right for your project
- Pros and cons of layers and textures in Luminar
- Pros and cons of layers and textures in Photoshop
- How to add layers and textures in both Luminar and Photoshop
- How to choose between Luminar and Photoshop for creating layers and textures
What Are Layers and Textures?
Layers
If you are a novice photo editor, using layers in your editing software may seem quite daunting. You may even wonder why you need to use them, anyway!
Layers are one of the most essential editing tools you can use. They offer a way to make changes to your image without destroying the original image.
If you make editing changes to your original image, you can’t always undo them if you make a mistake. With layers, you can discard the layer you’re working on if you don’t like the look of it, and there’s no harm done.
There are different types of layers, such as text layers and new layers. But for the majority of photo editing, you’ll mostly be using Adjustment Layers.
It can help to think of Adjustment Layers as layers that sit on top of your original photo and allow you to tweak it to your satisfaction.
Think of a sandwich: Your original image is the slice of bread on the bottom. Nice, but it needs a lot more to make it a tasty sandwich. A layer of lettuce, perhaps another one of chicken and a final one of mayo? Now you have a delicious meal.
Adjustment layers allow you to add and change image ingredients as you like. Want to add a preset, change saturation/exposure/contrast, etc.? Do it on a layer.
Textures
Textures are layers created from an image of a textural subject. Think of rough plaster, rocks, walls, and weathered wood. The screenshot below is an example of a texture:
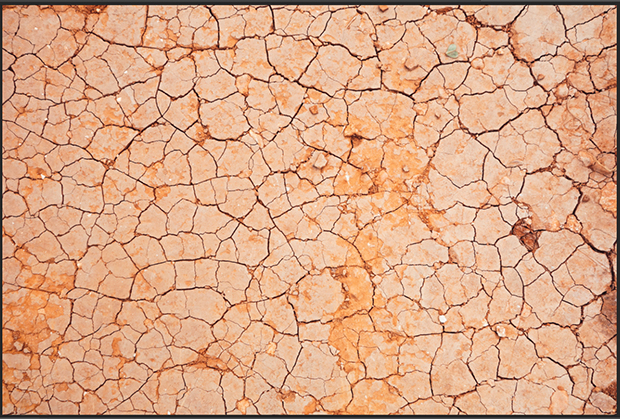
Texture overlay layers allow you to add textures to all or part of your image. Try adding a texture to your image if your editing isn’t otherwise working out. Sometimes, a texture can save it and turn it into something else altogether.
You can download lots of free textures from the Internet, or go out and photograph your own. If you choose to shoot your own, make sure to shoot RAW files instead of jpegs, as the image resolution will be much higher for photo editing later.
If you are downloading textures, try to find some of high resolution to work with. 300dpi images work much better than 72dpi images.
Also check the copyright of the images you download. Make sure you have permission to use them in your photos before you add them to your images.
Main Differences Between Layers and Textures in Skylum Luminar Versus Adobe Photoshop
Both Luminar and Photoshop editing software allow you to use layers, but each editor treats them differently in some ways.
Photoshop layers can be Adjustment Layers, Text Layers, New Layers, Duplicate Layers, Group Layers . This editing software has a huge amount of Layer options, as you can see below:
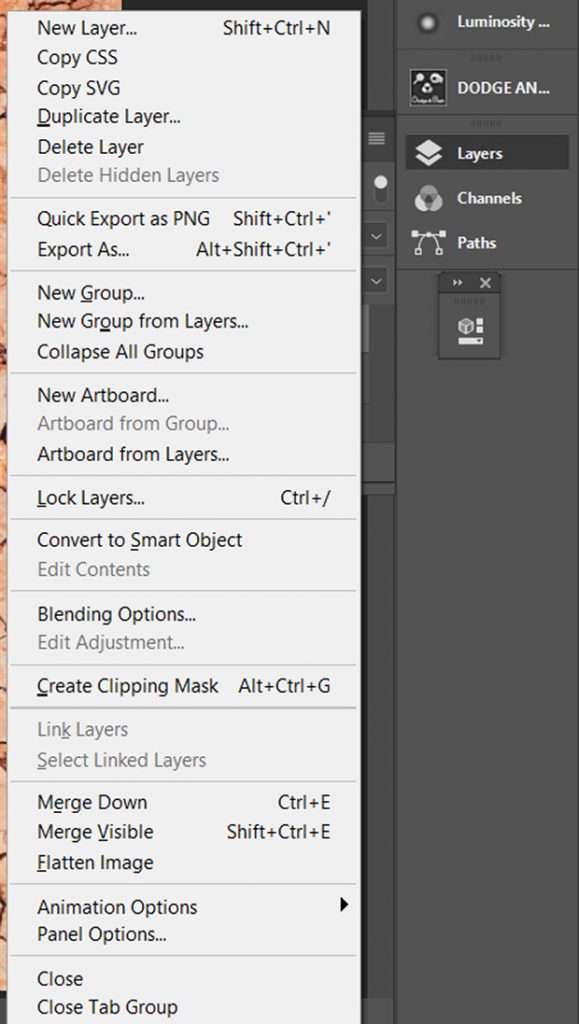
On the other hand, the Luminar Layers Panel offers fewer options and is a stripped-down, far simpler version of Photoshop’s Layers.
You only have three layer choices in Luminar: Add New Adjustment Layer, Add New Image Layer, or Create Stamped Layer.

Blending Modes work exactly the same in Photoshop and Luminar. But, in Photoshop, you can select an Adjustment Layer that allows you to change Curves, Exposure, Gradient, Contrast/Brightness, etc:
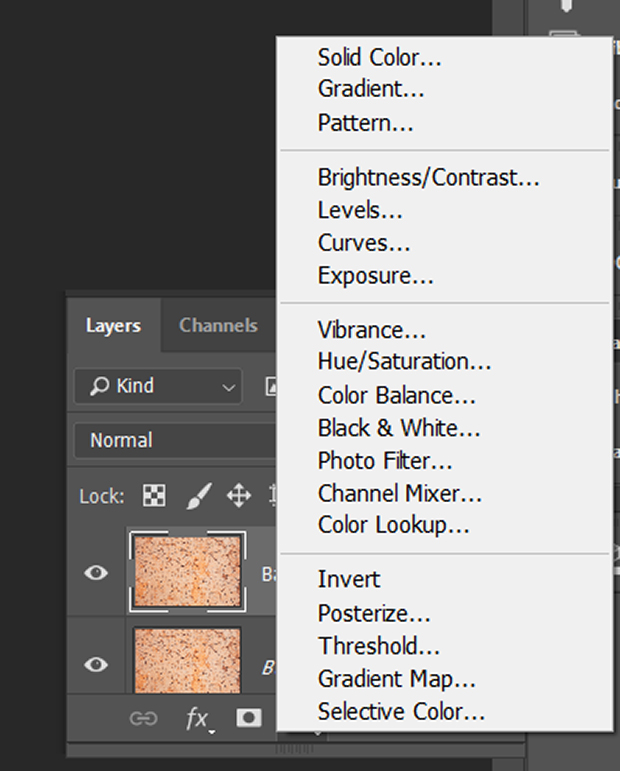
Luminar treats those editing tools as Filters, not separate Adjustment Layers. In both editing programs, you can add as many Filters/Adjustments as you like.
Based on those differences, you can decide whether Luminar or Photoshop is right for your particular project.
If you need to do a lot of complicated layer work, Photoshop will fit your needs better. In it, you can create clipping masks as well as add textures and make adjustment layers.
If you are just starting out with photo editing, Luminar might be a good place to being. Luminar will allow you o add texture without the confusion of extra layers and options like Photoshop.
Pros and Cons of Layers and Textures in Skylum Luminar
We’ll now look at the good and bad aspects of using Luminar editing software for layers and textures.
Pros
1. RAW file editing
Luminar has the edge on Photoshop with its RAW image editing abilities. Luminar lets you upload and edit your RAW files from start to finish.
Unlike Luminar, Photoshop does not open RAW files itself. Instead, you have to open them in the Adobe Camera RAW image editor first, adjust them, then download them into Photoshop as TIFF files to work on.
Most professional photographers shoot RAW files because it captures the most image data. RAW files also give the best resolution when edited, and they let you adjust the highlights, shadows, and more.
A JPEG image format simply isn’t capable of allowing you this much control.
If you shoot your own textures in RAW, then you can edit them directly in Luminar before adding them to your other images.
2. Easy to Use
Skylum prides itself on Luminar’s user-friendly interface. A complete beginner to photo editing will have no problem uploading images, then editing and exporting them. With Skylum Luminar, you won’t have to spend ages searching for tutorials on image editing.
3. Has a Specific Texture Overlay Filter
Luminar makes it very easy to add texture to your image and blend them together, simply by using the Texture Overlay Filter and Blending Modes.
4. Easy to Add Textures
Using the Texture Overlay Filter makes it very easy to upload a texture image from your computer to Luminar in just a couple of clicks.
Cons
1. Can be too Simplistic
The Texture Overlay Filter is great, but it doesn’t give you the fine control over the texture the way that Photoshop does. Luminar also has far fewer layer editing tools than Photoshop. For more control over you edits, Photoshop is the better tool.
How to Add and Edit Layers and Textures in Luminar
Adding Layers
Adding layers to Luminar is pretty simple. Go to the Layers Panel, click the + icon, and choose the type of layer you want to add. For most editing purposes, you will want to select the Add New Adjustment Layer option.
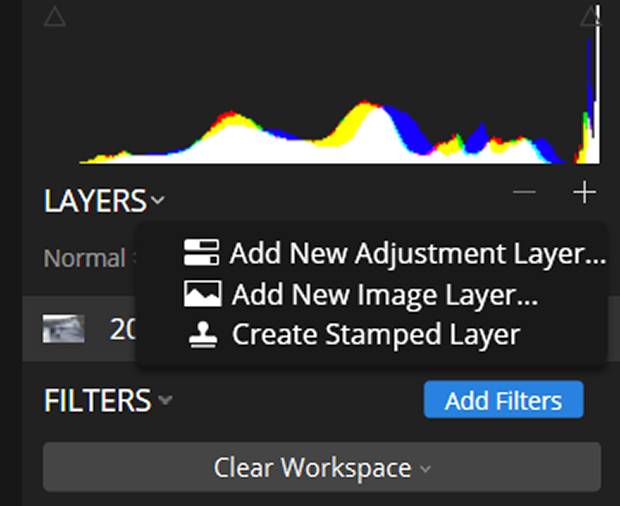
Once you’ve done that, you can add whatever edits you’d like.
Adding Textures
Step 1: Go to Add Filters on the right-hand side of the screen, and click.
Step 2: The Filters Catalog will appear. The Texture Overlay Filter is in the Creative Filters category:
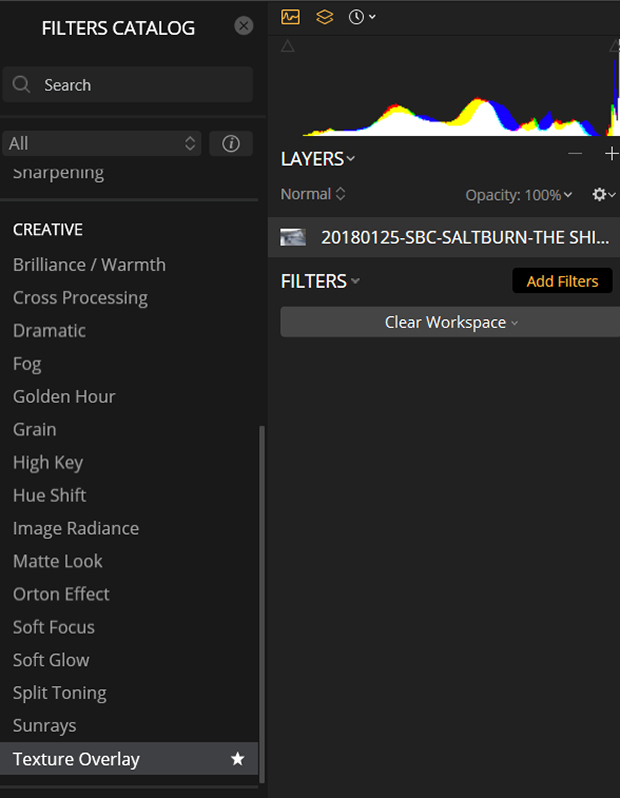
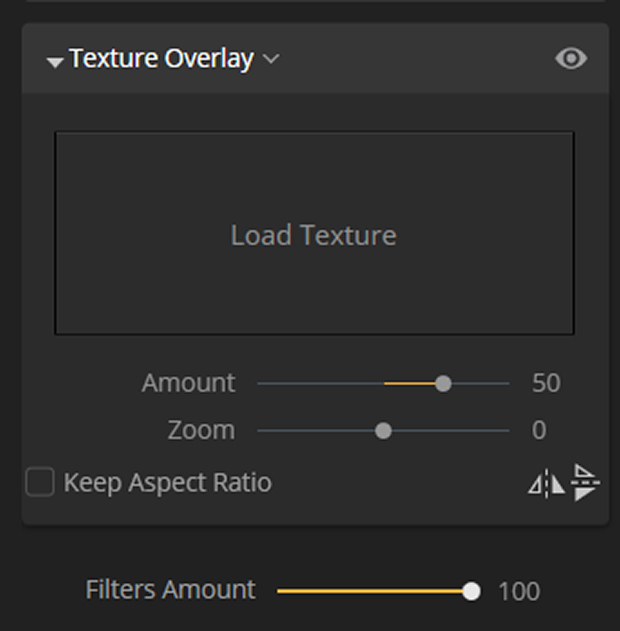
Step 3: Click on it, and it will open up in the Workspace:
This is the image I’m going to add texture to:
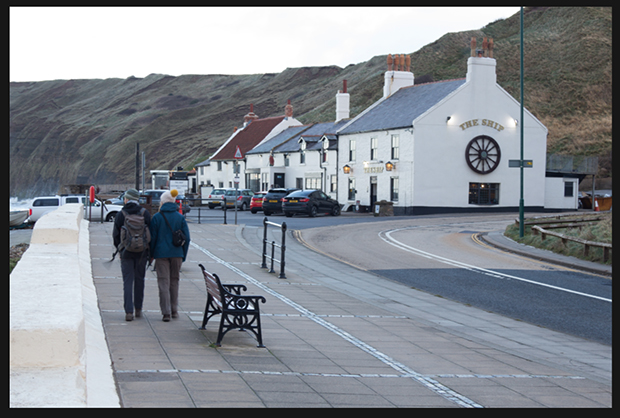
As it’s a shot of a seaside pub, I’m going to add an ocean texture to the image.
Step 4: Pick your texture by clicking on the Load Texture box:
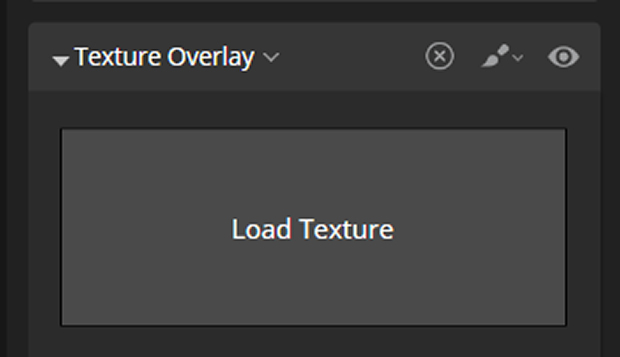
Step 5: Choose a texture from your hard drive and it will load up over your base image:
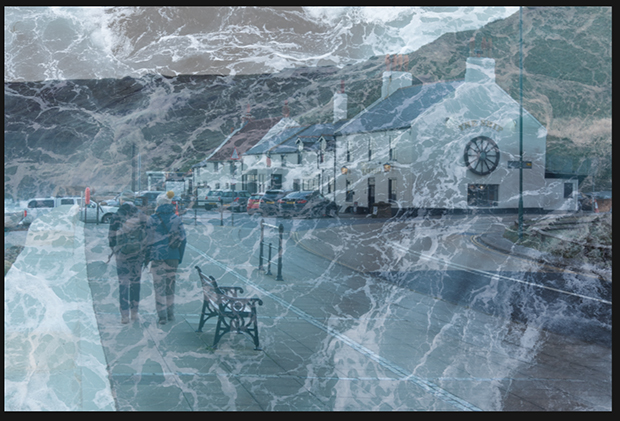
Notice that the ocean image is above the seaside pub image.
Step 6: Adjust the Amount and Zoom sliders to how you want them if needed.
Step 7: Go to Texture Overlay and click the drop-down arrow. Choose Blend from the menu, and all the Blending Modes will open up:
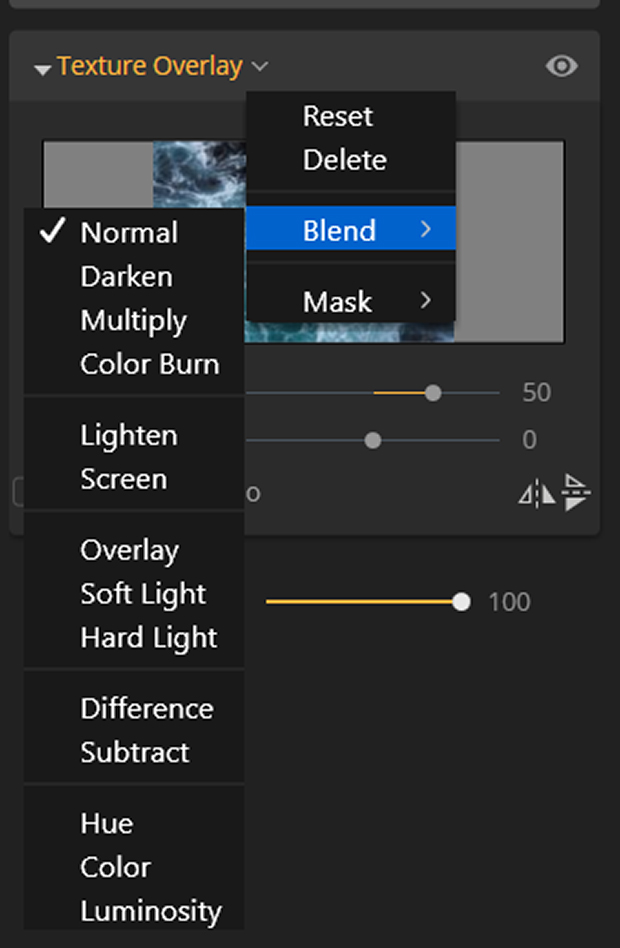
Step 8: Pick your blending mode. This is the fun part! As you mouse over each Blending Mode, your image will change dynamically to show you what it will look like when it’s applied:
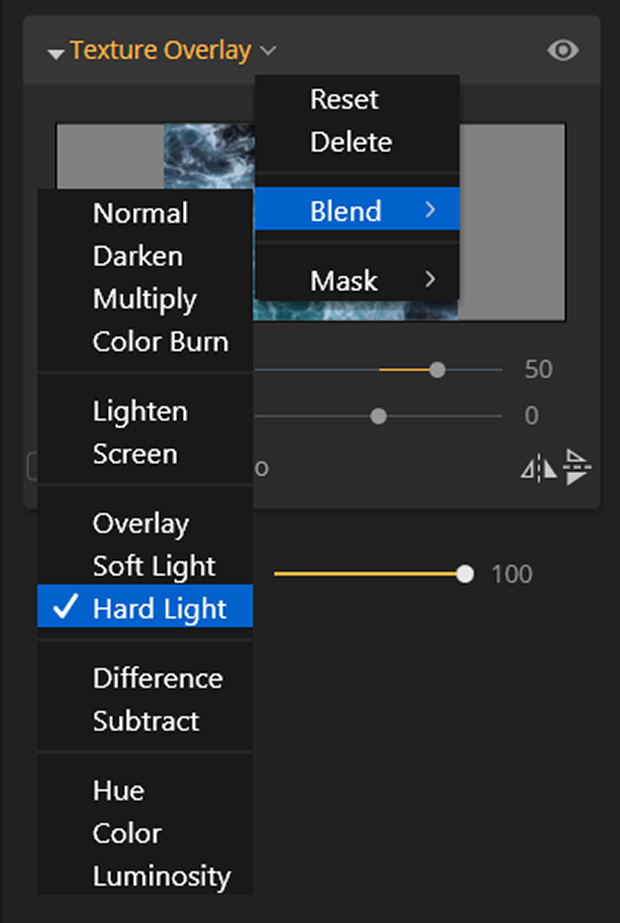
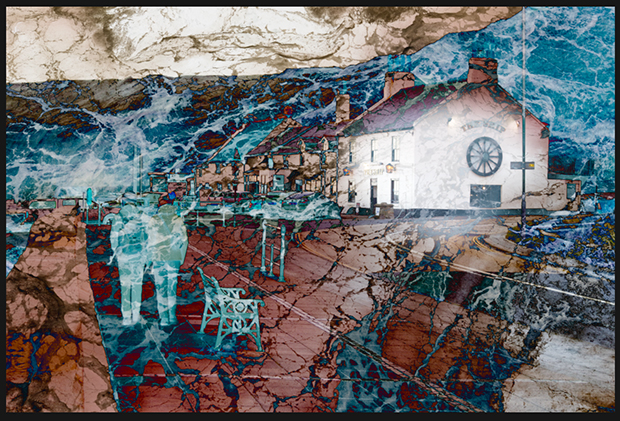
I ended up choosing Difference blend mode because I liked the dramatic result that changed it from a photo into a kind of art image:
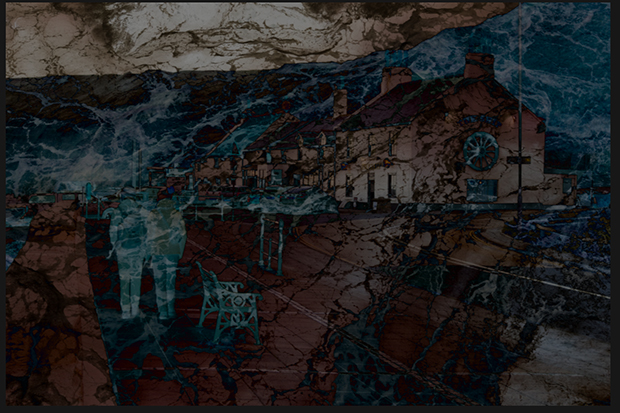
Because it was so dark, I added an Exposure filter. That lightened it up for the finished result:
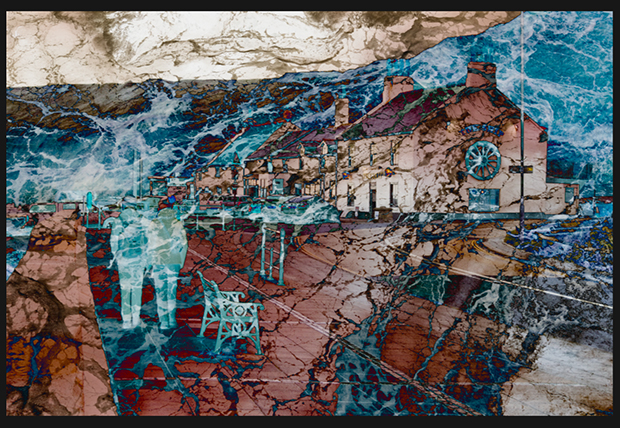
Of course, you don’t have to go so far or be as dramatic with your texture overlay. Sometimes I just can’t help myself!
You can reduce the amount of texture applied by moving the Filters Amount slider. And you can add any other image adjustments that you wish before saving and exporting your photo.
If you only want to add the texture to certain parts of your image, go the Brush icon on the Texture Overlay heading, and click on it:
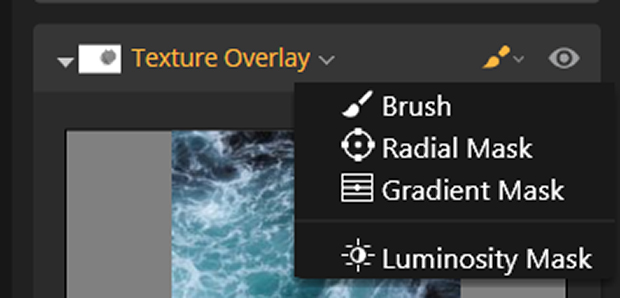
You can then choose to Paint or Erase with the brush. Paint will allow you to paint your texturing into the image, while Erase will let you remove it from the image.
Change the brush settings along the top menu bar to be more precise in your editing.
Pros and Cons of Layers and Textures in Adobe Photoshop
Now, we’ll take a deeper look at using Photoshop’s editing tools to create layers and textures.
Pros
1. A vast range of image editing tools
Photoshop is about far more than the layers, but layers are important to how Photoshop functions. It contains a large range of tools specifically for use with layers, like the Clipping Masks, Smart Objects, and Artboard from Layers.
2. Great for graphic design
It’s because of these editing tools, and many other features, that Photoshop is popular with graphic designers as well as photographers.
Photoshop is very versatile as an editing tool. It can create animations, add text layers to an image, or even edit video. Therefore, one of Photoshop’s biggest strengths is its versatility.
3. Professional selection tools
Selection and masking tools are useful if you plan on adding texture only to certain areas of your image.
Photoshop has several selection options, from the Magic Wand, Pen Tool and Magnetic Lasso Tool, through to Select Subject. It also has a powerful edge refining tool in Select and Mask.
These tools will only make adding texture to your image easier.
4. Adobe Creative Cloud
Adobe’s Creative Cloud offers updates for all its apps, tutorials, Adobe Stock, access to Behance (Adobe’s portfolio creator) and access to the Creative Cloud storage.

If you sign up for monthly subscriptions with Adobe, you get 20 GB of storage along with it. 20GB really isn’t much, but you can upgrade to 1TB for an extra monthly charge.
5. Create your own textures in Photoshop
Can’t find a web texture that’s quite right? You can create your own custom ones in Photoshop to use with your images.
There are lots of tutorials on the internet that will teach you how to make your own textures.
Cons
1. Steep learning curve
Photoshop can be hard for beginners to learn because it contains such a vast amount of editing tools. If you’re looking for a simple and quick way to add textures, then Luminar is better in this respect.
How to Add and Edit Layers and Textures in Photoshop
Adding Layers
Step 1: Open an image in Photoshop, and open up the Layers panel. To add an Adjustment Layer, go to the bottom of the Layers panel, and click on the circle icon:

Step 2: A menu with the Adjustment Layers will come up:
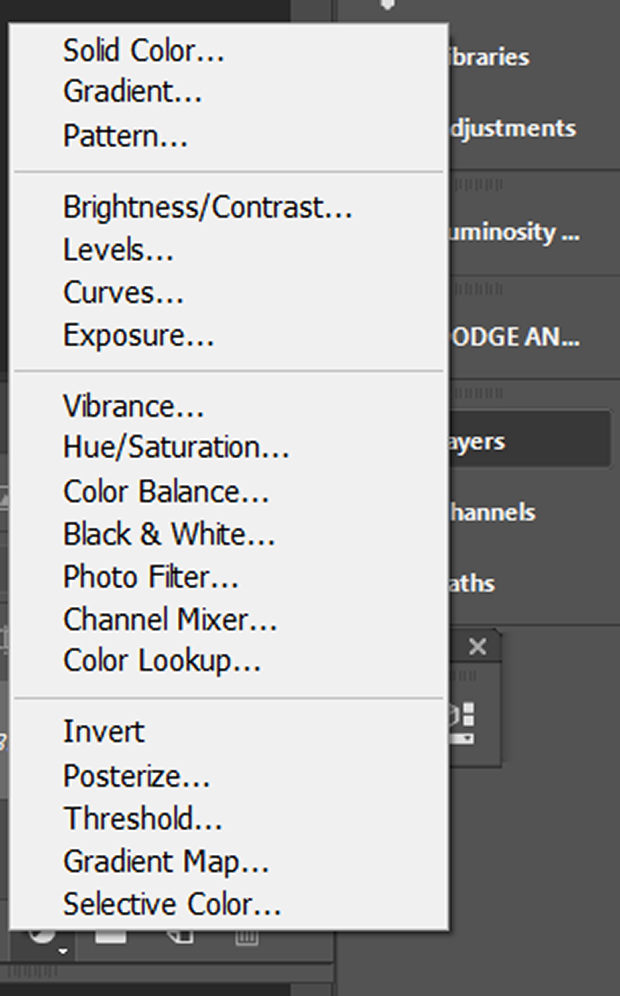
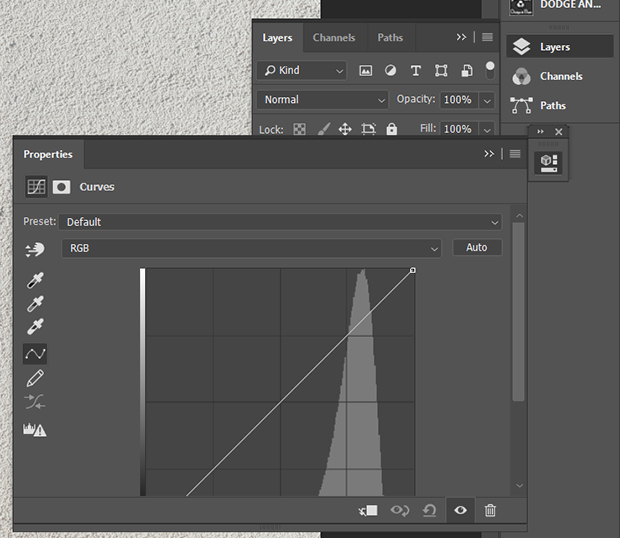
Step 3: Choose the Adjustment Layer you want to add, and it will appear on the Layers panel on top of your base image. The tool will then open up in a separate window so you can make adjustments:
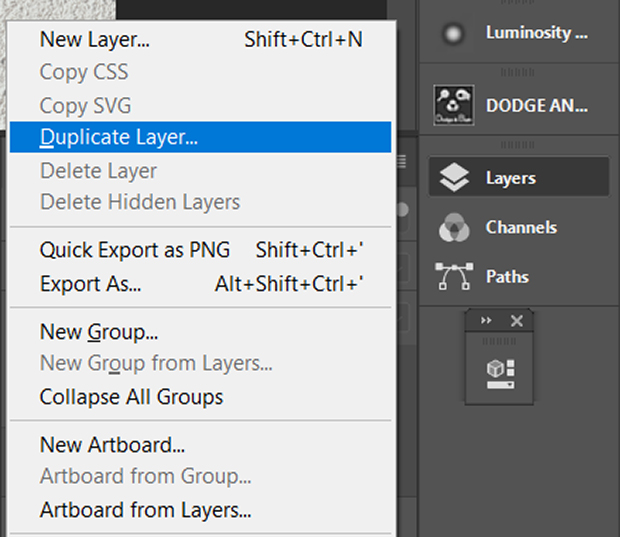
If you want to add a New Layer or Duplicate Layer, go to the menu button on the top right corner of the Layers panel and choose the type of layer you want in the dropdown:
Adding Textures
While there’s no dedicated Texture Overlay layer like there is in Luminar, adding your textures to Photoshop is still a pretty simple task.
Step 1: Open your base and texture images in Photoshop.
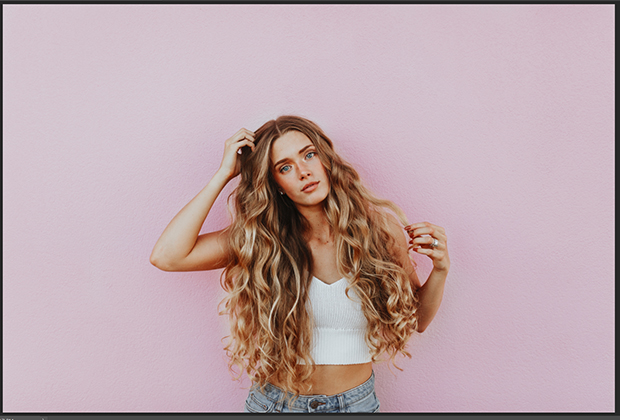
I’m using this photo as my base image:
And this is going to be my texture layer:
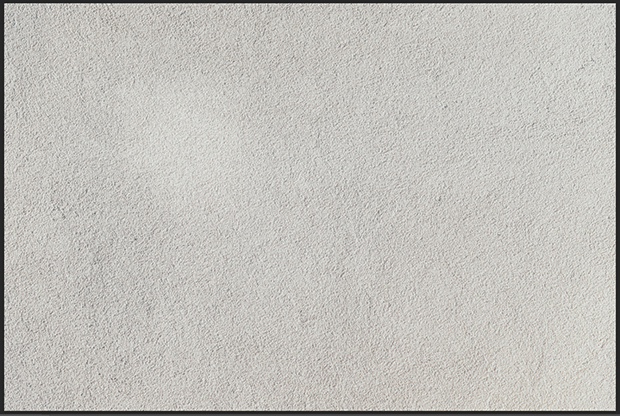
Step 2: Copy and paste your texture layer on top of your base layer. When you are on the texture layer, click Select >> All in the top menu bar.
Then click Ctrl + C to copy your image. Select the base image and click Ctrl + V to paste the texture on top of the base image.
Step 3: Go to Edit >> Transform or Free Transform to move, scale or rotate your texture image. When you’re done, don’t forget to press Enter.
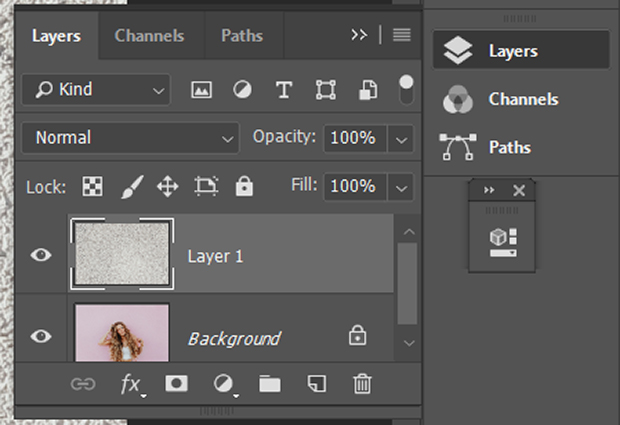
You’ll now have two layers:
Step 4: Choose the Blending Mode that suits your image. You can find the Blending Modes by clicking the drop-down under the word Normal in the Layers panel.
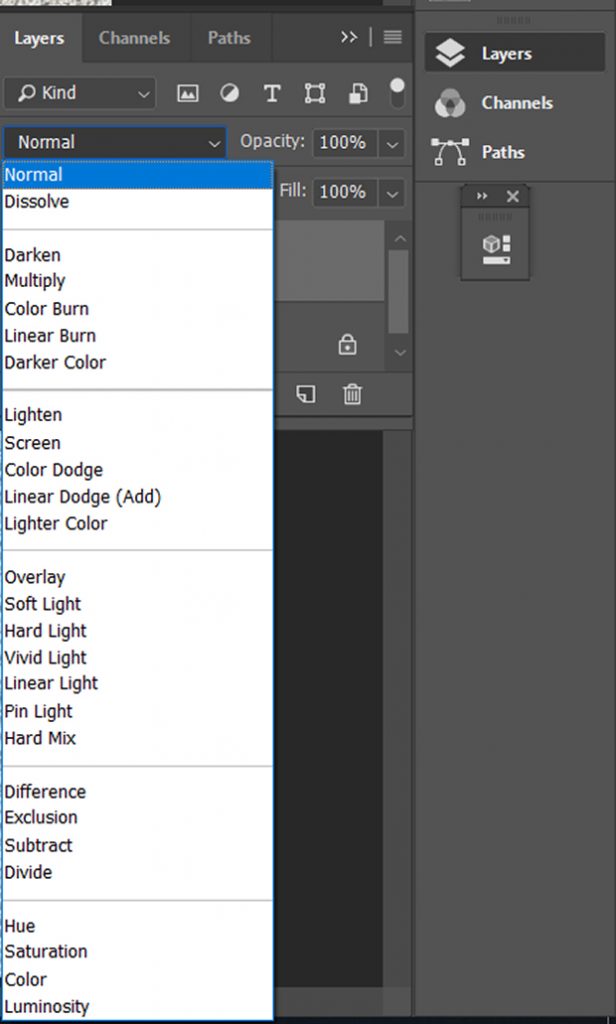
You can click through each one to see what it does. Or, you can select the Move tool from the very top of the toolbar over on the left-hand side.
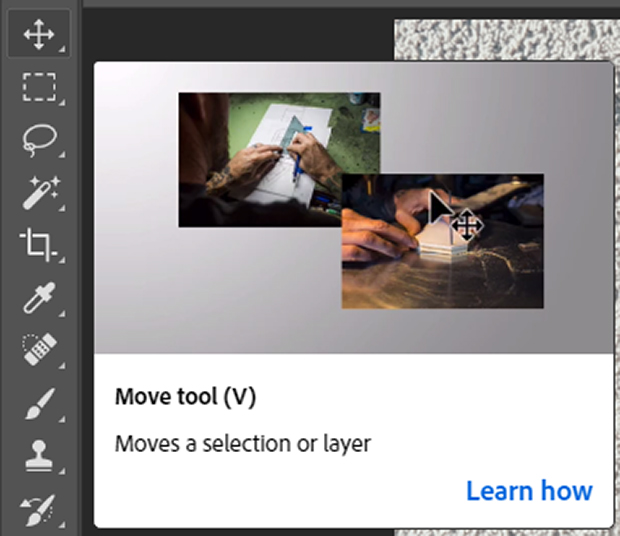
Then hold down Ctrl and Alt, and press the + or – keys to cycle through all the Blending Modes.
Step 5: Adjust the opacity of the texture layer by lowering the Opacity slider on the Layers panel.
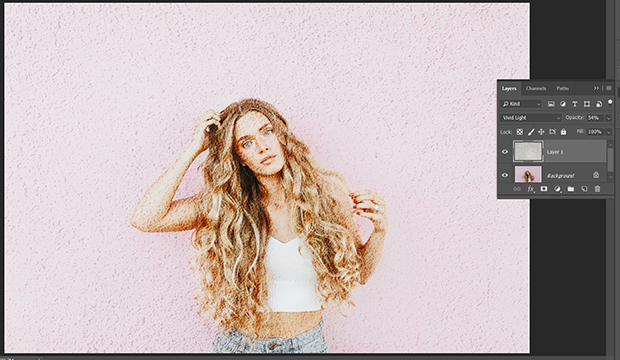
Step 6: Add any further layers if you want to make adjustments. Or, add another texture layer for a stronger effect.
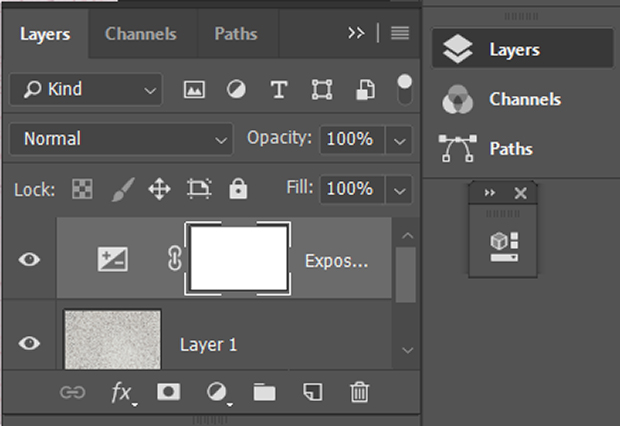
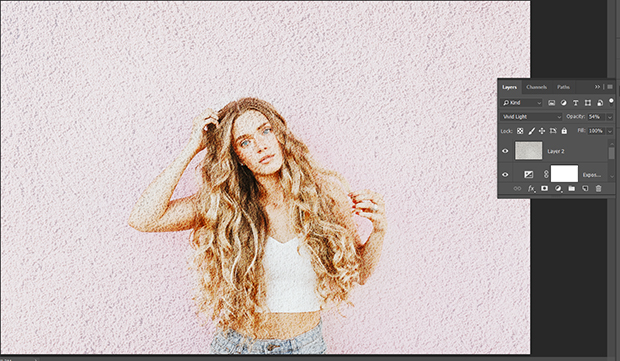
Use the same texture as before or add a different one. I added a second texture layer of the ocean here, and then tweaked the exposure:
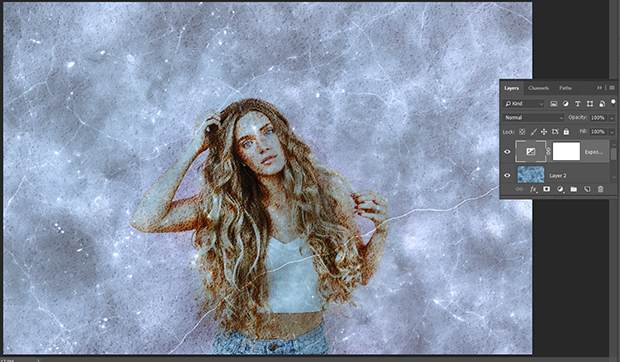
That’s it, finished!
If you want, you can use masks and brush tools so that your texture only appears on certain parts of the image.
Choosing Between Layers and Textures in Skylum Luminar Versus Adobe Photoshop
So, how do you choose between the two image editors? There are a few factors you should take into consideration before you decide.
What Types of Projects Does Photoshop Handle Best?
Photoshop can handle any project from the simplest photo editing up to the most complicated graphic design.
Anything that involves a lot of image enhancement and fine-tuning is ideal for Photoshop, because it has many different image layer options.
Photoshop also allows you to create your own texture images, so you can really personalize your work. Adding and editing text layers is also another useful Photoshop feature.
Photoshop has very professional select and refine edge tools, which make selecting parts of an image to add texture to very easy. Using these tools will give a professional result.
Unfortunately, Photoshop isn’t great for those who aren’t already familiar with the user interface. If you’re a beginner at image enhancement and photo editing, prepare to spend a lot of time reading or watching tutorials on how to use Photoshop.
What Types of Projects Does Luminar Handle Best?
Luminar is best for creating simple layers and adding textures with its Texture Overlay filter. This is great for those new to photo editing, but it is perhaps too simple for seasoned editors creating complicated texture overlays.
Luminar lacks adjustment layers and instead has adjustments in the Filter section. You can add a new adjustment layer in Luminar, but it doesn’t mean the same as it does in Photoshop. Users of both image editors may find this confusing at first.
If you shoot your own texture photos, Luminar has the advantage of allowing you to edit your raw files directly. This allows you to make an exposure fix in the highlights and shadows or your images, as well as the mid-tones.
You also don’t get the option to create your own textures or add text in Luminar. You can add other Filters and Luminar Looks (presets) to your texture images though.
Luminar is easy for image enhancement novices to come to grips with. It’s designed for anyone to use without needing hours of tutorials.
Must-Have Features for Creating Layers and Textures?
At the bare minimum, an editing software must have blending modes and layers to create blended texture images.
Both Photoshop and Luminar have them, but as mentioned above, each one has different strengths and weaknesses.
Cost Difference Between Luminar and Photoshop?
Luminar Prices
The Luminar photo editor is available for a one-off price of around $70, but you can often get it for $60 with discounts.
For this price, you get free software updates and bug fixes, and you can also access the Skylum Marketplace. This platform offers free and paid preset packs, LUTs, and more.
Luminar comes with an impressive range of filters and presets built-in, as well as an image library, photo organizer, and raw processor.
That’s not bad or the price. For novices looking to learn new creative photo editing skills in a user-friendly interface, Luminar is a great choice for the money.
Luminar is also available as a plugin for Photoshop. This plugin, called Luminar Flex, may suit graphic designers, retouchers, and professional photographers. With Flex, you get all of Luminar’s tools and image enhancement without having to leave Photoshop.
Flex gives you the best of both worlds if you need to use Photoshop but also like using Luminar for parts of your image workflow (like me).
If you’re registered as a Luminar 3 user, then you can get Flex for free. If you just want to buy Flex, you can get it for around $59.
Photoshop Prices
A few years ago, Adobe brought out a change in the way it priced its image editing software. Adobe changed from a hefty one-off price for each new version of Photoshop and instead introduced monthly subscriptions through its Creative Cloud.
This was a deeply unpopular move with graphic designers, professional and hobbyist photographers, who felt they would end up paying more monthly for having Adobe products than they would if they had bought it outright.
That’s certainly true if you get Photoshop or another single app on its own, at $20.99 a month. However, you can get the Adobe Creative Cloud Photography Plan for $9.99 a month.
This includes Photoshop, Lightroom Classic, Lightroom CC, Adobe Spark, Behance, and 20GB of storage.
The Creative Cloud Plan is a great choice for photographers. Photoshop and Lightroom together offer a very comprehensive image editing software bundle.
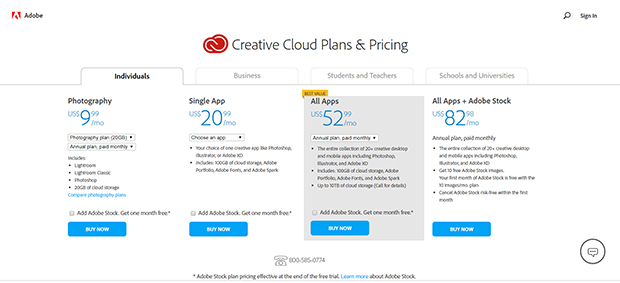
For $19.99 a month, you get the same photography plan, with 1TB of file cloud storage. Images take up a lot of room on your hard drive, and having a cloud storage plan is a great way to back up your precious photos.
However, you may well be able to find cloud storage at a cheaper price than Adobe’s Creative Cloud if you shop around.
For many photographers, having Adobe cloud storage for their images as well as the Photography Plan just makes life a whole lot simpler (I must admit, it does for me).
Conclusion
Adding textures through layers and blending modes can add depth and mood to your images. You can be as subtle or dramatic in your photo editing as you wish, and having the right editing software can make a massive difference in your workflow and finished product.
Hopefully, this article has given you some valuable insight into how this form of editing works. Now you know the differences between layers and textures in Skylum Luminar and Adobe Photoshop.
I also hope the tutorials and price comparisons were useful in helping you decide which image editor to use.
In the end, it will come down to your personal preferences, as well as the type of image editing you do. There’s also nothing wrong with having both image editors. I have both and use them for different parts of my editing!
Whatever you decide, enjoy being creative with textures and blending modes. Remember, there’s no such thing as the ‘right’ way to edit a photograph!
Using layers and textures in Skylum Luminar versus Adobe Photoshop will create great images regardless!
If you liked this article, you can join our email list for more photography and editing tips, as well as follow us on Facebook and Twitter.


