Envira Gallery Blog
Digital Photography Tips, Tutorials and Resources
Digital Photography Tips, Tutorials and Resources

by [email protected] on Sep 10, 2023
Maybe you have been in this scenario before: you have a great closeup photo of a friend or family member and want to add a new background, but the person’s hair is making this difficult. You might think, how am I going to make an accurate selection with all that hair in the way?
Fortunately, there are ways to approach this problem. Have you heard of the Refine Edge Tool in Photoshop CC? For complex edges in a picture, especially hair, you can use this super handy and easy tool to make complex selections in Photoshop.
Photoshop has several tools photographers can use to make selections. These include the Magic Wand Tool, the Lasso Tool, the Polygonal Tool, the Quick Selection Tool, and the Pen Tool. But using the Refine Edge Tool is a relatively quick and simple way to make a selection. In fact, it is one of the best tools Photoshop offers.
Intrigued? Good! Keep reading to learn how to use the Refine Edge Tool. Once you do, you will be ready to make accurate selections for complex subjects. This tutorial will:
You might want to follow along with Photoshop open beside you, completing each step as you go through this guide. But before we get into that, let’s take a closer look at the Refine Edge Tool.
Note: Please be aware that this tutorial follows the latest version of Photoshop CC. You can purchase it through Adobe’s Creative Cloud plan, which includes Lightroom for only $9.99/month.
Be sure to regularly update your copy of Photoshop to take advantage of the latest versions, since Adobe continuously updates all of its programs.
The Refine Edge Tool selects shapes such as hair, branches, or any part of an image with edges, especially complex ones. It allows you to precisely select these areas of the picture you want to crop out, such as your friend or family member.
You can then add a new background to your selection, such as a blue sky, to get the picture you want. In short, you can get very creative by adding a new background.
Using other tools aren’t always the best option when dealing with complicated edges.
For example, the Magic Wand Tool, while helpful, is kind of unpredictable. The Pen Tool allows you to make a selection by creating and connecting points along a shape. While this is very accurate method, it is slow and time consuming.
As one would guess, the Quick Selection Tool is fast, but it isn’t always accurate. It is most well-suited for parts of the image that are easily distinguishable from one another, such as large, clearly defined signs or cars in a cityscape.
Using the Refine Edge Tool is a straightforward process. Just follow the steps outlined below, and you will be able to quickly make a complex selection and then add in a new background.
If this is your first time using the tool, chose to work on a photo with a person in front of a solid background. This will make the process smoother, and you’ll be able to see more clearly how Photoshop’s Refine Edge Tool works.
First, right-click the background layer and select Duplicate Layer (or choose it under “Layer” on the top menu).

Click “OK” in the dialog box. You will see a copy of the layer containing your image above the original in the Layers Panel.
Note: We create the duplicate layer in order to avoid making changes to the original file. In other words, if you complete your edits on a duplicate layer, you can then easily go back to the original image and start over if you make a mistake.
Unlike most of the tools in Photoshop, which are located on the left side of the window, the Refine Edge Tool is stored elsewhere. To access it, you first need to use another selection tool.
With the duplicate layer selected, choose the Quick Selection Tool from the left side panel (or press “W” on the keyboard). Move the tool around the area of the picture you want to select.

Note: You can use other selection tools for this step as well.
After you use the Quick Selection Tool on the image, you will see “marching ants” around the selection you created.

If necessary, to make the selection more accurate, press and hold Alt or Cmd and click on spots you want to deselect.
A few years ago, Photoshop made it a little harder to find the Refine Edge Tool. They replaced it with the Select and Mask Tool in the left side panel.
However, they did not completely get rid of it. As you can see, it just takes a few more steps to access it:
At the top of the window, click Select and Mask.

A white transparent layer mask will appear over the image with the selected area clear. Choose a View Mode to see the selection in different layer masks.

You will see, finally, the Refine Edge Brush Tool on the left side along with a few others.
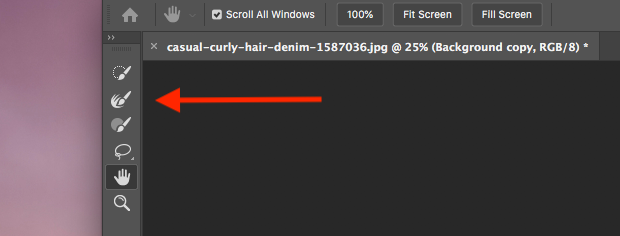
And on the right side you will see the Properties Tab, which has several adjustment sliders in it.

Adjust the Sliders (Radius, Smooth, Feather, Contrast, Shift Edge) in the box. Begin with Radius and work your way down. The Radius slider is the one you will use the most.
In general, you should aim to keep the sliders low, but of course every picture is different.
Note: If you have an older versions of Photoshop, these steps may not work. Instead, after you make a selection, hold the Shift key down on the keyboard. Then, under Select in the top menu, choose Select and Mask.
You will now see the Refine Edge Tool dialog box. It has the same sliders as the Select and Mask tool.
Select the Refine Edge Brush Tool on the left side, or press “R” on the keyboard.
Brush over the areas you want Photoshop to refine. Feel free to adjust the size and type of the brush in the brush drop-down menu to be as accurate as you need.
To refine the selection further, you can also check Decontaminate Colors. This reduces the number of colored pixels that surround the edge of selection and replaces them with pixels with the colors of the selection.

Note: Are you wondering how the Refine Edge Tool works? Photoshop makes the selection by quickly choosing between contrasting pixels (for example, pixels with hair and the pixels next to them). Technically, you could do this too but it would take a very long time.
When you are done refining the selection, you can now finish your edit.
In the Properties Tab, select Output To and choose one of the output options in the drop-down menu. If you choose “New Layer with Layer Mask,” you will be able to continue to edit the selection and leave the original picture intact as the background layer.
Click “OK”. The Properties Tab will close and Photoshop will bring you back to your regular workspace. You will see that the selection is now isolated and surrounded by a checkerboard background. This indicates that the surrounding area is transparent.

Note: If you don’t see the checkerboard, click the “eye” on the background layer to make it invisible.
If necessary, you can fine tune the image further. Sometimes the Refine Edge Tool makes parts of the image transparent that you want to remind intact (for example, when some hair appears transparent). If that’s the case:
Select the Layer Mask of the new layer and switch the foreground color to black.

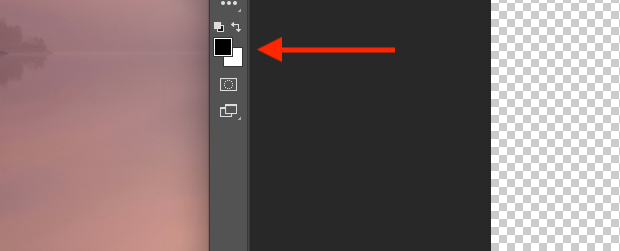
Select the Brush Tool and brush over the transparent area(s) to restore the missing pixels.
Finally, you’ve isolated the subject and now can add a new background — the whole point in using the Refine Edge Tool! There are a few ways you can do this depending on what background you want. You can add a new picture, a solid color background, a gradient, or a pattern.
Since a common choice is a solid color background, I’ll show you how to add one:
Select Layer from the top menu and select New Fill Layer >> Solid Color. Or, click on the Fill and Adjustment Layer button at the bottom of the layers panel.

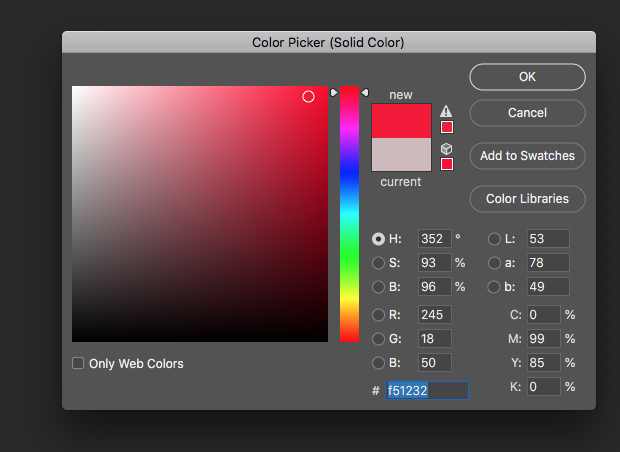
Click “OK” in the dialog box appears and choose a color from the color picker. Choose “OK” once more.
Move the solid color background layer under the layer with the selection.
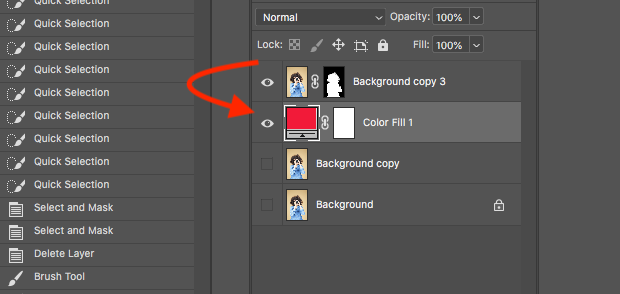
You should now see selection over the new background.

So that’s it! You have learned how to use the Refine Edge Tool, and you should now know how to isolate selections from images. As with other Photoshop tools, using the Refine Edge Tool does take practice.
It may be wise to start off with a solid background when using this tool. That way, you will have an easier time fine tuning the selection.
Also, keep in mind that while the Refine Edge Tool (and other edge-selection tools) is quite advanced, it won’t be able to make an absolutely perfect selection. This means you will probably have to zoom into the picture to make additional adjustments (i.e., adding or deleting the selection).
Remember, to zoom, press “Z” on the keyboard to select the Zoom Tool and click the area you want to work on. You may already be aware of this, but you can get close enough to see individual pixels.
Don’t forget to also try to select a variety of different subjects, including trees and colorful or busy backgrounds.
So, not to sound like a broken record, just keep practicing! In no time you’ll be able to make selections quickly and work more efficiently when editing images. You will spend less time editing a more time doing what we all love: taking pictures.
If you found this tutorial helpful, you also may be interested in checking out these articles:
Do you want to improve your photography skills even more? If so, please follow us on Twitter and Facebook to read more of our free WordPress tutorials and other resources.
Envira Gallery helps photographers create beautiful photo and video galleries in just a few clicks so that they can showcase and sell their work.