






A cutout that looks pasted onto its new background almost always has the same giveaway: edges that are razor sharp while everything around them is soft.
Real photos rarely have edges like that. Light and focus blend a subject into its surroundings, so a hard outline reads as fake even when viewers can’t say why.
I’ve fixed this on portraits, product shots, and vignettes, and the cure is always the same: soften the edge until it melts into whatever sits behind it.
Photoshop gives you four ways to blur edges, and the best one never touches your original pixels.
In This Article
- What Blurring the Edges of a Photo Does
- Method 1: Fade Edges With a Feathered Layer Mask
- Method 2: Feather a Selection Into a Solid Color
- Method 3: Blur Edges by Hand With the Blur Tool
- Method 4: Blur Edges With Gaussian Blur and Iris Blur
- How to Save a Photo With Blurred Edges for the Web
- FAQs About How to Blur Edges in Photoshop
What Blurring the Edges of a Photo Does
Blurring edges turns a hard border into a gradual fade. Your subject then blends into a new background, a solid color, or full transparency.
It’s the right fix in three common situations:
- Cutouts and composites: a soft edge helps when you merge a picture with a new background.
- Vignette-style portraits: an oval that fades to white or black keeps attention on the face.
- Softer frame edges: blurring the outside of a photo mimics the shallow depth of field a wide-open lens gives you.
Every method below works in the current version of Photoshop, and you can mix them in one edit.
Method 1: Fade Edges With a Feathered Layer Mask
I reach for this method first, because a mask hides the edge instead of deleting it. If the fade looks wrong tomorrow, one slider fixes it.
Start by selecting what you want to keep. Select » Subject picks out a person or product in a few seconds, while the Elliptical Marquee Tool suits a classic oval vignette.
For hair and fur that need a cleaner selection, our guides to the Lasso Tool and Refine Edge Tool can help.
If your photo is still the locked Background layer, click its lock icon to make it a normal layer. Then, with your selection active, click the Add layer mask button at the bottom of the Layers panel.
Everything outside your selection disappears, and a mask thumbnail appears next to the layer. Black on the mask hides and white shows.
Click the mask thumbnail and open the Properties panel (Window » Properties). Drag the Feather slider to the right and the hard outline melts into a soft gradient.
Adobe covers the same steps in its guide to fine-tuning layer masks. A few pixels suit a cutout, while a large value gives a dreamy vignette.
How to Fade Edges to Transparent
Hide or delete every layer underneath your masked one. When the gray-and-white checkerboard shows through, the feathered pixels are partly see-through.
Save it as a PNG and the soft edge sits on any page color. Our tutorial on how to make an image transparent in Photoshop has more options.
Method 2: Feather a Selection Into a Solid Color
This is the classic way to blur edges in Photoshop, and it gives you a finished vignette on white or any solid color.
Pick the Elliptical Marquee Tool and drag an oval around the part you want sharp. I selected the model’s face, so everything inside the marching ants stays untouched.

Next, go to Select » Modify » Feather, or press Shift+F6.
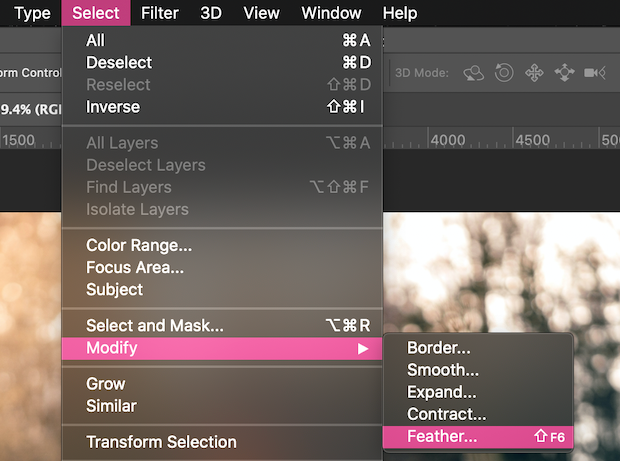
The Feather Selection box has one setting, Feather Radius, which sets how wide the soft transition is. Five pixels gives a crisp fade, while 30 pixels is much gentler.

The screenshot shows 5 pixels, but I went with 20 for this portrait, then clicked OK.
Now choose Select » Inverse (Shift+Ctrl+I, or Shift+Cmd+I on a Mac). The selection flips, so you’ll change everything except your subject.

Add a layer with Layer » New » Layer and fill the selection using Edit » Fill or the Paint Bucket Tool. I chose white, the quickest route to a clean backdrop, and our white background guide has other methods.
Press Ctrl+D (Cmd+D on a Mac) to deselect, and the portrait fades softly into white.

A black or brand-colored fill gives the same vignette a different mood.
 Expert Tip
Feather Radius is measured in pixels, so the same number looks different on every file. Twenty pixels is a gentle fade on a small web image but barely shows on a full-size camera file. I check the fade at 100% zoom (Ctrl+1 or Cmd+1) before filling anything.
Method 3: Blur Edges by Hand With the Blur Tool
When only one edge needs help, like hair against a new background, the Blur Tool paints softness exactly where you want it.
It lives under the teardrop icon in the left toolbar, grouped with the Sharpen Tool and Smudge Tool. Click and hold the icon to see all three.

First, duplicate your layer so the original stays safe underneath. Right-click it in the Layers panel and choose Duplicate Layer, or use Layer » Duplicate Layer.

In the options bar at the top, Strength sets how much blur each stroke adds. For edge work, Mode is best left on Normal.

Adobe’s Blur tool instructions suggest 10 to 30% Strength for subtle softening. Resize the brush as you go with the [ and ] keys.
Now drag along the edge. Holding the mouse still does nothing, since the tool only blurs while it moves.
If the cutout and its background are separate layers, tick Sample All Layers so the blur mixes the two together. Our Brush Tool guide explains size and hardness.
Method 4: Blur Edges With Gaussian Blur and Iris Blur
Blur filters give you an even softness without brushing by hand, and two of them suit edges well.
Soften a Cutout Edge With Gaussian Blur
For a cutout, the trick is to blur the layer mask from Method 1, not the photo itself.
Click the mask thumbnail, choose Filter » Blur » Gaussian Blur, and set a Radius of a few pixels. The edge softens while your subject stays sharp.
It’s the same filter you’d use to smooth skin in Photoshop, so it pays to get comfortable with it.
Blur the Outer Edges With Iris Blur
For a soft outside and a crisp center, Iris Blur is faster than any selection. Choose Filter » Blur Gallery » Iris Blur, and a pin with an ellipse appears on your photo.
Adobe’s Blur Gallery documentation describes three zones around that pin: a sharp area, a fade area, and a blur area.
Drag the pin onto your subject, then drag the handles to reshape the zones. Set the strength with the ring around the pin or the Blur slider in the Blur Tools panel, then click OK.
Press M to preview the blur mask, where black stays sharp and lighter areas blur. Converting the layer to a Smart Object first keeps the effect editable.
Want the whole background soft, not just the edges? Follow our step-by-step guide on how to blur a background in Photoshop.
How to Save a Photo With Blurred Edges for the Web
Your fade is easy to lose at the last step, because the file format decides what happens to soft pixels.
Two formats cover almost every case:
- PNG for edges that fade to transparent: go to File » Export » Export As, choose PNG, and keep Transparency ticked so the fade stays see-through on any background.
- JPG for edges that fade into a solid color: JPG can’t store transparency, so use it for finished vignettes like the one in Method 2.
Either way, keep the layered PSD file too so you can adjust the feather later without starting over.
Then comes the fun part: putting your edits where people will actually see them.
Edit for Free, Showcase Like a Pro
Envira Gallery, the WordPress gallery plugin, has a free version that shows off your finished edits in a clean gallery with a built-in lightbox. When you want your name on every photo, Watermarking comes with the Plus plan.
FAQs About How to Blur Edges in Photoshop
Where is the Blur Tool in Photoshop?
It sits in the left toolbar under a teardrop icon, grouped with the Sharpen Tool and Smudge Tool. Click and hold that icon to switch between the three. If none of them appear, go to Edit » Toolbar to add the group back.
Why is my Blur Tool not doing anything?
The Blur Tool only works while you drag, so holding the mouse still does nothing. Also check that Strength isn’t near 0%, that the right layer is selected, and that no selection is blocking the area. On an empty layer, tick Sample All Layers.
How do I fade edges to transparent in Photoshop?
Select what you want to keep, click Add layer mask in the Layers panel, and raise the Feather slider in the Properties panel. Hide the layers underneath, then export a PNG with Transparency ticked, because a JPG fills the faded area in.
How do I blur the edges of just one layer?
Add a layer mask to that layer and feather it in the Properties panel, or apply Gaussian Blur to the mask. Both change only the layer you have selected, so the rest of your file stays as it was.
What is the difference between feathering and blurring in Photoshop?
Feathering softens the border of a selection or mask, so the edge fades gradually. Blurring softens the detail inside the pixels themselves. Feathering is what blends a cutout into a background, while blurring makes an area look out of focus.
Soft edges are a small fix that makes an edit look finished instead of assembled. If you’d rather frame a photo than fade it, be sure to check out our post on how to add a border in Photoshop.
Not using Envira Gallery yet? Get started today!
Don’t forget to follow us on Facebook and X (Twitter) for the best photography tips, resources, and WordPress tutorials.










very nice lesson!!
We’re glad you’ve found it useful!
Your statement ‘It will fill the image with the white color, leaving the selection around the face of the model in the image. ‘ is totally unclear. Does ‘It’ mean ‘creating the new layer’? If so, how can creating a new layer will fill the image of another layer with the white color? What do you mean by ‘ leaving the selection around the face of the model’?
Your description works until this step. The rest is not valid.
Please clarify your statement.
Thanks
Loved it.. Thanks!
Nothing happened? I hit control d… nothing.