Sharing photos with clients and website visitors should be simple. Whether you’re a photographer delivering client galleries, a creative professional showcasing portfolio work, or a business owner distributing marketing images, you need an easy way for people to save and download your photos.
Adding a photo gallery download button solves this problem. No more emailing large files or using third-party transfer services. Your visitors can download exactly what they need with a single click, right from your website.
Best of all, you can set this up in just a few minutes without touching a single line of code. In this comprehensive guide, I’ll show you exactly how to allow users to download gallery images in WordPress.
Why Allow Gallery Downloads in WordPress?
Before we jump into the technical steps, let’s talk about why enabling photo gallery downloads can benefit your website and business.
Here’s what you can achieve when you add download functionality to your galleries:
- Better client experience: Wedding photographers, event photographers, and portrait artists can deliver photos directly through their website. Clients get instant access to their images without waiting for email attachments or third-party file transfers.
- Streamlined workflow: Instead of manually sending files to clients or uploading to multiple platforms, you can create a single gallery where authorized users can download what they need.
- Increased engagement: Visitors are more likely to interact with galleries when they can easily save images they love. This is especially valuable for stock photography sites, creative portfolios, and resource libraries.
- Professional presentation: A clean download button integrated into your gallery looks more polished than asking visitors to right-click and save images. It shows you’ve thought about the user experience.
- Control and tracking: With the right tools, you can control who downloads your images, track download activity, and even require passwords for access to specific galleries.
By default, WordPress doesn’t include a download feature for galleries. While visitors can technically right-click and save images, this creates a clunky experience and gives you no control or insights.
That’s where Envira Gallery comes in. It’s the best gallery plugin for WordPress, and it includes powerful download functionality that’s easy to set up and customize.
Why Use Envira Gallery for Downloadable Galleries?
Before we jump into the tutorial, let me explain why Envira Gallery is the best solution for offering a gallery download option in WordPress.
- Drag-and-Drop Simplicity. It uses an intuitive drag-and-drop interface that makes creating galleries easy. Upload images, rearrange them, and customize settings without writing code.
- Complete Download Control. The Downloads addon gives you advanced control over how visitors save your images. Add download buttons to individual images, enable “download all” functionality, customize button placement, and choose whether downloads appear in lightbox view.
- Built for Performance and Security. Envira Gallery is optimized for speed with built-in image compression and lazy loading. It also includes password protection, watermarking capabilities, and right-click protection so you control exactly who can view and download your images.
- Professional Features That Scale. As your needs grow, Envira Gallery grows with you. The plugin includes client proofing galleries, eCommerce integration to sell prints, social sharing buttons, album functionality, Lightroom integration, and mobile-responsive design.
Thousands of photographers, creative agencies, and businesses rely on Envira Gallery to showcase and deliver their work.
With Envira Gallery, you’re not just adding a download button, you’re investing in a complete gallery solution.

Seamus Jennings
I’ve had Envira for a while now and am very happy with it. It’s cheap, easy to use, looks very nice and is very quick to load. I had one small issue… so I raised a ticket. A few message exchanges with their support team and they sent me a code snippet which solved my problem. So also very good support!
How to Allow Users to Download Gallery Images in WordPress
Ready to create your first downloadable gallery? Let’s walk through the process step by step.
Step 1: Install and Activate Envira Gallery Plugin
The first thing you need to do is install Envira Gallery on your WordPress website. You’ll need to go the Envira Gallery website and choose the license level that works for you.
To access the Downloads addon we’ll be using in this tutorial, you’ll need either the Pro or Agency license. Once you’ve completed your purchase, you’ll receive an email with your license key and a download link for the plugin.
At this point, you’ll need to log in to your WordPress admin dashboard and navigate to Plugins » Add New. Click the Upload Plugin button at the top of the page.

Next, click Choose File and select the Envira Gallery .zip file you downloaded. Then click Install Now. After the installation completes, click Activate Plugin.
Once activated, go to Envira Gallery » Settings in your WordPress dashboard. Enter your license key in the provided field and click Verify Key.
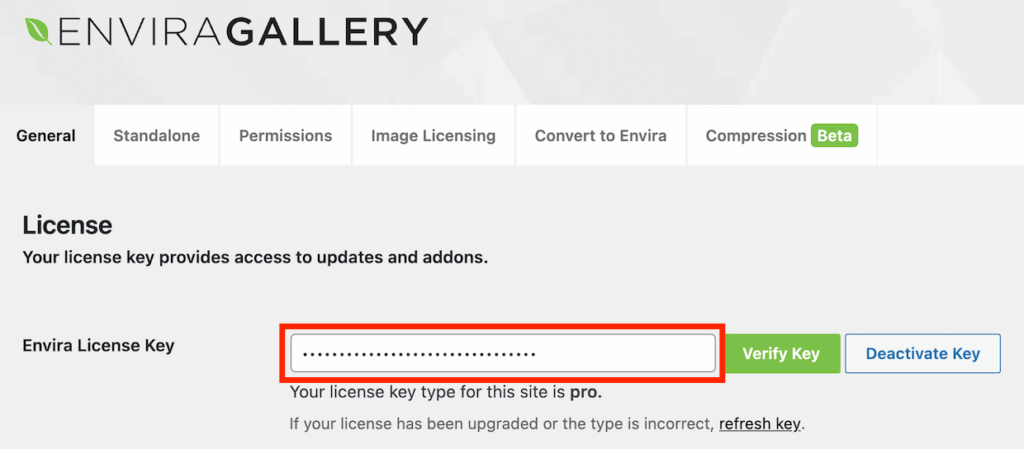
Verifying your license key gives you access to all the premium features and addons, including the Downloads addon we’ll use in the next step.
If you need more detailed instructions, check out our complete guide on how to install Envira Gallery in WordPress.
With Envira Gallery installed and activated, you’re ready to add download functionality to your galleries!
Step 2: Install and Activate the Downloads Addon
Envira Gallery uses a modular addon system that lets you enable the specific features you need. This way, you don’t waste unneccessary space on your site with features you’re not using.
To add download buttons to your galleries, you’ll need to activate the Downloads addon.
From your WordPress dashboard, navigate to Envira Gallery » Addons. Scroll down until you find the Downloads addon and click on Install. Then, toggle the Activate button. Once you do, the Status will change to Active.
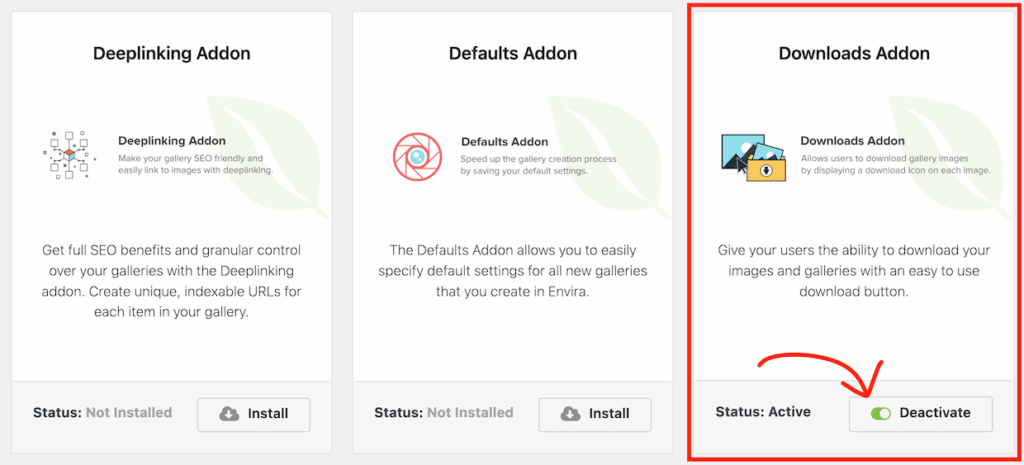
This addon gives you complete control over how visitors download images from your galleries.
You can add download buttons to individual images, enable a “Download All” option for entire galleries, customize button placement, and even enable downloads in lightbox view.
Important Note: Remember, the Downloads addon is only available with Envira Gallery Pro and Agency licenses. If you’re using the free version or the Basic license, you’ll need to upgrade your license to access this feature.
Step 3: Create an Image Gallery with Your Photos
With Envira Gallery and the Downloads addon ready to go, it’s time to create your image gallery.
Navigate to Envira Gallery » Add New Gallery in your WordPress dashboard.
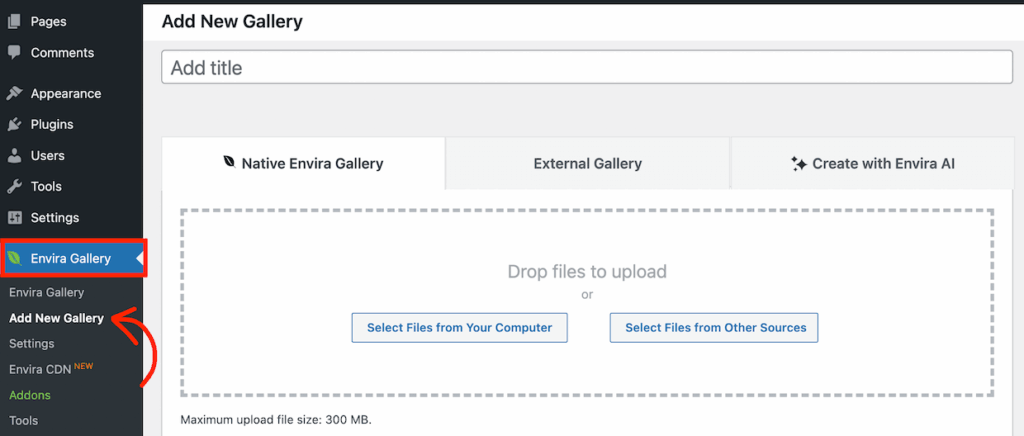
Here, you’ll see the gallery creation screen. Start by giving your gallery a descriptive title. This title is mainly for your reference in the WordPress admin, though you can choose to display it on your site if you want.
On this screen, you’ll also notice that the Native Envira Gallery tab is selected by default. If you’re pulling images from your computer or the WordPress Media Library, this is the option you’ll need.
Need help managing your gallery photos?
Learn how to use tags and categories to sort and organize your WordPress photo galleries.
However, if you have the Instagram addon enabled, you can also use the External Gallery tab to pull photos from Instagram. Or, you can use the Create with Envira AI to generate images instantly.
Upload all the images you want to include in your downloadable gallery. Envira Gallery supports all standard image formats, including JPG, PNG, and GIF.
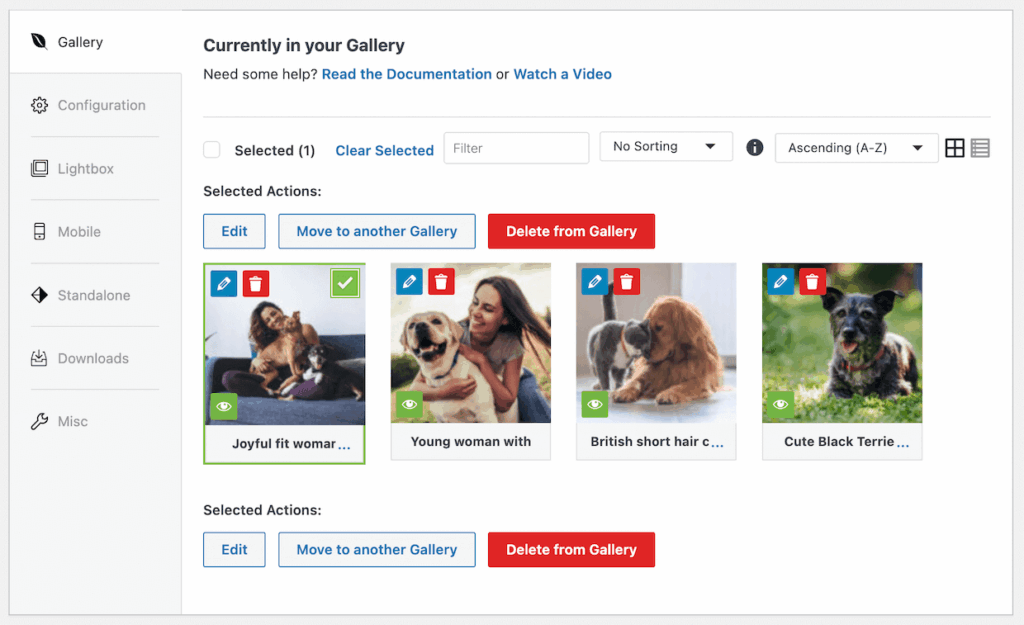
Once your images are uploaded, you can easily customize your gallery’s appearance.
Simply drag images to reorder them and click the blue pencil icon on each image to configure its settings.
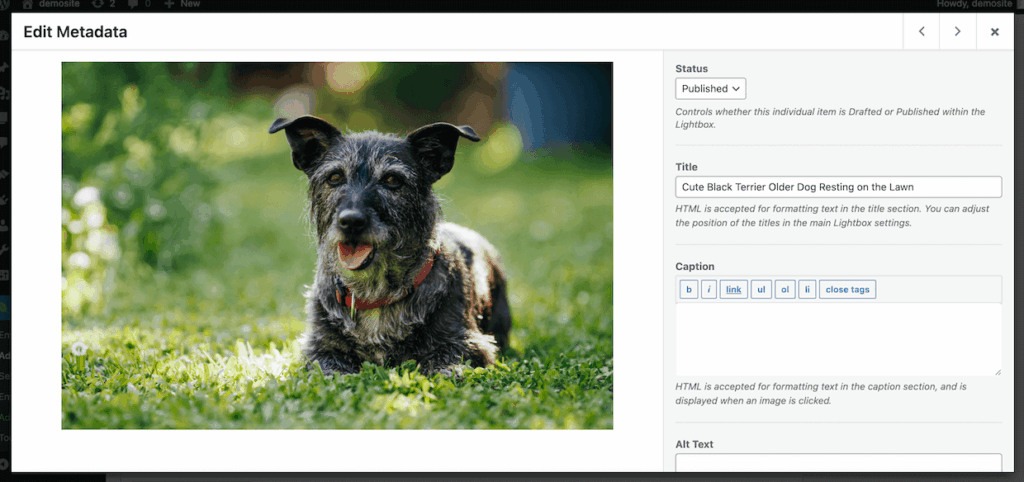
You can edit the title, alt text, caption, link settings, and more. Just make sure to hit the Save Metadata button when you’re done.
Next, click the Configuration tab in the left-hand menu.
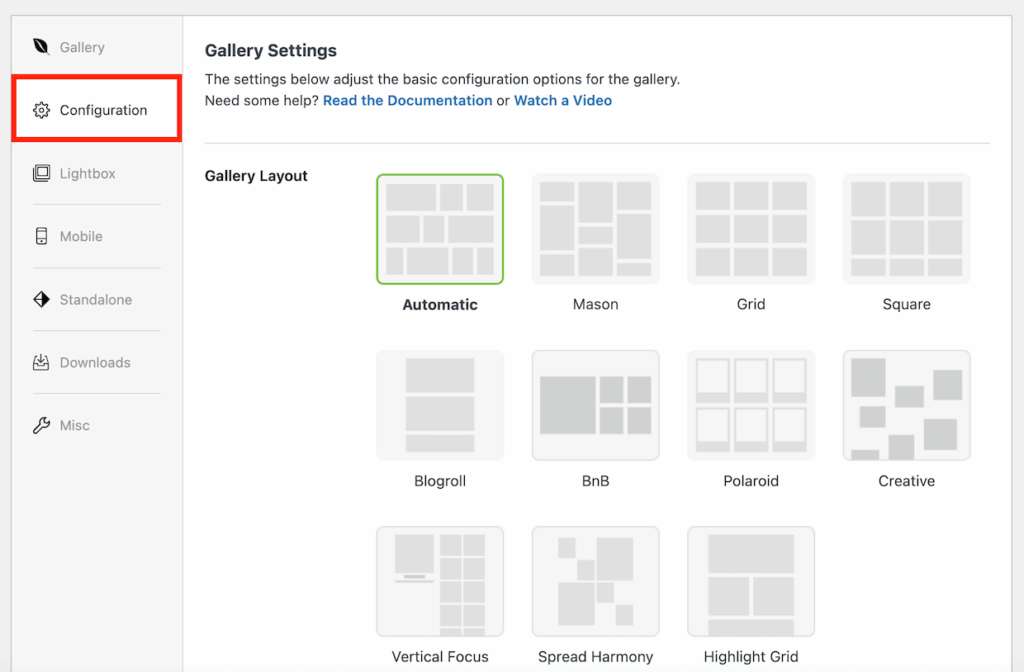
Here, you can customize your gallery’s layout options, adjust image sizes and dimensions, and even enable lazy loading to ensure speedy performance.
Take a moment to explore these settings and customize your gallery’s appearance.
For more detailed guidance on gallery settings and customization options, check out our tutorial on how to create a WordPress photo gallery.
Step 4: Enable the Download Button Option
With your gallery created and configured, it’s time to enable the gallery photos download button
Simply click on the Downloads tab in the left-hand menu. At the top, check the box next to Display Download Button?.
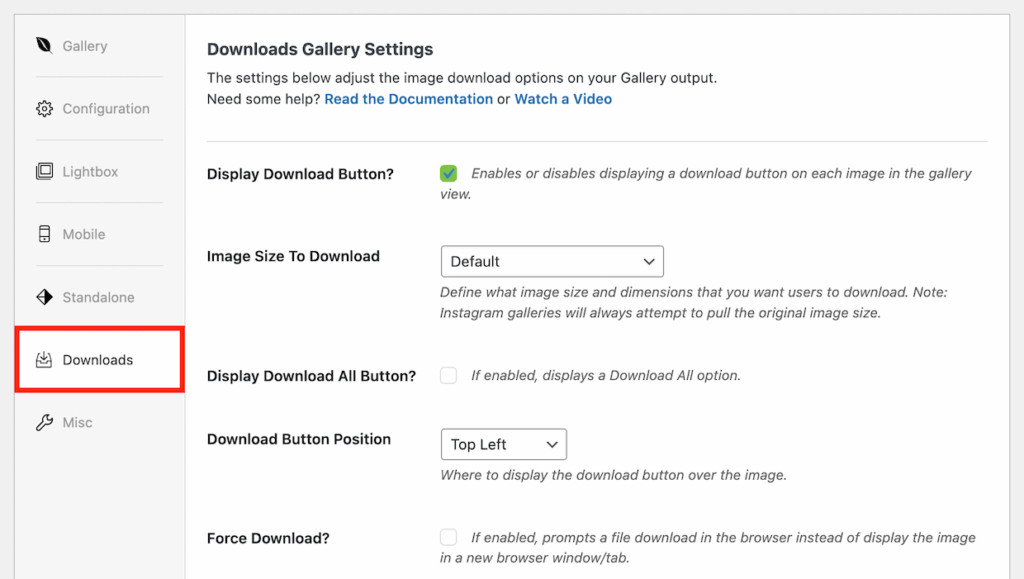
Once this feature is enabled, a download icon will appear on each image in your gallery, making it easy for visitors to save photos with a single click.
Envira Gallery gives you several options to customize how downloads work in your gallery:
- Image Size to Download: Choose from options like Thumbnail, Medium, and Original Size.
- Download Button Position: Pick where the download button appears on each image. Make sure to select a position that doesn’t obscure important parts of your images.
- Display Download All Button: Enable this option to let users download every image in the gallery at once. This is incredibly useful for client galleries where people want to save their entire collection. The images will be packaged in a convenient zip file. You can opt to display the button above or below the gallery and customize the button text.
- Force Download?: If you enable this setting, the image or gallery will automatically be downloaded to the user’s device. If you leave it unchecked, the image or gallery will open in a new browser tab.
- Downloads Lightbox Settings: Check this option to show download buttons when images are viewed in lightbox mode. This gives users multiple opportunities to download images as they browse.
Best Practices for Download Settings
Here are some tips for configuring your download settings:
- For client proofing galleries, enable both individual image downloads and the “Download All” option for maximum convenience.
- If you’re concerned about image theft, consider disabling the “Display Download All” option and only allowing individual downloads. This makes bulk downloading more time-consuming for anyone with bad intentions.
- Test your download buttons on mobile devices to make sure they’re easy to tap and don’t interfere with other gallery navigation.
- For stock photography or resource sites, make the download button prominent so visitors can easily find it.
With your download settings configured exactly how you want them, it’s time to publish your gallery and see it in action!
Step 5: Publish and Display Your Image Gallery
You’ve created your gallery, uploaded your images, and enabled downloads. Now let’s publish your gallery and add it to your website.
Scroll to the top of the gallery editor and click the Publish button on the right side.
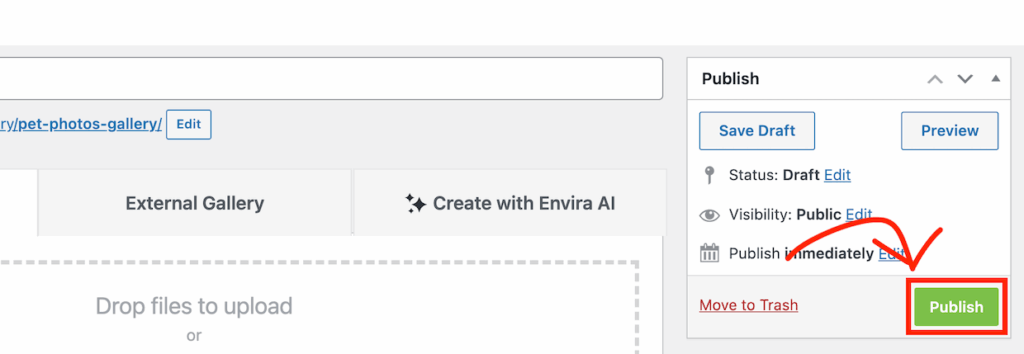
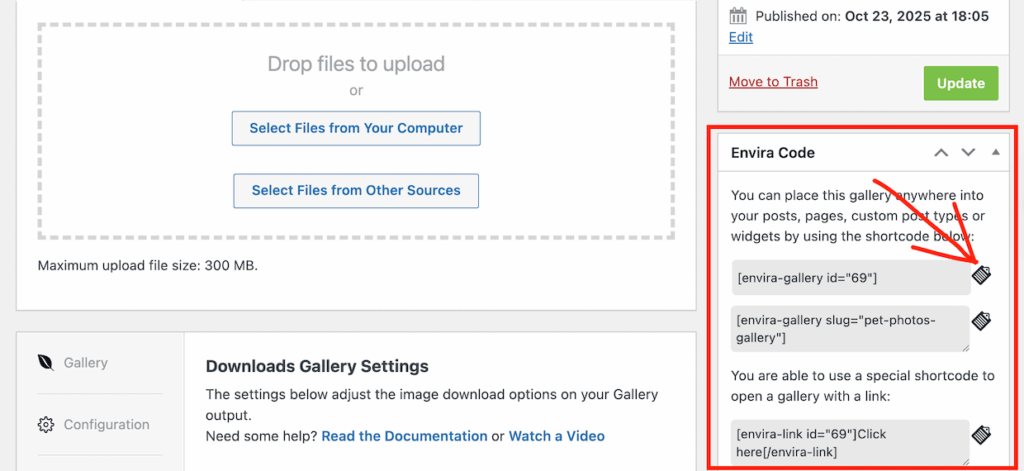
Your gallery is now saved and ready to display on your website. You’ll now see the Envira Code section appear on the right side of the screen.
It will display the gallery’s shortcode. You can click the clipboard right next to the shortcode to copy it to your clipboard.
Now navigate to the page or post where you want to display your downloadable gallery. You can create a new page by going to Pages » Add Page or edit an existing page or post.
If you’re using the WordPress block editor, simply click the + button to add a new block. Then search for “Envira Gallery,” and add the block to the page.
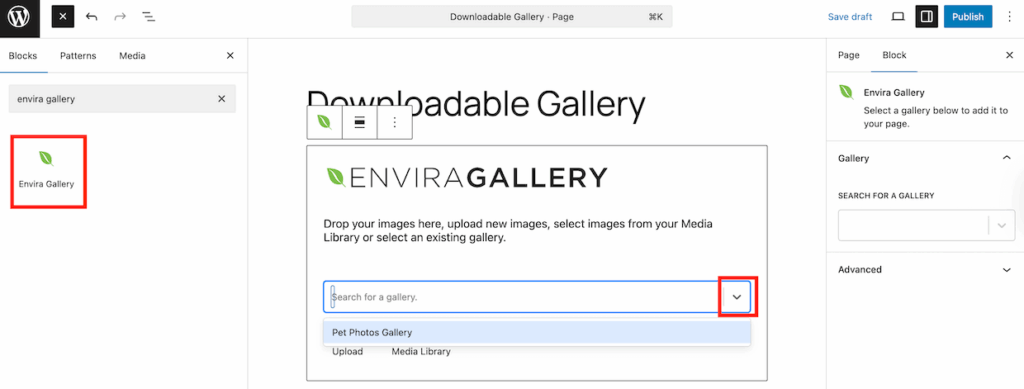
Use the dropdown menu to select the image gallery with the download option that you just created.
Alternatively, if you’re using the WordPress classic editor, you can use Envira Gallery shortcodes instead of the block.
Finally, click the Publish or Update button to make your gallery live on your website, then visit the page on your live site to see your downloadable gallery in action.
You should see your images displayed in a beautiful, responsive grid. When you hover over an image, it will show the download button where you configured it to be displayed.
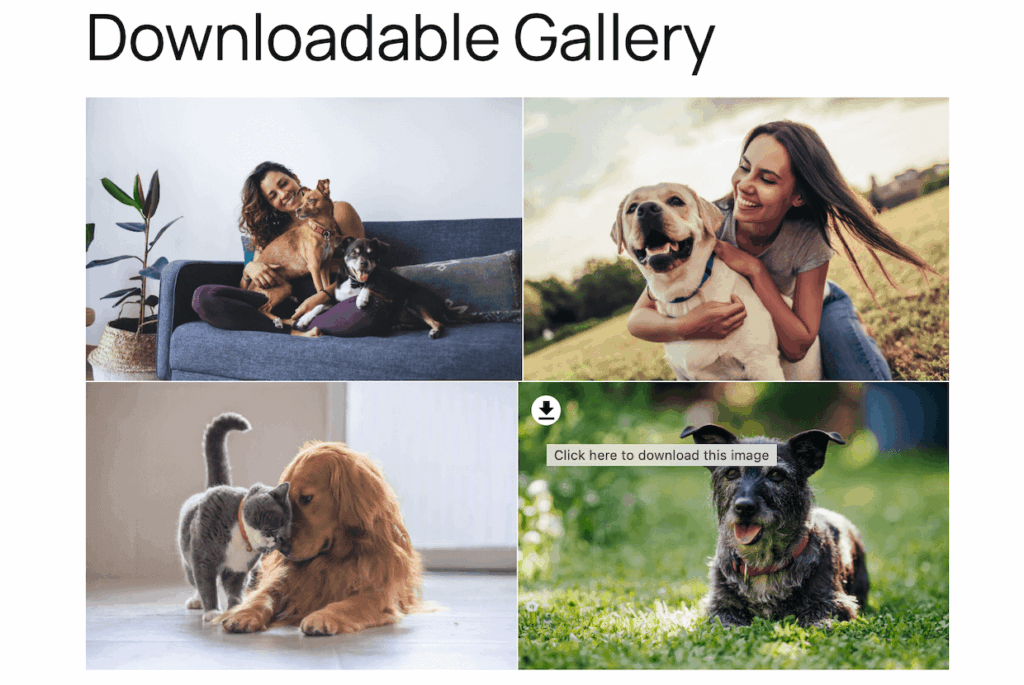
If you enabled and configured the “Download All” button, you’ll see that as well. And if you configured the lightbox download option, here’s what it will look like.
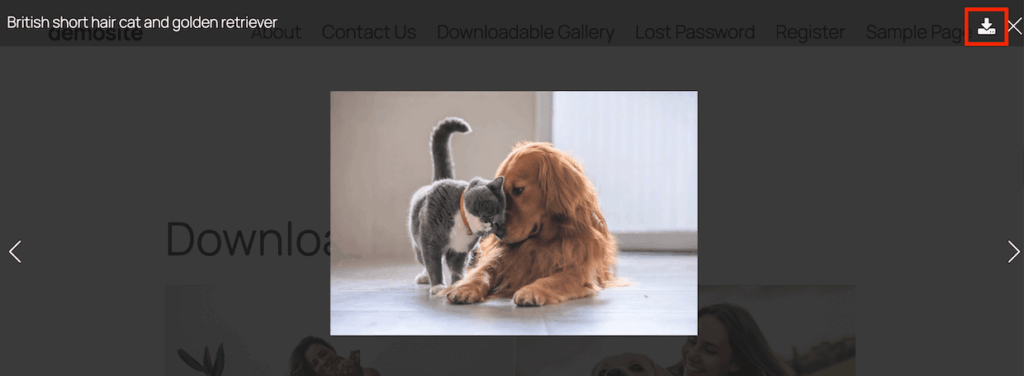
Congratulations! You’ve successfully created a downloadable image gallery in WordPress!
Want to add a download button to WordPress albums?
The good news is that the process is almost identical when you use the Envira Gallery plugin. All you have to do is use the Albums addon to create multiple image galleries for your collection first.
Bonus: How to Protect Your Downloadable Galleries
While making images easy to download is great for user experience, you may want to control who has access to certain galleries.
This is especially important for private client galleries, premium content, confidential business images, and even personal photos you only want to share with specific people.
Fortunately, Envira Gallery makes it easy to add password protection to your galleries. You can create a unique password for each gallery, allowing you to share different galleries with different groups of people.
Adding Password Protection to Your Image Galleries
After you activate the Password Protection addon, you can enable this feature under the Publish panel. Simply click the Edit button next to Visibility and check the option for Password Protected.
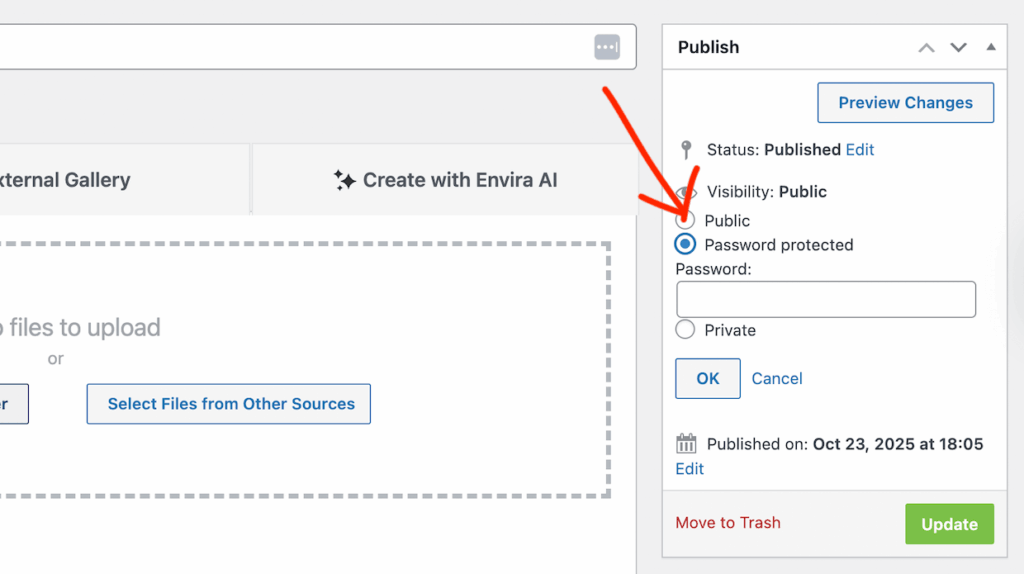
Enter a password and click the OK button.
You can also scroll down to the Envira: Password Protection panel to limit access to certain usernames and configure the messages that users will see when they try to access a password-protected gallery.
Make sure to save or publish your changes.
Once you’ve added password protection, you can share the gallery URL along with the password with your clients or authorized users.
When they visit the gallery page, they’ll see a password prompt. After entering the correct password, they’ll gain full access to view and download the images.
For more detailed instructions, see our guide on using the Password Protection addon.
Additional Security Options
For even more control over your images, consider these additional security measures:
- Watermarking: Use Envira Gallery’s Watermarking addon to automatically add watermarks to your images. This protects your work even after it’s downloaded.
- Right-Click Protection: Enable Envira Gallery’s image protection features to disable right-clicking on images, making it harder for users to save images without using your download button.
- Expiring galleries: If you’re sharing galleries with clients who only need temporary access, you can create galleries that automatically expire after a certain date. You can easily do this using Envira Gallery’s Schedule addon.
Want to Take Your Galleries Even Further?
Check out these helpful resources to make the most of your WordPress galleries:
- How to Create an Image Gallery with Thumbnails in WordPress
- How to Optimize Images for Web (WordPress Best Practices)
- SEO for Photographers: Proven Tips You Need Know to Rank
Not using Envira Gallery yet? Get started today!
Don’t forget to follow us on Facebook and X (Twitter) for the best photography tips, resources, and WordPress tutorials.
Frequently Asked Questions About Gallery Downloads in WordPress
Will allowing downloads slow down my website?
No, adding download functionality doesn’t impact your site’s loading speed. The download button is a lightweight feature that only activates when users click it. Envira Gallery is optimized for performance, so your galleries will load quickly regardless of whether downloads are enabled.
Can I allow downloads for some images but not others?
With Envira Gallery, download settings apply to the entire gallery. If you want some images to be downloadable and others not, create separate galleries: one with downloads enabled and one without. This gives you granular control over which images users can save.
What file format will users get when they download images?
Users will download images in their original format (JPG, PNG, GIF, etc.) at the resolution you uploaded them. If you want to offer high-resolution downloads, upload high-quality originals. If you prefer smaller file sizes, optimize your images before uploading.
Can I charge users to download images?
Yes! Envira Gallery integrates with WooCommerce, allowing you to sell digital downloads directly from your galleries. You can set prices for individual images or offer gallery bundles. For detailed instructions, check out our guide on how to sell photos on WordPress.




Does it allow to download the image files to users smartphone or only to laptop and desktop?
Hey Justin, the Download addon allows you to download images on all devices.
good tutorial)
hey.. good plugin but is it free with all these features or i have to buy
Hey Aisha, the Downloads Addon requires a Pro or Agency license. It’s not free. 🙂
I am making a wallpaper website on WordPress.
I want a download icon on EACH of my wallpapers.
And the Download button should be visible in the mobile website too.
Hello, I can’t see downloads tab. Can I use this in free version?
Hello,
Are you able to downlaod multiple images in one go?